
User`s manual


27
English
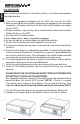
3. Disconnect the battery cable from the UPS's external battery connector.
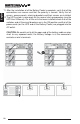
4. Remove the front panel of the Battery Pack.
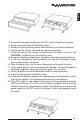
5. Remove the four retaining screws from the battery tray retaining bracket.
6. Disconnect the mating, red and black, battery connectors.
7. Grasp the battery tray handle and gently pull the battery tray out. Use
CAUTION: the battery tray is extremely heavy.
8. Remove the battery jumper wires, the battery connector and the batteries.
9. Install the new batteries into the battery tray, connect the battery jumper
wires and the battery connector.
10. Slide the battery tray into the case, taking care not to pinch the wires.
11. Verify proper polarity, red to red and black to black. Connect the battery's
connectors together. Some sparking may occur; this is normal.
12. Install the battery tray retaining bracket and the retaining screws.
13. Install the front panel of the Battery Pack.
14. Dispose of the batteries properly at an appropriate recycling facility or return
them to the supplier in the packing material for the new batteries.
15. The UPS system is now ready for the normal start-up procedure (see the
UPS User's Manual). On all the units that were installed, check that all the
switches and all the circuit breakers are in the ON position and that all the
power cords (on the UPS and all the Battery Packs) are plugged into the
AC outlet.