
User`s manual

19
English
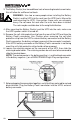
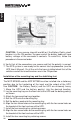
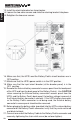
22. Connect the other end of the battery cable to the UPS's battery connector
and secure by tightening the strain relief screw (do not over tighten).
CAUTION: If you reverse steps #21 and #22 or if the Battery Pack's circuit
breaker is in the ON position, the open end of the battery cable will have
battery voltage at the connector's contacts. To avoid this, follow the
procedure in the correct order.
23. Verify that all the connections are secure and that the polarity is correct.
24. The UPS system is now ready for the normal start-up procedure (see the
UPS User's Manual). On all the units that were installed, check that all the
switches and all the circuit breakers are in the ON position.
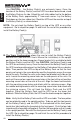
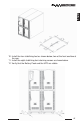
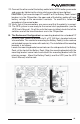
B. The Rackmount Configuration has mounting brackets for a standard 19"
(46.5cm) rack. Mounting brackets to fit a 23" (59.2cm) standard rack are
also available. The screws for mounting the Battery Pack(s) to the rack are
not included (screw size varies with rack size). The installation of the mounting
brackets is as follows:
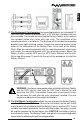
Locate the mounting bracket screw holes on the side panels of the Battery
Pack, at the front of the Battery Pack. Align the mounting bracket with the
mounting bracket screw holes and attach the mounting bracket with the
retaining screws. Mount the Battery Pack(s) and the UPS (see the UPS
User's Manual) into the rack.