
User`s manual

9
English
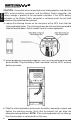
5. With this style of configuration, the UPS and the Battery Pack can be
connected using either of the following configurations:
A. The Battery Pack with the Plug & Play configuration and the UPS with
the Hardwire configuration.
B. The Battery Pack with the Hardwire configuration and the UPS with the
Plug & Play configuration.
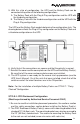
The UPS and the Battery Pack models determine the configuration style. The
drawing below reflects the Plug & Play configuration on the Battery Pack and
a Hardwire configuration on the UPS.
6. Verify that all the connections are secure and that the polarity is correct.
7. Reinstall the cover and the cover plates on the UPS and the Battery Pack(s).
Be sure that all the cover and cover plate screws are installed.
8. The UPS system is now ready for the normal start-up procedure (see the
UPS User's Manual). On all the units that were installed, check that all the
switches and all the circuit breakers are in the ON position.
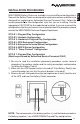
STYLE 4: PRO Rackmount Configuration
(Must be performed by Authorized Service Personnel ONLY)
1. Be sure to read the installation placement procedure, the cautions section
and the safety precautions section before installing the Battery Pack(s).
2. The PRO Rackmount Battery Pack(s) comes with mounting brackets for a
standard 19" (46.5cm) rack. The mounting brackets can also be reversed to
fit a 23" (59.2cm) standard rack. The screws for mounting the Battery Pack
to the rack are not included (screw size varies with rack size).
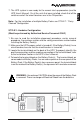
Note: For the installation of multiple Battery Packs see STYLE 7: "Daisy
Chained" Configuration.