SNMP-NET UPS SNMP Card (Web-Based monitoring SNMP Card) User’s Manual PN: 34000281 R1
SNMP-NET Table of Contents Chapter 1 Introduction ....................................................................................................3 Features...............................................................................................................................3 System Application ..............................................................................................................3 Chapter 2 Installation ....................................................................
SNMP-NET Chapter 1 Introduction Features • Network connection through RJ45 connector Allows connection of the UPS directly to the Ethernet network through a RJ45 connector without using RS232 ports on the computer and without loading any individual UPS management software on the network server. • Network UPS management Allows remote management of the UPS from any workstation through Internet or Intranet.
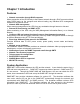
SNMP-NET UPS NMS Station or W eb Browser SNMP-NET SNMP Card Power Line Shutdown S/W Operating System 1 Ethernet Shutdown S/W Shutdown S/W Operating System 2 Operating System N.
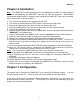
SNMP-NET Chapter 2 Installation Note: The SNMP-NET cards are designed to be Hot Swappable, but there is a remote chance that when Hot-Swapping the SNMP-NET card that the UPS will shutdown. MINUTEMAN recommends following steps 1 through 8 when installing the SNMP-NET card, but to hot-swap, skip to step number 3 and omit steps 6, 7. 1. 2. 3. 4. 5. 6. Turn off all the equipment that is plugged into the UPS. Turn off the UPS and unplug the UPS’s power cord from the AC wall outlet.
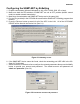
SNMP-NET Configuring the SNMP-NET by EzSetting 1. Prepare a workstation (Microsoft Windows 9x, Me, NT4.0, 2000, 2003, XP or later). 2. Make sure both the DIP-switches of SNMP-NET are set to OFF position (default: normal mode) to enable network transmission. 3. Make sure the workstation and SNMP-NET device are in the same LAN. 4. Put the CD (provided) in the CD-ROM drive and find the SNMP-NET EzSetting program then launch it. 5. Press the Discover button to search for all of the UPS’ in the LAN.
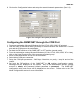
SNMP-NET 8. Click on the Configuration button and setup the essential network parameters. (See 2-3) Figure 2-3 Configure the system parameters. Configuring the SNMP-NET through the COM Port 1. Prepare a workstation (Microsoft Windows 9x, Me, NT4.0, 2000, 2003, XP or later). 2. Use the RJ45 to DB9 serial cable (provided) to connect between the SNMP-NET Console port and the COM port on the workstation. 3. Set both the DIP-switches of the SNMP-NET to OFF position (normal mode). 4.
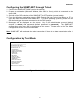
SNMP-NET Configuring the SNMP-NET through Telnet 1. Connect the SNMP-NET SNMP card to the network. 2. Prepare a workstation (Microsoft Window, Max OSX or Linux), which is connected to the same LAN. 3. Set both of the DIP-switches of the SNMP-NET to OFF position (normal mode). 4. From the Windows workstation open a DOS Prompt and type “telnet Host Name or IP” to open the telnet connection with SNMP-NET. For other operating systems, please run the OS shell and type the same command as in the DOS prompt. 5.
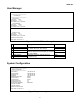
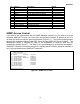
SNMP-NET User Manager +========================+ User Manager +========================+ Administrator [1]. Account: admin [2]. Password: ******** [3]. Limitation: Only in This LAN Device Manager [4]. Account: device [5]. Password: ******** [6]. Limitation: Only in This LAN Read Only User [7]. Account: user [8]. Password: ******** [9]. Limitation: Only in This LAN [0]. Back To Previous Menu Please Enter Your Choice => Figure 2-5 SNMP-NET User Manager Menu No. Function 1. 2. 3. 4. 5. 6.
SNMP-NET No. Function 1. 2. 3. 4. 5. 6. 7. 8. 9. a. b. c. Description Default IP Address The SNMP-NET IP address. Subnet Mask The sub-net mask setting. Gateway IP The network default gateway.
SNMP-NET SNMP Trap If you want to use a PC and perform the SNMP manager ‘trap’ function in order to manage the UPS through SNMP-NET, the IP address of the PC must be added to the SNMP Trap list. The Event Level field is used to decide what kind of power events should be sent to the target address. There are 3 levels of power events: Information, Warning and Severity.
SNMP-NET Wake On LAN SNMP-NET supports the packet to wakeup workstations in 2 conditions: power restore or system startup with a time delay.
SNMP-NET Chapter 4 Managing SNMP-NET Running the Web Browser (Internet Explorer) 1. Make sure that you have a TCP/IP network already installed. 2. If there is no DHCP network service on the network, contact your network administrator to get an IP address for you workstation that has the same network’s address as the SNMP-NET IP address. The default IP address of SNMP-NET is 192.168.1.100. 3. Start your Web Browser. Enter the URL “http://host_name” or “http://ip_address” in the address box.
SNMP-NET UPS Shutdown during Power Crisis UPS only: SNMP-NET responds to two different kinds of UPS shutdown events (AC failed, Battery Low). Go to Configure in the UPS Management menu and Login as an Administrator. Set the options in UPS Shutdown Action section then press the Submit button.
SNMP-NET SNMP Access Control Setting SNMP-NET supports SNMP protocol. You can use an NMS to manage the UPS through the network. The IP address of the workstation must be entered in the SNMP-NET write access table to prevent unauthorized users from configuring SNMP-NET via SNMP protocols. Power Fail/Restore Simulation To make sure the network configuration is correct, SNMP-NET provides two test buttons to simulate power fail and power restore events.
SNMP-NET Chapter 5 Shutdown Software There are two kinds of shutdown software to help you to protect servers from power crisis. One is SNMP-NET Client the other one is the SNMP-NET ShutdownAgent. Both programs have the ability to shutdown servers gracefully. The major difference is the SNMP-NET ShutdownAgent can only receive SNMP traps of power fail and low battery signals but the SNMP-NET Client can observe the UPS parameters, record power events and values. Installation of SNMP-NET Client in Windows 1.
SNMP-NET Chapter 6 Specification Technical Specification Network Connection Operating Temperature Operating Humidity Power Input Power Consumption Size Weight RJ-45 jack connector 0 ~ 40° C 10 ~ 80 % 9~24V DC 1 Watt Maximum 130 mm x 60 mm (L x W) 58 g Dipswitch Definition No. 1 2 3 4 SW1 ON ON OFF OFF SW2 ON OFF ON OFF Function Mode Console Configuration Mode For Environmental Sensor Pass Through Mode Normal Mode LED Indicator No. 1 2 3 Yellow LED Flashing (0.
SNMP-NET Chapter 7 Appendix Troubleshooting 1. How can I provide a SNTP (Simple Network Timer Protocol) server for SNMP-NET? Solution: There are two ways to provide a network Time Server for SNMP-NET: 1) Install the SNMP-NET Client software you can find it on the CD. 2) Install the “Simple TCP/IP Services” of “Networking Services” from “Add/Remove Windows Components”. You may need a Windows CD while installing. Note: Do not forget to provide the IP address of the host in the Time Server page. 2.
SNMP-NET 6. Unable to perform an SNMP get operation. Solution: Check the SNMP settings stored in the SNMP-NET. The IP Address of the PC you are using must be entered in one of the SNMP Access Control NMS IP fields, with Read or Read/Write permission. The Community String on the PC and SNMP-NET must match. 7. Unable to perform an SNMP set operation. Solution: Check the SNMP settings stored in the SNMP-NET.
SNMP-NET Glossary Agent Ethernet Gateway IP IP Address MAC MIB NMS OID Router SNMP Sub-Agent TCP/IP TFTP Server UDP/IP UPS Implemented SNMP applications in network elements (hosts). Agents perform the network management’s functions as requested by the network administrator from an NMS. Local Area Network technology, can link up to 1,024 nodes in a bus network. Ethernet provides raw data transfer in a rate of 10 megabits/sec. with actual throughputs in 2 to 3 megabits/sec.
SNMP-NET Obtaining Technical Assistance For Technical Support on the Web, please visit the Support section of our Web site or visit our online Discussion Forum at www.minutemanups.com In order to diagnose the problem you are having, our technicians need the following information from you.
SNMP-NET LIMITED PRODUCT WARRANTY Para Systems Inc. (Para Systems) warrants this equipment, when properly applied and operated within specified conditions, against faulty materials or workmanship for a period of three years from the date of original purchase by the end user. For equipment sites within the United States and Canada, this warranty covers repair or replacement of defective equipment at the discretion of Para Systems. Repair will be from the nearest authorized service center.