
User Guide

EN-51
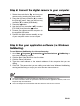
Step 2: Connect the digital camera to your computer
1. Rotate the mode dial to and turn your
camera on by pressing the power switch.
2. Press the four-way controller (X) to select
the [Set-up2] menu, then use the four-way
controller (T) to select [USB Mode].
3. Press the button.
4. Use the four-way controller (ST) to select
[PC CAM], then press the button.
5. Connect your camera and the computer via
the supplied USB cable.
6. Position the digital camera steadily on top
of your computer monitor or use a tripod.
Step 3: Run your application software (i.e. Windows
NetMeeting)
To use Windows NetMeeting for videoconferencing:
1. Go to Start Æ Programs Æ Accessories Æ Communications Æ NetMeeting to
launch the NetMeeting
program.
2. Click the Start Video button to view live video.
3. Click the Place Call button.
4. Type the e-mail address or the network address of the computer that you are
calling.
5. Click Call. The person that you are calling must also have Windows NetMeeting
running and be willing to accept your call to start the videoconference.
The video resolution for videoconferencing applications is generally 320 x 240.
For more information about the operation of videoconference application software, refer to its
respective help documentation.
Use of AC adapter is recommended while the camera is used as a PC camera.
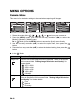
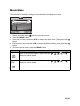
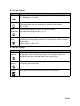
USB Mode
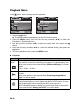
USB Mode
Select :
Select :
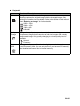
Select :
PC
PC
PC CAM.
PC CAM.
PC CAM.
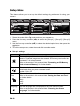
USB Mode
PC
PictBridge
PictBridge
PictBridge