FCC STATEMENT This device complies with Part 15 of the FCC Rules. Operation is subject to the following two conditions: (1) This device may not cause harmful interference, and (2) This device must accept any interference received, including interference that may cause undesired operation. Note: This equipment has been tested and found to comply with the limits for Class B digital devices, pursuant to Part 15 of the FCC rules.
READ THIS FIRST Trademark Information Microsoft® and Windows® are U.S. registered trademarks of Microsoft Corporation. Pentium® is a registered trademark of Intel Corporation. Macintosh is a trademark of Apple Computer, Inc. SDTM is a trademark. Photo Explorer and Photo Express are trademarks. Other names and products may be trademarks or registered trademarks of their respective owners. Product Information Product design and specifications are subject to change without notice.
SAFETY INSTRUCTIONS Read and understand all Warnings and Cautions before using this product. Warnings If foreign objects or water have entered the camera, turn the power OFF and remove the batteries. Continued use in this state might cause fire or electric shock. Consult the store of purchase. If the camera has fallen or its case has been damaged, turn the power OFF and remove the batteries. Continued use in this state might cause fire or electric shock. Consult the store of purchase.
Cautions Insert the batteries paying careful attention to the polarity (+ or –) of the terminals. Inserting the batteries with polarities inverted might cause fire and injury, or damage to the surrounding areas due to the battery rupturing or leaking. Do not fire the flash close to anyone’s eyes. This might cause damage to the person’s eyesight. Do not subject the LCD monitor to impact. This might damage the glass on the screen or cause the internal fluid to leak.
Notes on Battery Usage Carefully read and strictly observe the Safety Instructions and the notes described below: Different battery types and surrounding temperatures may affect the battery performance. Avoid using batteries in extremely cold environments as low temperatures can shorten the battery life and reduce camera performance. The battery may feel warm after a long period of continuous use of the camera or the flash. This is normal and not a malfunction.
CONTENT INTRODUCTION ........................................................................................................... 8 Package Contents ............................................................................................................. 9 GETTING TO KNOW YOUR CAMERA ....................................................................... 10 Front View .......................................................................................................................... 10 Rear View .
PLAYBACK MODE – ADVANCED FEATURES ......................................................... 32 Deleting Images/Video Clips .............................................................................................. 32 Protecting Images/Video Clips .......................................................................................... 33 Setting the DPOF ...............................................................................................................
INTRODUCTION Overview Let the Land & Sea adventures begin with your new waterproof/shockproof digital camera. Equipped with the latest digital technology, the camera is automatic and easy to use. Here are some of the features that you will surely enjoy. 6.0 Megapixels DPOF can be used to print your provides 6.0 megapixels for high images on a DPOF compatible printer image quality.
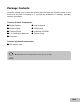
Package Contents Carefully unpack your kit box and ensure that you have the following items. In the event that any item is missing or if you find any mismatch or damage, promptly contact your dealer. Common Product Components: Digital Camera User’s Manual Camera Strap USB Cable Camera Pouch Software CD-ROM 2 x AA Alkaline batteries Spare O-ring Desiccant Common (Optional) Accessories: SD memory card Accessories and components may vary by retailer.
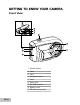
GETTING TO KNOW YOUR CAMERA Front View 7 8 9 1 2 6 3 5 4 1. Shutter button 2. Flash 3. Lens 4. Waterproof door 5. Latch 6. Latch lock 7. PC/USB terminal 8. Battery cover 9.
Rear View 1 2 3 4 11 5 6 10 7 9 1. W Arrow button (Left) Self-timer button 2. S Arrow button (Up) MENU button 3. OK button Power switch / Digital zoom button 4. Playback button 5. X Arrow button (Right) Flash button 8 6. T Arrow button (Down) MODE button 7. Strap holder 8. Tripod socket 9. LCD monitor 10. Focus switch Macro mode Normal mode 11.
LCD Monitor Information Camera Mode A 1. Internal memory/SD memory card indicator [ ] Status of internal memory [ ] Status of SD memory card 2. Remaining battery status [ ] Full battery power [ ] Medium battery power [ ] Low battery power [ ] No battery power 3. Flash mode [Blank] Auto [ ] Red-eye Reduction [ ] Forced Flash [ ] Flash Off 4. Focus area 5. Image size [ ] 2816 x 2112 [ ] 2272 x 1704 [ ] 1600 x 1200 [ ] 640 x 480 6. Possible number of shots 7. Quality [ ] Fine [ ] Standard [ ] Economy 8.
Video Mode 1. 2. 3. 4. 5. 3 2 Video mode 1 Recordable movie time available SD memory card indicator (if present) Battery power indicator 5 Focus area 00:00:33 4 2 Image Playback 1. 2. 3. 4. 3 1 Playback mode SD memory card indicator (if present) 4 Battery power indicator Playback information 100-0001 Size EV. 2006.02.10 2272 x 1704 0.3 10:26 0001 Video Playback 1. 2. 3. 4. 5. 6. 7.
PREPARING THE CAMERA Installing the Batteries Use 2 AA size batteries to power the camera. Make sure that the power is off before inserting or removing the batteries. 1. Slide the latch lock to unlock the latch and open the waterproof door as shown in the illustration. 2. Open the inside battery cover and insert the batteries in the correct orientation as shown in the illustration. 3. Close both the battery cover and waterproof door and lock the latch.
Inserting and Removing an SD Memory Card (Optional Accessory) The digital camera comes with 16MB of internal memory (14MB available for image storage), allowing you to store captured still images or video clips in the digital camera. You can also expand the memory capacity by using an optional SD (Secure Digital) memory card so that you can store more files. 1. Make sure your camera is turned off before inserting or removing a memory card. 2. Open the waterproof door and then the inside battery cover. 3.
Attaching the Camera Strap Attach the strap as shown in the illustration. LED Indicators Color Green Green EN-16 State Solid Flashing During photography Ready for shot. Accessing files in progress. Flash charging in progress. During connection to a PC System ready. Accessing files in progress.
GETTING STARTED Turning the Power On/Off Load the batteries and insert an SD memory card before starting. J J To turn the power on, push and hold the OK button until the camera turns on. To turn the power off, push and hold the OK button until the camera turns off. J The power is turned off automatically when the camera has not been operated for a fixed time period. To resume operation, turn the power on again. Refer to section in this manual titled “Auto Off” in the Setup Menu for further details.
Setting the Date and Time Follow the steps below to set the date display style, current date and time. 1. Push and hold the OK button until the camera turns on. button and access the setup 2. Press the S / menu with the X button. 3. Select [Date/Time] with the S / T buttons, then press the OK button. 4. Select the item’s field with the W / X buttons and adjust the value for the date and time with the S / T buttons. The date and time is set in the order yearmonth-day-hour-minute.
Formatting an SD Memory Card or Internal Memory The term “Formatting” means preparing an “SD Memory Card” to record images; this process is also called “initialization”. This utility formats the internal memory (or memory card) and erases all stored images and data. 1. Push and hold the OK button until the camera turns on. 2. Press the S / button and access the setup menu with the X button. 3. Select [Format] with the S / T buttons, then press the OK button. 4.
PHOTOGRAPHY MODE Shooting Images - The Basics 1. Push and hold the OK button until the camera turns on. 2. Compose the image on the monitor screen so that the main subject is within the focus frame. 3. Press the shutter button to capture the image. A 0.3 02/05/2006 08:03 The captured image appears to be larger than the one appearing on the LCD during preview.
Using the Zoom Function This camera is equipped with 4x digital zoom. You can enlarge the subjects by continuing to press the OK button. As useful as this feature is, you should remember that the more the image is magnified, the grainier the image may become. To capture a zoomed image, perform the following steps: 1. Push and hold the OK button until the camera turns on. 2. To activate the digital zoom, push and release the OK button. Each push and release of the OK button will increase the zoom up to 4X.
Using the Flash The flash is designed to function automatically when lighting conditions warrant the use of flash. The camera has four flash modes: Auto Flash (default), Red-eye Reduction, Forced Flash and No Flash. You can take an image using a desired flash mode to suit your circumstances. 1. Push and hold the OK button until the camera turns on. 2. Toggle the X / button until your desired flash mode appears on the LCD monitor. 3. Compose your scene and press the shutter button.
Using the Self-Timer The self-timer can be used in situations such as group shots. When using this option, you should either mount the camera on a tripod (recommended) or rest it on a flat, level surface. 1. Secure the camera to a tripod or place it on a stable surface. 2. Push and hold the OK button until the camera turns on. 3. Toggle the W / button until your desired self-timer mode appears on the LCD monitor. OFF 10s [ No Indication] 2s 10+2s 4. Compose your scene and press the shutter button.
Setting White Balance This feature lets you make adjustments to compensate for different lighting types according to your shooting conditions. 1. Push and hold the OK button until the camera turns on. 2. Press the S / button. 3. Select [White Balance] with the S / T buttons, then press the OK button. 4. Select the desired setting with the S / T buttons, then press the OK button. 5. To exit from the menu, press the W button. Ex.
Scene Mode Selection You can select the scene mode according to your shooting requirements. There are 9 available scene modes. [ A ] Auto: Select this mode to adjust point-and-shoot action. [ ] Sport: Select this mode when you want to photograph fast-moving subjects. [ ] Night: Select this mode when you want to take pictures outdoors at night. [ ] Portrait: Select this mode when you want to capture an image that makes the person stand out against the background.
PLAYBACK MODE - THE BASICS Viewing Images You can display the still images you have just captured. 1. Push and hold the OK button until the camera turns on. 2. Press the [ ] button. The last recorded image appears on the LCD monitor. 100-0001 3. Use W or X button to select the desired 2272 X1704 Size images. 0.3 EV. To view the previous image, press the W 09:26 2006.02.10 button. 0001 To view the next image, press the X button. 4. To exit from playback mode, press the [ ] or T (MODE) button.
Magnifying Images While reviewing your images, you may enlarge a selected portion of an image. This magnification allows you to view fine details. The zoom factor displayed on the screen shows the current magnification ratio. 2.0X T T T 1. Push and hold the OK button until the camera turns on. 2. Press the [ ] button. 3. Continuously push and release the OK button to zoom in on the picture. The magnification factor is displayed on the LCD monitor. 4.
Thumbnail Display This function allows you to view 9 thumbnail images on the LCD monitor simultaneously so you may search for a particular image. 1. Push and hold the OK button until the camera turns on. 2. Press the [ ] button. 3. Continuously push and release the OK button until the thumbnail images are displayed. For recorded video clips, the [ ] video mode icon will be displayed. 4. Use the S / T / W / X button to move the cursor to select the image to be displayed at regular size. 5.
Slideshow Display The slide show function enables you to play your images back automatically in sequential order. This is a very useful and entertaining feature for reviewing recorded images and for presentations. 1. Press the [ ] button. 2. Press the S / button. 3. Select [Slide Show] with the S / T buttons, then press the OK button. 4. Use S / T to select the playback interval, then press the OK button. The slideshow starts. 5. To stop the slide show during playback, press the OK button.
VIDEO MODE Recording Video Clips This mode allows you to record video clips with sound via the built-in microphone. 1. Push and hold the OK button until the camera 00:00:33 turns on. 2. Press T / MODE and switch to [ ] mode. 3. Press the shutter button to start recording. 4. To stop recording, press the shutter button again. When recording a video clip, the flash cannot be used. Sound recording with video is optimized for underwater use. The camera’s waterproof case will limit audio performance in air.
PLAYBACK MODE – ADVANCED FEATURES Deleting Images/Video Clips Use this function to delete one or all images/video clips stored in the internal memory or memory card. Please note that the deleted images or video clips cannot be recovered. Exercise caution before deleting a file. Deleting in Playback Mode 1. Press the [ ] button. 2. Select the image you want to erase with the W / X buttons. 3. Press the S / button. 4. Select [Delete] with the S / T buttons, then press the OK button. 5.
Protecting Images/Video Clips Set the data to read-only to prevent images from being erased by mistake. Protecting Images 1. Press the [ ] button. 2. Select the image that you want to protect with the W / X buttons. 3. 4. 5. 6. Press the S / button. Select [Protect] with the S / T buttons, then press the OK button. Select [Single] or [All] with the S / T buttons, then press the OK button. Select [Set] with the S / T buttons, then press the OK button.
Setting the DPOF DPOF (Digital Print Order Format) allows you to embed printing information on your memory card. By using DPOF, you can select an image to be printed and then specify how many prints or which image you would like. Take your memory card to a DPOF enabled printer that accepts memory cards. The DPOF/card-compatible printer will read the embedded information on the memory card and print your images as specified. 1. Press the [ ] button. 2.
9. Select [On] or [Off] with the S / T buttons, and press the OK button. J On: The date of the photograph will also be printed. J Off: The date of the photograph will not be printed. 10.Select [Print Enable] with the S / T buttons, and press the OK button. 11.Select [Execute] with the S / T buttons, and press the OK button. J This creates a file containing the DPOF information. When the operation is finished, press the W button continuously to return to the playback mode.
Connecting to a PictBridge Compliant Printer If a printer that supports PictBridge is available, images can be printed by connecting the digital still camera directly to the PictBridge-compatible printer without using a computer. Connecting the camera to the printer 1. Connect the USB port on the camera and the USB jack on the printer with the supplied USB cable, then turn on your camera and the printer. The screen for selecting the USB mode is displayed. 2. Select [PictBridge] and press the OK button.
3. If you select [Select] in the previous step, the figure shown on the right hand side will appear. J Select the multi images that you want to print simultaneously with the W/Xbuttons. J Select the [Print Num.] (up to 99) with the S/T buttons. J After selecting the desired image and printing number, press the OK button to confirm. 4. Select [Print] with the S/T buttons, and press the OK button to start printing. 5. The printing starts and the figure shown on the right hand side appears.
TAKING UNDERWATER PICTURES MUST DO for Underwater Use 1. Read and understand the instructions contained in this manual before using the camera underwater. 2. Do not exceed the depth rating of 10m or the camera may leak. 3. Follow these important O-ring care instructions or the camera may leak. J Inspect and clean O-ring and O-ring contact surfaces for sand, hair and other debris before every use.
How to Install and Remove O-ring To remove O-ring, use a non-sharp object, like a credit card to lift up O-ring at one of the corners. To Install O-ring, carefully push O-ring into groove, making sure to align the shape of the o-ring with the shape of the groove. Be careful not to twist the O-ring. Important: Do NOT lubricate O-ring Carefully inspect and clean O-ring and O-ring contact surfaces before each underwater use.
Maintaining a Waterproof Seal Every camera is tested for quality and a waterproof seal. It is your responsibility to properly care for the O-ring and O-ring contact surfaces to maintain a waterproof seal. Carefully follow these important O-ring care instructions. Not following these care instructions may cause the camera to leak and void your warranty. 1. Carefully inspect O-ring and O-ring contact surfaces for damage (cuts, scratches, tears, cracks, dents and any other imperfections.) before every use.
Using and Cleaning the Camera Underwater Entering the water with camera 1. Do not jump into the water with camera in your hand. Have someone hand you the camera after you have entered the water. 2. For tips on taking pictures, see “Great Underwater Pictures Made Easy”. After using camera underwater 1. Before entering dive boat, hand the camera to someone on the boat. 2. Make sure the sealed camera is placed in a fresh water tank available on most dive boats.
Great Underwater Pictures Made Easy Taking underwater pictures is much different from taking land pictures. Here are the most important tips to taking great pictures underwater: 1. Crystal Clear water. Crystal Clear water is essential for good underwater pictures. Remember the human eye can see more detail than a camera. In other words, your eyes see the water as being clearer than it actually is. Floating particles like algae, and silt cause low visibility.
TRANSFERRING FILES FROM YOUR DIGITAL CAMERA TO COMPUTER System Requirements Windows Pentium lll 600 MHz or higher Windows 2000/XP or later 64MB RAM 128MB hard disk space CD-ROM drive Available USB port Macintosh PowerPC G3/G4/G5 OS 9.0 or later 64MB RAM 128MB hard disk space CD-ROM drive Available USB port Step 1: Connect the digital camera to your computer 1. Push and hold the OK button until the camera turns on. 2. Connect one end of the USB cable to an available USB port on your computer.
Step 2: Download images or video clips When the digital camera is turned on and connected to your computer, it is considered to be a disk drive, just like a floppy disk or CD. You can download (transfer) images by copying them from the “Removable disk” (“untitled” or “unlabeled” disk on a Macintosh) to your computer hard drive. Windows Open the “removable disk” and double click on the DCIM / DSCIM folder to open it to find more folders. Your images are inside these folder(s).
EDITING SOFTWARE INSTALLATION Installing Photo Explorer Ulead ® Photo Explorer provides a simple and efficient way to transfer, browse, modify and distribute digital media. Acquire photos, video or sound clips from various digital device types and easily browse or add personal descriptions; make timely modifications; or distribute the media through the medium of your choice: E-mail, Print, Slideshow Presentations.
USING THE DIGITAL CAMERA AS A PC CAMERA Your digital camera can act as a PC camera, which allows you to videoconference with business associates, or have a real-time conversation with friends or family. To use the digital camera for videoconferencing, your computer system must include the items as below: Microphone Sound card Speakers or headphones Network or Internet connection Video conferencing (or video editing) software is not included with the digital camera.
Step 2: Connect the digital camera to your computer 1. 2. 3. 4. Push and hold the OK button until the camera turns on. Connect one end of the USB cable to an available USB port on your computer. Use S / T to select [PC Camera], then press the OK button. Position the digital camera steadily on top of your computer monitor or use a tripod. When using this digital camera as a PC camera, it is necessary to install the batteries into the digital camera. Step 3: Run your application software (i.e.
MENU OPTIONS Camera Menu This menu is for the basic settings to be used when capturing still images. 1. Push and hold the OK button until the camera turns on. 2. Press the S / button. 3. Select the desired option item with the S / T buttons, then press the OK button to enter its respective menu. 4. Select the desired setting with the S / T buttons, then press the OK button. 5. To exit from the menu, press the W button. Size This sets the size of the image that will be captured.
White Balance This sets the white balance for a variety of lighting conditions and permits images to be captured that approach the conditions that are seen by the human eye. * * * * * * [ Blank ] Auto ] Daylight [ [ ] Cloudy [ ] Tungsten [ ] Fluorescent [ ] Manual WB In Underwater mode the following white balance options are displayed: * Auto / Less 15 Feet / Over 15 Feet / Manual WB Select the appropriate underwater depth for best white balance.
Preview This sets whether or not to display the captured image on the screen immediately after the image is captured. * On / Off Date Print The date of recording can be printed directly on the still images. This function must be activated before the image is captured. * On / Off Video Menu This menu is for the basic settings to be used when recording video clips. 1. Push and hold the OK button until the camera turns on. 2. Toggle the T / MODE button and switch to [ ] mode. 3. Press the S / button. 4.
Playback Menu In the [ ] mode, choose which settings are to be used for playback. 1. Press the [ ] button. 2. Press the S / button. 3. Select the desired option item with the S / T buttons, then press the OK button to enter its respective menu. 4. Select the desired setting with the S / T buttons, then press the OK button. 5. To exit from the menu, press the W button. Delete Refer to section in this manual titled “Deleting Images/Video Clips” for further details.
Setup Menu Set your camera’s operating environment. button and access the setup 1. Press the S / menu with the X button. 2. Select the desired option item with the S / T buttons, and press the OK button to enter its respective menu. 3. Select the desired setting with the S / T buttons, and press the OK button. Date/Time This sets the date and the time.
SPECIFICATIONS Item Image Sensor Effective pixels Image size Description CCD 6.0 Mega pixels Still image: 2816 x 2112, 2272 x 1704, 1600 x 1200, 640 x 480 Video clip: 320 x 240 Image quality Still image: Fine, Standard, Economy Recording media 16MB internal memory (14MB available for image storage) SD memory card (Optional, up to 2GB) File format Image format: JPEG; video format: Motion JPEG Lens F-no.: 3.3 Focal length: 6.
TROUBLESHOOTING GUIDE Symptom The power does not turn on. Possible causes Solutions / Corrective Actions * The batteries have run out. * Load new or fully charge * The batteries are not batteries. oriented correctly. * Load the batteries in the correct * The battery cover is not direction. closed properly. * Close the battery cover correctly. The camera suddenly * The function of Auto off * Set the option of Auto Off to in setup menu has been powers down. Off. activated.
Possible Number of Recordable Images The frame counter indicates the approximate number of images that can be stored on the SD memory card. The number of recordable images may vary depending on the recorded subject, the capacity of the memory card, and whether there are files other than images or when the recording is made while switching the picture quality or resolution.
A. Information on Disposal for Users (private households) 1. In the European Union Attention: If you want to dispose of this equipment, please do not use the ordinary dust bin! Attention: Your product is marked with this symbol. It means that used electrical and electronic products should not be mixed with general household waste. There is a separate collection system for these products.