
User Guide


MAIN UNIT PREPARATION
The following must be completed before operation.
A battery is already fitted in the main unit when purchased. This battery is just for checking the function of
the unit so it may only last a short period of time.
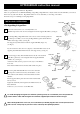
Setting Speed Scale
Press AC button on the backside of the Main Unit to clear all data. All displays will illuminate. Then “mile/h” alone will be
displayed, “km/h” and “mile/h” are alternately displayed each time when the Start/Stop button is pressed. Select either as
desired. Press the center Set button to set the speed scale.
Setting the wheel circumference
The figures “2155” (standard wheel circumference for 27") will flicker. This is just a guideline so you have to adjust this
number to the exact size of your rear wheel. Measure the exact circumference of your wheel and input this number.
If you are going to use HyperBrain on HyperMag or HyperRim, set this number as “117” (the circumference of the drive
roller of your Hyper series resistance unit).
To revise “2155” to any number, press the Mode button to decrease the number one by one. When the button is held down, it
will rapidly decrease. To increase the number, press Start/Stop button.
When the desire figure appears, press the Set button. Current Speed and Elapsed Time will be displayed, then the figure you
selected will be set.
Setting the 24-hour clock time
Set the main unit in the clock mode by pressing the Mode button for over 2 seconds.
Press the Set button to adjust the time. The time stored appears, and the figures for minute flicker. Press the Start/Stop
button to advance the figures one by one. When the button is held down, it will rapidly increase. Set a time one or two
minutes ahead of the current time.
Press the Mode button. The figures for hour will flicker. Adjust it by using the Start/Stop button.
Press the Set button and the undisplayed second will return to zero. Now setting is completed.
How to replace the battery
If the display becomes invisible from the front, it is time for replacing battery.
Prepare a new battery (CR2032) in advance, before taking out the old battery. Insert a new battery so that it is tightly fitted to
the contact.
When replacing, be careful not to press the AC buttons, and replacement must be done promptly (within 20 seconds).
After replacement, don’t press AC button, because the data including total distance (odometer) is continuously measured, and
AC button will set all data erased.
However, the following malfunction might occur after replacement:
•No display appears.
•Unusual display appears.
•Display is O.K. but button don’t work.
In the above cases, press AC button so that display / buttons returns to normal. Please refer to "Main Unit Preparetion" in the
operating instructions.
When you pick the battery, make sure you must hold it at both edge. Do not hold the battery on both surface, this will
discharge the battery rapidly.