flashmeter_vi_eng.qx33 02.12.
flashmeter_vi_eng.qx33 02.12.25 9:20 PM ページ 2 Instruction Manual FLASH METER VI Thank you for purchasing the MINOLTA FLASH METER VI. The Minolta Flash Meter VI has the following features: ● The integrated exposure meter combines incident light measurement and spot (reflected light) measurement in a single unit. ● For spot measurement, the Flash Meter VI uses a parallax-free optical system. This eliminates the displacement of the measurement area that varies with the distance from the subject.
flashmeter_vi_eng.qx33 02.12.25 9:20 PM ページ 4 Table of Contents Never attempt to look directly at the sun through the viewfinder of the meter. Doing so will damage your eyesight. The instrument should not be operated if it is damaged, or smoke or odd smells occur. Doing so may result in a fire. In such situations turn off the power immediately, disconnect the AC adapter, and contact the nearest authorized service facility.
flashmeter_vi_eng.qx33 02.12.
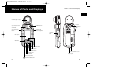
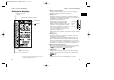
flashmeter_vi_eng.qx33 02.12.25 9:21 PM ページ 4 Names of Parts and Displays Names of Parts and Displays Data panel displays 1. Analog scale status indicator The left (L) and right (R) analog scales are used for incident light measurement and spot measurement, respectively. 1. Analog scale status indicator 2. Analog scale L The display of the pointers corresponds to measurement data and memory data for incident light measurement.
flashmeter_vi_eng.qx33 02.12.25 9:21 PM ページ 6 Names of Parts and Displays Names of Parts and Displays 7. Digital readout When the measurement data display unit is set to "FNo." or "FNo. direct reading," the f-number (FNo.) is displayed. When the display unit is set to "EV," the exposure value (EV) is displayed in 0.1-stop increments. For flash light measurement, only the FNo. display mode is available.
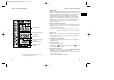
flashmeter_vi_eng.qx33 02.12.25 9:21 PM ページ 8 Names of Parts and Displays Preparations Viewfinder display Battery WARNING 15.Measuring index circle Do not throw batteries into fire. Do not recharge (nonrechargeable batteries), short circuit, heat or disassemble batteries. Otherwise, there is a risk of causing fire or injury due to an explosion or fluid leakage. CAUTION Do not use any batteries other than those designated for use with the instrument.
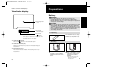
flashmeter_vi_eng.qx33 02.12.25 9:21 PM ページ 10 Preparations Preparations If you turn on the meter when the battery power is running low, "b.c." will appear on the display for approx. 0.5 sec. before the normal display appears. the battery 3 Replace chamber cover. 3. Checking The instrument automatically checks the battery when power is on. After a new battery is installed, the display appears as shown below after the power is turned on.
flashmeter_vi_eng.qx33 02.12.25 9:21 PM ページ 12 Preparations Setting film speed Specify a film speed with the Up/down dial while holding down the ISO button. ● Turning the control upward increases the film speed in increments of 1/3-stop. The maximum film speed is ISO 8000. ● Turning the control downward lowers the film speed in decrements of 1/3-stop. The minimum film speed is ISO 3. ● Be sure to set film speed to the correct setting, since all measurement results are based on the set value.
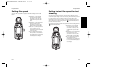
flashmeter_vi_eng.qx33 02.12.25 9:21 PM ページ 14 Preparations Preparations Selecting a measuring method suitable for the light-receiving method Select a measuring method, either incident light measurement or spot measurement, appropriate to the shooting conditions and nature of the photograph. The Flash Meter VI can measure exposure in either way. For incident light measurement, select either the Spherical Diffuser or optional Flat Diffuser. 1.
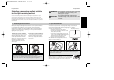
flashmeter_vi_eng.qx33 02.12.25 9:21 PM ページ 16 Preparations Preparations Difference between incident-light and Spot (reflected-light) readings Exposure can be measured in two basic ways. One way is to measure the light incident on the subject, i.e. the brightness of light illuminating the subject (illuminance) (see Fig. 1); the other is to measure the light Spot reflected by the subject, i.e. the intensity of the light reflected from the subject in the direction of the camera (luminance) (see Fig. 2).
flashmeter_vi_eng.qx33 02.12.25 9:21 PM ページ 18 Preparations Basic Operation Spot (reflected-light) readings Here we explain the basics of using the MINOLTA FLASH METER VI to take exposure readings. Spot (reflected-light) exposure readings directly measure the amount of light (luminance) reflected from the subject to the camera. Unlike the case of incident-light readings, this method does not rely on the assumption of a standard subject reflectance of 18%.
flashmeter_vi_eng.qx33 02.12.25 9:21 PM ページ 20 Basic Operation Basic Operation Measuring ambient light 1. With a still camera Spot measuring button ↓ Set film speed (p. 12) the meter to start 1 Prepare taking readings. the MODE button to 2 Press switch the mode display to AMBI. ● Changing the measuring mode retains the memory data but clears previous measurement data. E20 the desired shutter 3 Specify speed with the up/down dial. ● Shutter speed can be set within the range of 30 min.
flashmeter_vi_eng.qx33 02.12.25 9:21 PM ページ 22 Basic Operation Basic Operation Display example Display units are EV Display units are FNo. If you set your desired shutter speed, the f-number required for proper exposure at that shutter speed is displayed on the digital readout. The reading is also displayed on the analog scale by a pointer. Ex.: The display shows a reading of F4.0+0.2-stops. E22 If the f-number reading is outside the meter’s display range, “FNo.
flashmeter_vi_eng.qx33 02.12.25 9:21 PM ページ 24 Basic Operation Basic Operation 2. With a cine camera If the opening of your camera’s shutter is not 180°, the film speed should be adjusted as follows: Insert a battery (p. 9) ↓ Set CINE mode (p. 72) Shutter opening and film speed adjustment The default setting of TIME/CINE mode is “TIME.” In the custom setting (Alt) mode, change “TIME” to “CINE.” ↓ Shutter opening 160° 220° Set film speed (p. 12) the meter to start 1 Prepare taking readings.
flashmeter_vi_eng.qx33 02.12.25 9:21 PM ページ 26 Basic Operation Basic Operation Measuring flash light 1. With a sync cord Insert a battery (p. 9) ↓ Set film speed (p. 12) the measuring 4 Press button to take readings. ● The meter takes measurements continuously as you hold down the incident light measuring button. The digital display on the data panel displays the measurement data. At the same time, the measurement data are also displayed on the dot indicator of the analog scale L.
flashmeter_vi_eng.qx33 02.12.25 9:21 PM ページ 28 Basic Operation Basic Operation Display example the flash sync cord 3 Attach to the meter’s sync terminal. ★ Take care when connecting the flash to the meter, as the flash may fire. E28 the desired shutter 4 Specify speed with the up/down dial. ● Shutter speeds can be set within the range of 30 min. To 1/1000 sec. (The speed can be set within the flash sync speed range of your camera.) ● Turning the up/down dial upward increases the shutter speed.
flashmeter_vi_eng.qx33 02.12.25 9:21 PM ページ 30 Basic Operation Basic Operation ★ When measuring flash light using a sync cord (CORD mode), the flash may fail to fire (e.g. if the trigger voltage of the flash is too low). In this case, take a reading without sync firing the flash (NON CORD mode). If the f-number reading is outside the meter’s display range, “FNo.” blinks and the display shows either “– O – ” (over-range error) or “– U –” (under-range error).
flashmeter_vi_eng.qx33 02.12.25 9:21 PM ページ 32 Basic Operation Basic Operation 2. Without a sync cord (Incident light measurement) Insert a battery (p. 9) ↓ Set film speed (p. 12) the meter to start 1 Prepare taking readings. the mode display to 2 Set NON CORD using the MODE button. ● Changing the measuring mode retains the memory data but clears previous measurement data. ● Settings for shutter speed and display units will be automatically adjusted as follows. 1/1250 to 1/16000 sec.
flashmeter_vi_eng.qx33 02.12.25 9:21 PM ページ 34 Basic Operation Basic Operation Display example the flash to take a 5 Fire reading. ● The meter detects the light of the flash and reads and displays the exposure on the digital readout. The measured value is also displayed on the dot indicator of the analog scale, and the proportion of flash light is indicated on the analyze scale. ● Pressing the CLR button clears the measured value. ● To take further readings, repeat the process from step 4.
flashmeter_vi_eng.qx33 02.12.25 9:21 PM ページ 36 Basic Operation Basic Operation Light Ratio Analyze function For flash light measurement, the Flash Meter VI uses a method of measuring flash light/ambient light separately. The proportion of ambient light and flash light to the total exposure is indicated on the quadrant analyze scale.
flashmeter_vi_eng.qx33 02.12.25 9:21 PM ページ 38 Special Functions Special Functions Here we explain how to use the special functions of the MINOLTA FLASH METER VI. Latitude display function Generally, with a color slide film, the film latitude range that ensures linearity of exposure and density is about 5 to 6 EV. The analog scale L of the Flash Meter VI can display the standard exposure and the latitude range based on the standard exposure.
flashmeter_vi_eng.qx33 02.12.25 9:21 PM ページ 40 Special Functions Special Functions Combining incident light measurement and spot measurement The Flash Meter VI offers a comparative display of the results of incident light measurement and spot (reflected light) measurement. Used with the latitude display function, the meter provides a clear and simple graphical decision process for determining an exposure suited to the nature of the photograph.
flashmeter_vi_eng.qx33 02.12.25 9:21 PM ページ 42 Special Functions Special Functions Memory function To store measurement data in memory of the Flash Meter VI, simply press the MEMORY button. Up to ten pieces of data (including incident light measurement data and spot measurement data) can be stored. To display the incident light measurement data stored in memory on the pointer of the analog scale L, simply press the incident light measuring button.
flashmeter_vi_eng.qx33 02.12.25 9:21 PM ページ 44 Special Functions ◆ The measured value is displayed on the digital display. If the latest measurement is an incident light measurement, the pointers corresponding to the measured value on the digital display appear on the analog scale L. If it is a spot measurement, the pointers corresponding to the measured value on the digital display appear on the analog scale R. ◆ The memory data from the latest measuring method are displayed on the pointer.
flashmeter_vi_eng.qx33 02.12.25 9:21 PM ページ 46 Special Functions Special Functions ● Hold down the S/A/H button to display the average of the memory data on the digital display and on the pointer of the analog scale (L). Average exposure For spot measurement, the meter calculates the average of the maximum and minimum measurements stored in memory. For incident light measurement, the meter calculates an average exposure from up to ten measurements stored in memory.
flashmeter_vi_eng.qx33 02.12.25 9:21 PM ページ 48 Special Functions Special Functions Shadow calculations (for spot readings only) When you want to reproduce some detail in the darkest areas of a composition (shadow areas) without blocking them out, take a spot reading of the shadow area and use the meter’s shadow exposure calculation function to determine the appropriate exposure for the shot.
flashmeter_vi_eng.qx33 02.12.25 9:21 PM ページ 50 Special Functions Special Functions Highlight calculations (for spot readings only) When you want to reproduce some detail in the brightest areas of a composition (highlight area), without washing them out, take a spot reading of the highlight area and use the meter’s highlight exposure calculation function to determine the appropriate exposure.
flashmeter_vi_eng.qx33 02.12.25 9:21 PM ページ 52 Special Functions Special Functions Brightness difference function To fix the displayed measurement result or calculation result, press the LATITUDE button after taking an ordinary measurement or while holding down the S/A/H button. When the next measurement is taken with the meter, the exposure difference between the fixed measurement/calculation result and the new measurement result appears on the digital display.
flashmeter_vi_eng.qx33 02.12.25 9:21 PM ページ 54 Special Functions Special Functions If the incident light measuring button is used to take the measurement described in Step 1 and to monitor the exposure difference: Fixed measurement result When the measuring button is released: Measured value for the point monitored (When AMBI mode is selected, the meter continuously takes measurements as long as the measuring button is held down. The positions of the lit dots change with the measurement result.
flashmeter_vi_eng.qx33 02.12.25 9:21 PM ページ 56 Special Functions Special Functions Monitoring exposure difference after shadow-based exposure calculation a spot measurement 1 Take of the shadow area of the subject. holding down the 2 While S/A/H button, set the calculation mode to “S” with the up/down dial. the LATITUDE 3 Press button while holding down the S/A/H button. ◆ The indicator appears and the calculated standard exposure is fixed. (In this case, the standard exposure is fixed to F4.0 +0.
flashmeter_vi_eng.qx33 02.12.25 9:21 PM ページ 58 Special Functions Measuring lighting ratio using the Flat Diffuser The lighting ratio is the brightness ratio between the highlight and shadow areas of a composition. For example, if the difference in measurement values (exposure difference) obtained by an incident light measurement is one stop, the lighting ratio is 2:1; if it’s two stops, the ratio is 4:1.
flashmeter_vi_eng.qx33 02.12.25 9:21 PM ページ 60 Special Functions the incident light 5 Press measuring button while holding the meter near the subject with the Flat Diffuser facing the main light source. Special Functions the MEMORY button 6 Press to store the measurement value. the incident light 7 Press measuring button while holding the meter near the subject with the Flat Diffuser facing the fill light source.
flashmeter_vi_eng.qx33 02.12.25 9:21 PM ページ 62 Special Functions Special Functions Using the brightness difference function of the instrument, the lighting ratio can be read with an accuracy of 0.1 stops. Alternatively, instead of storing the readings in memory, as explained in step 6 on page 60, the following method can be used: the LATITUDE button. is displayed on the data 6 Press panel, and the exposure reading for the main light source is fixed.
flashmeter_vi_eng.qx33 02.12.25 9:21 PM ページ 64 Special Functions ● EV-lx conversion table (with Flat Diffuser attached) Special Functions ● EV-cd/m2 conversion table Decimal Decimal Integeral Integeral How to read the EV-lx conversion table The EV-lx conversion table lists the integer component of EV values vertically and the decimal fraction components of EV values horizontally. For example, if the meter displays a reading of EV 10.2, the row for the integer 10 and the column for the decimal 0.
flashmeter_vi_eng.qx33 02.12.25 9:21 PM ページ 66 Special Functions Special Functions Custom settings mode (Alt mode) The operation settings of the Flash Meter VI, such as exposure correction value and shutter speed increment settings, can be customized to suit your preferences. To set the meter to “Alt” mode, turn on the power by pressing the POWER button while holding down either the incident light measuring button, spot measuring button, ISO button, S/A/H button, LATITUDE button or MODE button.
flashmeter_vi_eng.qx33 02.12.25 9:21 PM ページ 68 Special Functions Special Functions 2) Shutter speed increments 3) Display unit Choose between increments of 1/2-stop, 1/3-stop and 1-stop, according to the shutter speed settings your camera. the power on while 1 Turn pressing the ISO button, or press the ISO button in Alt mode. the up/down dial to 2 Turn set the step value. ● Choose from values of 1.0 (1), 0.5 (1/2) and 0.3 (1/3). Select the desired display unit.
flashmeter_vi_eng.qx33 02.12.25 9:21 PM ページ 70 Special Functions Special Functions 4) Latitude Specify an upper limit (H) and lower limit (S) for latitude display mode. Specify a shift value (H) for highlight-based exposure calculation and a shift value (S) for shadow-based exposure calculation. on the power while 1 Turn pressing the LATITUDE the LATITUDE 3 Press button. the LATITUDE 5 Press button. the LATITUDE 7 Press button. the S value with 4 Specify the up/down dial.
flashmeter_vi_eng.qx33 02.12.25 9:21 PM ページ 72 Special Functions Special Functions 5) TIME/CINE setting Reference: How to reset to initial settings Switches between shutter speed and framing-rate in AMBI mode Note that it is not possible to switch to another measuring mode (CORD or NON CORD) while the framing-rate setting is active. the power on while 1 Turn pressing the MODE button, or press the MODE button while in Alt mode.
flashmeter_vi_eng.qx33 02.12.25 9:21 PM ページ 74 Accessories Flat Diffuser Care and Storage Sync. Cord III 1. Care 1) If the meter gets dirty, it can be wiped with a soft, dry cloth. Do not use solvents such as thinners or benzene at all. 2) If the Spherical Diffuser becomes stained, remove it from the meter, wash the diffuser carefully in water with amild detergent, and rinse and dry the diffuser thoroughly before reattaching it to the meter.
flashmeter_vi_eng.qx33 02.12.25 9:21 PM ページ 76 Handling Instructions Handling Instructions 1) If the meter is used in the rain, at the seashore, or near a volcano, it may become rusty or corroded due to water or corrosive gas. In such situations, be careful to protect the meter as much as possible. 2) Do not subject the meter to shock or vibration. For protection, store the meter in its case when carrying it.
flashmeter_vi_eng.qx33 02.12.
flashmeter_vi_eng.qx33 02.12.25 9:21 PM ページ 80 Minolta Co., Ltd. 3-13, 2-Chome, Azuchi-Machi, Chuo-ku, Osaka 541-8556, Japan ©2002 Minolta Co., Ltd.