
Instruction manual


154
Data-transfer mode
PictBridge
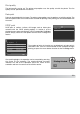
Repeat the previous steps until all the images to be printed are selected. Press the central
button of the controller to continue.
On the PictBridge screen, the digital-zoom lever can be used to switch between the single frame and
index playback formats, or to activate enlarged playback to examine image files.
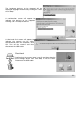
Confirm the transfer-mode option in section 1 of the setup menu is
set to PTP. Connect the camera to a PictBridge compatible printer
using the camera’s USB cable. The larger plug on the cable is
connected to the printer. Open the terminal cover and insert the
smaller plug of the cable into the camera. Turn the camera on; the
PictBridge screen is displayed automatically.
Individual still images can be selected for printing on the PictBridge screen. Movie clips, RAW and
images with an embedded color profile (p. 68) cannot be selected. For other printing options, see the
menu navigation section on page 156.
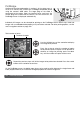
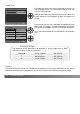
Use the left/right keys of the controller to display
the image to be printed.
Total number of prints
Number of copies
Press the up key to select the number of copies
to be printed. Up to 20 copies can be printed. To
deselect an image for printing, press the down
key until the number of copies reaches zero.
:select:move :print