USER MANUAL, HANDBUCH, GUIDE DE L’UTILISATEUR MANUAL DEL USUARIO, MANUALE UTENTE SIMPLICITY SERIES MINIVATOR 1000 MINIVATOR 2000 MANUUML
Introduction Contents Thank you for choosing a Minivator stairlift from Handicare. Please read these operating instructions carefully. Your Minivator stairlift has been designed and built with careful attention to detail. Features of your Minivator stairlift . . . . 3 In order to obtain many years of trouble free use please follow the instructions, paying particular attention to the care and maintenance requirements.
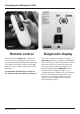
Features of your Minivator stairlift Folding seat base 5 Simple to operate key switch control 2 Swivel seat 6 Folding armrests 3 Infrared remote control 7 Diagnostic display 4 Folding footrest with safety edges ENGLISH 1 3 6 6 2 5 1 7 4 USER MANUAL 3 3
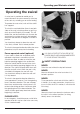
Operating your Minivator stairlift Figure 1 Before use Before using your stairlift, MOST IMPORTANTLY please ensure the stairs are clear of other people, pets or any objects which may obstruct your stairlift. Then ensure that the arms, footplate and seat are folded down for use to ensure your safety (Figure 1). For your safety the stairlift will not operate from the operating lever unless both arms are in the down position. BEFORE OPERATING YOUR STAIRLIFT ALWAYS FASTEN YOUR LAP BELT.
ENGLISH Operating your Minivator stairlift Figure 3 Key switch Your Minivator stairlift is fitted with a key switch (Figure 3). The stairlift cannot be operated unless the key is inserted and turned to the on position. The key switch is provided to enable you to lock the stairlift to prevent it being used by others (for example children). However, it can be left in the on position if desired. If you remove your key for safety reasons, please ensure you put it in a safe place.
Operating your Minivator stairlift Figure 5 Remote control The remote control (Figure 5) is used to call the lift to either the top/bottom of the stairs or to operate a powered folding hinge where fitted. The control may also be used by an attendant where the user is unable to operate the stairlift themselves. The attendant should always remain off the staircase until the stairlift is stationary.
Operating your Minivator stairlift ENGLISH Operating the swivel A swivel seat is provided to enable you to mount/dismount the seat more easily at the top of the stairs by swivelling you on to the landing. To operate the seat swivel, wait until the stairlift has stopped. To swivel the seat hold either (there is one both sides of the seat) swivel lever down or pull it up (only up on the Simplicity 950 model).
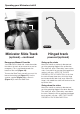
Operating your Minivator stairlift Figure 8 Figure 9 Folding your stairlift Your Minivator stairlift seat, armrests and footrest can be folded to allow easier passage up and down stairs when it is not in use (Figure 8). SAFETY PRECAUTION ALWAYS RETURN THE STAIRLIFT TO ITS STOWED POSITION. I.E. WITH ARMRESTS, SEAT AND FOOTREST FOLDED AND THE CHAIR PARALLEL TO THE TRACK AS SHOWN IN FIGURE 8, SO THAT EXITS ARE NOT OBSTRUCTED.
Operating your Minivator stairlift ENGLISH Minivator Slide Track or Hinged track In some installations a hinged track or Minivator Slide Track may be necessary, usually to move the track out of the way of the doorway at the foot of the stairs. The Minivator powered hinged track and Slide Track are fully automatic in operation and will function as follows: Minivator Slide Track (optional) Going up the stairs Mount the stairlift as previously directed and push the operating toggle in the up direction.
Operating your Minivator stairlift Locking bolt Figure 11 Figure 12 Minivator Slide Track Hinged track (optional) – continued powered (optional) Emergency Manual Override Going up the stairs Your Slide Track is fitted with a manual override that allows the track to be moved in case of an emergency. This is positioned towards the bottom of the track (Figure 10). Mount the stairlift as previously directed and push the operating toggle in the up direction.
ENGLISH Operating your Minivator stairlift Figure 13 At this time the seat will beep three times whilst the hinge track automatically folds open (Figure 13). When the hinge is fully open the stairlift will continue to the bottom of the stairs. Parking the Stairlift WHEN THE STAIRLIFT IS NOT IN USE IT SHOULD BE MOVED TO ITS PARK POSITION SO THAT IT DOES NOT CAUSE AN OBSTRUCTION. THE STAIRLIFT DOES NOT CHARGE WHEN IT IS PARKED AT THE BOTTOM OF THE STAIRS.
Operating your Minivator stairlift Figure 15 Emergency hand winding instructions In the unlikely event that the lift has a total power failure or runs on to the final track stops there is an emergency hand winding procedure. Please follow these steps: 1 Switch off the stairlift with the key. 2 Insert the emergency hand winding knob (Figure 15). The position of the hand winding hole will always be on the downside main body panel, regardless of the model that you have.
Annual service We advise that your stairlift is serviced after the first 12 months and thereafter AT LEAST EVERY 12 MONTHS. The service history log must be filled in regularly as a proof of specified maintenance. Failure to do so may invalidate the product warranty. This work must be carried out by a competent person, i.e. a Handicare approved dealer. If in doubt, please contact the Handicare Service Department on +44 (0) 8700 118282.
Routine care and maintenance Battery care and charging Your Minivator stairlift is battery powered and will continue to work for a period of time even if you have a power cut. You should normally be able to travel up and down the stairs at least 10 times without needing to charge the batteries. Particularly in the event of a power cut, however you should always ensure that there is sufficient light to allow safe travel, and especially at each end of the track where you get on and off the lift.
Appendix 1 Diagnostic Display Code: None Description: No display. Self help action: Press the toggle switch and see if display comes on. Check that the main power switch on the lift is turned on. If this does not clear the fault, contact your dealer or Handicare. Code: Okay Meaning: Charging. Self help action: If lift does not drive check that the arms are down. If this does not clear the fault, contact your dealer or Handicare. 1 Code: 1 Meaning: Requires charge.
5 Code: 5 Meaning: Ends limit activated. 6 Code: 6 Self help action: Contact your dealer or Handicare. Meaning: Safety edge (up/down direction) activated – footplate. Self help action: Contact your dealer or Handicare. 7 Code: 7 Meaning: Batteries approaching critical level. Self help action: The stairlift batteries require charging. Drive the lift to the charge contacts – if the ’Okay’ code does not show contact your dealer or Handicare.
Appendix 1 Code: d Meaning: The main power relay is welded closed. Self help action: Contact your dealer or Handicare. F Code: F Meaning: Brake semi-conductor failed. Self help action: Contact your dealer or Handicare. H Code: H Meaning: The main power relay has closed early. Self help action: Contact your dealer or Handicare. L Code: L Meaning: Current limit exceeded. Self help action: Contact your dealer or Handicare. 18 USER MANUAL E Code: E Meaning: The main power relay did not close.
Code: o Meaning: The main control board has a memory problem. Self help action: Contact your dealer or Handicare. Code: r Meaning: No charge current. Self help action: Make sure that power supply is switched on from mains. If it is contact your dealer or Handicare. Code: y Meaning: The main control board has a software fault. Self help action: Contact your dealer or Handicare. .8. Code: N/A Meaning: Lift is in “sleep mode” to conserve battery power.
NO CONNECTION NO CONNECTION NO CONNECTION COM HINGE INTERLOCK CONNECTOR ALL CONTACTS NORMALLY CLOSED EXCEPT DIRECTION FINAL LIMIT END STOP END STOP SAFE EDGE SAFE EDGE NO CONNECTION COM 4 3 DIRECTION ON DIAGNOSTIC DISPLAY 2 1 EXTERNAL DIAGNOSTIC FRONT PANEL LED CONNECTION CHARGE POSITIVE (33VDC) MOTOR 1 HINGE HINGE INFRARED/ RADIO ON BATTERY NEGATIVE BATTERY POSITIVE (24VDC) CREEP TO PARK CONNECTOR FUNCTION OF SWITCHES 1 ON 4 3 DIP 2 2 1 4 3 DIP 1 2 PING ENABLE ON PLATF
END LIMITS 3 4 DIP-SWITCH 1 2 ON M2 (USE ANY CONNECTION) NEGATIVE M1 SWIVEL MOTOR COMMS 1 (USE ANY CONNECTION) CSE126 POWER SWIVEL PCB 2 3 4 2 3 4 2 3 4 2 3 4 1 ON 2 3 4 POWER SWIVEL - SMART SEAT 1 ON POWER SWIVEL - LUX/SS 1 ON 2000 HINGE 1 ON 1000 HINGE 1 ON DIP SWITCH SETTINGS: POWER FOOTPLATE - SMART SEAT MS 126 Power Swivel PCB ENGLISH Appendix 2 – Wiring diagrams USER MANUAL 21 21
Appendix 3 – Certificate of conformity We Handicare of 82 First Avenue, Pensnett Estate, Kingswinford West Midlands DY6 7FJ, England.
Installation information Installed by: ENGLISH Important information about your stairlift which should be completed by the installation engineer.
Einleitung Inhalt Vielen Dank, dass Sie sich fur einen MinivatorTreppenlift entschieden haben. Bitte lesen Sie diese Bedienungsanleitung sorgfältig durch. Ihr Minivator-Treppenlift wurde mit sorgfältiger Hingabe zum Detail gestaltet und gebaut. Merkmale Ihres Minivator-Treppenlifts . . . . . . . . . . . . . . . . . 25 Bedienung Ihres Minivator-Treppenlifts . . . . . . . . . . . . . . . . .
Merkmale Ihres Minivator-Treppenlifts 1 Zusammenklappbare Sitzbasis 2 Drehsitz 3 Infrarot-Fernbedienung 6 Zusammenklappbare Armlehne 4 Zusammenklappbare Fußauflage 7 Diagnoseanzeige Einfach zu bedienende ENGLISH 5 Schlusselschalter-Steuerung DEUTSCH mit Sicherheitskanten 3 6 6 2 5 1 7 4 HANDBUCH 25 25
Bedienung Ihres Minivator-Treppenlifts Abb. 1 Vor Nutzung Vor Nutzung Ihres Treppenlifts ist am wichtigsten, dass Sie sicherstellen, dass sich keine anderen Personen, Haustiere oder sonstigen Gegenstände auf der Treppe befinden, die den Treppenlift behindern könnten. Stellen Sie dann sicher, dass Armlehnen, Fußauflage und Sitz zur Nutzung herunter beklagt sind, um Ihre Sicherheit sicherzustellen (Abb. 1).
DEUTSCH Bedienung Ihres Minivator-Treppenlifts Abb. 3 Schlusselschalter Ihr Minivator-Treppenlift hat einen Schlusselschalter (Abb. 3). Der Treppenlift kann nur betrieben werden, wenn sich der Schlusselschalter in der Position Ein befindet. Der Schlusselschalter ist vorhanden, um Ihnen das Abschließen des Treppenlifts zu ermöglichen und damit die Nutzung durch andere (z. B. Kinder) zu verhindern Falls gewunscht kann er jedoch in der Position Ein belassen werden.
Bedienung Ihres Minivator-Treppenlifts Abb. 5 Abb. 6 Fernbedienung Diagnoseanzeige Die Fernbedienung (Abb. 5) wird zum Rufen des Lifts zum oberen/unteren Treppenende oder zum Betrieb eines angetriebenen Scharniers, sofern vorhanden, benutzt. Die Fernbedienung kann auch von einem Begleiter zum Betrieb des Treppenlifts benutzt werden, wenn der Benutzer dazu nicht in der Lage ist. Der Treppenlift hat eine Diagnoseanzeige (Abb. 6), die einen Fehlercode zur Hilfe bei der Fehlerdiagnose anzeigt.
Bedienung Ihres Minivator-Treppenlifts Bedienung des Drehsitzes DEUTSCH Der Drehsitz wird geboten, um Ihnen das Besteigen/Absteigen vom Sitz oben an der Treppen durch Drehen des Sitzes in den Flur zu erleichtern. Warten Sie vor Betrieb des Drehsitzes bis der Treppenlift zum Stillstand gekommen ist. Zum Drehen des Sitzes einen der Drehhebel (es befindet sich jeweils einer auf beiden Seiten des Sitzes) herunter drucken oder nach oben ziehen (nur Simplicity 950 Modelle).
Bedienung Ihres Minivator-Treppenlifts Abb. 8 Abb. 9 Zusammenklappen Ihres Treppenlifts Sitz, Armlehnen und Fußauflage Ihres MinivatorTreppenlifts können zusammengeklappt werden, um einfachen Durchgang die Treppe herauf und hinunter zu ermöglichen, wenn der Lift nicht benutzt wird (Abb. 8). SICHERHEITSMASSNAHMEN DEN TREPPENLIFT IMMER IN DIE VERSTAUPOSITION BRINGEN, D.H.
Bedienung Ihres Minivator-Treppenlifts Minivator Slide Track oder Schiene mit Scharnier DEUTSCH In einigen Fällen kann die Installation einer Schiene mit Scharnier oder des Minivator-Slide Tracks erforderlich sein. Dies geschieht gewöhnlich, um die Schiene unten an der Treppe aus dem Bereich einer Turöffnung zu entfernen. Die Schiene mit Scharnier oder der Slide Track von Minivator sind vollautomatisch und funktionieren wie folgt: Minivator Slide Track (optional) Abb.
Bedienung Ihres Minivator-Treppenlifts Klemmbolzen Abb. 11 Abb. 12 Minivator Slide Track Schiene mit Scharnier (optional) – fortgesetzt angetrieben (optional) Um fortzufahren den Knopf AUF wieder drucken und halten. Nach kurzer Verzögerung beginnen die Bewegungen wieder. WARNUNG BITTE ENTFERNEN SIE ALLE HINDERNISSE, DIE DIE BEWEGUNG DER SCHIENE BEHINDERN KÖNNTEN, BEVOR SIE DEN SLIDE TRACK BEDIENEN.
DEUTSCH Bedienung Ihres Minivator-Treppenlifts Abb. 13 Der Sitz piept nun drei Mal während der klappbare Bereich sich automatisch ausklappt (Abb. 13). Nachdem der klappbare Bereich vollständig verfahren wurde, fährt der Lift bis zum unteren Treppenende weiter. Abb. 14 WARNUNG BITTE ENTFERNEN SIE ALLE HINDERNISSE, DIE DIE BEWEGUNG DER SCHIENE BEHINDERN KÖNNTEN, BEVOR SIE DEN KLAPPBAREN BEREICH BEWEGEN.
Bedienung Ihres Minivator-Treppenlifts Abb. 16 Anleitung NotfallHandbetrieb Fur den unwahrscheinlichen Fall eines vollständigen Stromausfalls oder wenn der Lift auf den Endstop auffährt gibt es einen NotfallHandbetrieb. Bitte befolgen Sie diese Schritte: 1 Schalten Sie den Treppenlift mit dem Schlussel aus. 2 Fuhren Sie den Notfall-Drehknopf ein (Abb. 16). Das Loch fur den Notfall-Drehknopf befindet sich unabhängig vom Modell immer auf der nach unten weisenden Seite des Hauptgehäuses.
Sicherheit und Wartung Jährliche Wartung Diese Arbeiten mussen von einem Fachmann, d.h. von einem von Handicare zugelassenen Händler, ausgefuhrt werden. Im Zweifelsfalle wenden Sie sich bitte an die Kundendienstabteilung von Handicare unter +44 (0) 8700 118282. Wenn der Treppenlift Ihr Eigentum ist und Sie ihn nicht mehr benötigen, können Ihr Händler oder Handicare daran interessiert sein, ihn Ihnen abzukaufen.
Routinemäßige Pflege und Wartung Pflege und Aufladen der Batterie Ihr Minivator-Treppenlift ist batteriebetrieben und funktioniert fur eine gewisse Zeit, selbst wenn die Spannungsversorgung unterbrochen ist. Sie sollten in der Lage sein, mindestens 10 Mal die Treppe heraufund hinunterzufahren, ohne dass die Batterien geladen werden mussen. Insbesondere bei Stromausfall mussen Sie jedoch immer darauf achten, dass fur sicheren Betrieb ausreichend Licht vorhanden ist.
Anhang 1 Diagnoseanzeige Code: Keiner Bedeutung: Keine Anzeige. Selbsthilfemaßnahmen: Den Wechselschalter drücken und überprüfen, ob die Anzeige leuchtet. Überprüfen, ob der Hauptschalter am Lift eingeschaltet ist. Wenn der Fehler dadurch nicht behoben wird, mit Ihrem Händler oder Handicare Kontakt aufnehmen. Code: Okay Bedeutung: Lädt auf. Selbsthilfemaßnahmen: Wenn der Lift nicht verfährt überprüfen, ob die Armlehnen heruntergeklappt sind.
Anhang 1 5 Code: 5 Bedeutung: Endanschlag aktiviert. Code: 6 Bedeutung: Sicherheitskante (Richtung hoch/runter) aktiviert – Fußauflage. Selbsthilfemaßnahmen: Mit Ihrem Händler oder Handicare Kontakt aufnehmen. DEUTSCH Selbsthilfemaßnahmen: Mit Ihrem Händler oder Handicare Kontakt aufnehmen. 6 7 Code: 7 Bedeutung: Batterien haben kritisches Niveau erreicht. Selbsthilfemaßnahmen: Die Batterien des Treppenlifts müssen aufgeladen werden.
Anhang 1 Code: d Bedeutung: Das Hauptspannungsrelais ist verschweißt. Selbsthilfemaßnahmen: Mit Ihrem Händler oder Handicare Kontakt aufnehmen. F Code: F Code: H Bedeutung: Das Hauptspannungsrelais hat zu früh geschlossen. Selbsthilfemaßnahmen: Mit Ihrem Händler oder Handicare Kontakt aufnehmen. L Code: L Bedeutung: Stromgrenze überschritten. Selbsthilfemaßnahmen: Mit Ihrem Händler oder Handicare Kontakt aufnehmen. 40 HANDBUCH Code: E Bedeutung: Das Hauptspannungsrelais hat nicht geschlossen.
Anhang 1 Code: o Bedeutung: Speicherproblem auf der Hauptsteuerplatine. Code: P Bedeutung: Angetriebener Drehstuhl spricht nicht an. Selbsthilfemaßnahmen: Mit Ihrem Händler oder Handicare Kontakt aufnehmen. DEUTSCH Selbsthilfemaßnahmen: Mit Ihrem Händler oder Handicare Kontakt aufnehmen. P Code: r Bedeutung: Kein Ladestrom. Selbsthilfemaßnahmen: Stellen Sie sicher, dass die Spannungsversorgung am Netz eingeschaltet ist.
SCHARNIERVERRIEGELUNG ANSCHLUSS KEINE VERBINDUNG KEINE VERBINDUNG KEINE VERBINDUNG GEMEIN KEINE VERBINDUNG GEMEIN ALLE KONTAKTE NORMAL GESCHLOSSEN AUSSER RICHTUNG ENDAUSSCHALTER ENDSTOP ENDSTOP SICHERHEITSKANTE SICHERHEITSKANTE RICHTUNG 9-WEG-ANSCHLUSS 8-WEG-ANSCHLUSS EIN 1 1 2 3 2 3 INFRAROT/FUNK LERN-KNOPF STROM FUSSAUFLAGE DIAGNOSE-ANZEIGE EIN EXTERNE DIAGNOSE 4 DIP-SCHALTER 2 4 LADEN POSITIV (33VDC) BREMS-ANSCHLUSS (24VDC) FRONTPLATTE LED ANSCHLUSS INFRAROT/ FUNK SCHARNIER
ENDSCHALTER 3 4 M2 NEGATIVE KOMMUNIKATION 1 (BELIEBIGE VERBINDUNG BENUTZEN) (BELIEBIGE VERBINDUNG BENUTZEN) DIP-SCHALTER 1 2 EIN M1 DREHMOTOR 2 3 4 2 3 4 2 3 4 2 3 4 2 3 4 DEUTSCH STROM FUSSAUFLAGE – SMART-SITZ 1 EIN STROM DREHSITZ – SMART-SITZ 1 EIN STROM DREHSITZ – LUX/SS 1 EIN 2000 SCHARNIER 1 EIN 1000 SCHARNIER 1 EIN DIP-SCHALTER-EINSTELLUNGEN MS 126 Platine Angetriebener Drehsitz Anhang 2 – Schaltpläne HANDBUCH 43 43
Anhang 3 – Konformitätszertifikat Wir Handicare 82 First Avenue, Pensnett Estate, Kingswinford West Midlands DY6 7FJ, England.
Installationsinformationen (Unternehmensname) Seriennummer: Installationsdatum: Fälligkeitsdatum des ersten Service: Händlerstempel: HANDBUCH 45 45 DEUTSCH Installiert durch: ENGLISH Wichtige Informationen uber Ihren Treppenlift, die vom Installationstechniker ausgefullt werden mussen.
Introduction Matières Nous vous remercions d’avoir choisi un monteescalier Minivator de Handicare. Veuillez lire soigneusement les présentes consignes. Votre monte-escalier Minivator a fait l’objet d’une conception et d’une construction particulièrement soignée et détaillée. Caractéristiques de votre monte-escalier Minivator . . . . . . . . . . . . . .
Caractéristiques de votre monte-escalier Minivator 1 Siège escamotable 5 Interrupteur à clé convivial 2 Siège pivotant 6 Accoudoirs pliants 3 Télécommande à infrarouge 7 Écran de dépannage 4 Repose-pieds escamotable avec rives de sécurité 6 FRANÇAIS 3 6 2 5 1 7 4 GUIDE DE L’UTILISATEUR 47 47
Commande de votre monte-escalier Minivator Figure 1 Préparatifs avant l’emploi Avant d’utiliser votre monte-escalier, VEUILLEZ OBLIGATOIREMENT vous assurer que les escaliers sont dégagés de toute personne, ou animal domestique ou objet quelconque, qui pourraient encombrer le passage. Ensuite, pour votre sécurité, veillez à ce que les accoudoirs, le repose-pieds et le siège soient abaissés à fond (Figure 1).
FRANÇAIS Commande de votre monte-escalier Minivator Figure 3 Interrupteur à clé Votre monte-escalier Minivator est muni d’un interrupteur à clé (Figure 3). Il ne peut fonctionner que si la clé est introduite et tournée à la position Marche. L’interrupteur à clé vous permet de bloquer votre monte-escalier et d’interdire toute utilisation inadvertante (notamment par les enfants). Vous pouvez cependant le laisser en position de marche si vous le souhaitez.
Commande de votre monte-escalier Minivator Figure 5 Figure 6 Télécommande Écran de diagnostic La télécommande (Figure 5) sert à appeler l’appareil en haut ou en bas de l’escalier, ou à commander un rail articulé motorisé selon le modèle. Elle peut également être utilisée par une personne accompagnante si la personne assise dans le monte-escalier n’est pas en mesure de le faire fonctionner à elle seule.
Commande de votre monte-escalier Minivator Commande du siège pivotant Un siège pivotant est prévu pour vous aider à monter/descendre plus facilement sur le palier en haut de l’escalier. Avant d’actionner le pivot du siège, attendez l’arrêt du monte-escalier. N’essayez pas de quitter le siège tant que vous n’aurez pas senti le déclic de verrouillage.
Commande de votre monte-escalier Minivator Figure 8 Figure 9 Pliage de votre monte-escalier Au repos, le siège de votre monte-escalier Minivator et le repose-pieds sont escamotables, ce qui facilite le passage dans l’escalier (Figure 8). CONSIGNES DE SÉCURITÉ PAR PRECAUTIONS EN VUE DE NE PAS OBSTRUER LES SORTIES, REPLIEZ TOUJOURS LE MONTE-ESCALIER (ACCOUDOIRS, SIEGE ET REPOSE-PIEDS) ET METTEZ LE SIEGE PARALLELE AU RAIL, COMME ILLUSTRÉ EN FIGURE 8.
Commande de votre monte-escalier Minivator Rail à glissière ou Rail articulé Minivator Certaines situations peuvent nécessiter un rail articulé ou un rail à glissière Minivator, notamment pour tenir le rail à l’écart d’une porte située en bas de l’escalier.
Commande de votre monte-escalier Minivator Locking bolt Figure 11 Rail à glissière Minivator (en option) – suite à glissière s’arrêteront dès que vous lâcherez le bouton ascendant. Pour continuer, appuyez à nouveau et maintenez appuyé le bouton ascendant. Après un court délai, le mouvement recommence. AVERTISSEMENT AVANT DE PILOTER LE RAIL À GLISSIÈRE, VEILLEZ À ENLEVER TOUT OBSTACLE ÉVENTUELLEMENT PRÉSENT SUR LE CHEMIN.
FRANÇAIS Commande de votre monte-escalier Minivator Figure 13 il s’arrête – CONTINUEZ D’AGIR SUR LA MANETTE DE COMMANDE DANS LE SENS DE LA DESCENTE. Le siège émet alors 3 bips sonores tandis que le rail articulé se déplie automatiquement (Figure 13). Une fois le rail articulé entièrement déplié, le monte-escalier continuera jusqu’en bas de l’escalier. Figure 14 AVERTISSEMENT AVANT DE PILOTER LE RAIL ARTICULÉ, VEILLEZ À ENLEVER TOUT OBSTACLE ÉVENTUELLEMENT PRÉSENT SUR LE CHEMIN.
Soins et maintenance périodiques Figure 15 Consignes d’enroulement manuel en cas d’urgence Une procédure d’enroulement manuel est prévue dans le cas improbable d’une panne totale d’alimentation du monte-escalier ou de dépassement de la butée finale du rail. Les consignes à suivre sont les suivantes: 1 Éteignez le monte-escalier à l’aide de l’interrupteur à clé. 2 Introduisez la poignée d’enroulement d’urgence (Figure 15).
Sécurité et révision Révision annuelle Nous vous conseillons de faire réviser votre monte-escalier AU MOINS TOUS LES ANS après les 12 premiers mois, et de faire remplir le carnet de révision régulièrement comme justificatif des travaux de maintenance préconisés. Le non respect de cette consigne risque d’annuler la garantie de votre monte-escalier. La révision sera obligatoirement réalisée par une personne compétente, par ex. un revendeur Handicare agréé.
Soins et maintenance périodiques Entretien et recharge de la batterie Entretien et nettoyage Votre monte-escalier Minivator est alimenté par batterie et continuera de fonctionner pendant une période de temps, même en cas de coupure de courant. Normalement, vous devriez pouvoir monter et descendre les escaliers au moins 10 fois avant d’avoir à recharger les batteries.
Appendice 1 Écran de dépannage Code: Aucun Description: Aucun code affiché. Mesure autocorrectrice: Appuyez sur la manette de commande et vérifiez que l’écran s’allume. Vérifiez que le témoin indicateur de courant secteur est allumé sur le monte-escalier. Si le défaut n’est toujours pas remédié, contactez votre revendeur ou la société Handicare. Code: OK Description: Recharge en cours. Mesure autocorrectrice: Si le monte-escalier ne marche pas, vérifiez que les accoudoirs sont bien abaissés.
Appendice 1 Code: 5 Description: Déclenchement d’un détecteur limiteur final. Mesure autocorrectrice: Contactez votre revendeur ou la société Handicare. 7 Code: 7 Description: Le niveau de charge des batteries atteint un niveau critique. Mesure autocorrectrice: Les batteries de votre monte-escalier ont besoin d’être rechargées. Déplacez le monte-escalier jusqu’aux plots de recharge – si le code OK ne s’affiche pas, contactez votre revendeur ou la société Handicare.
Appendice 1 Code: d Description: Le relais du courant secteur est soudé fermé. Mesure autocorrectrice: Contactez votre revendeur ou la société Handicare. F Code: F Description: Défaut de semi-conducteur de frein. Mesure autocorrectrice: Contactez votre revendeur ou la société Handicare. H Code: H Description: Fermeture précoce du relais d’alimentation secteur. Mesure autocorrectrice: Contactez votre revendeur ou la société Handicare. L Code: L Description: Limite de courant dépassée.
Appendice 1 Description: La carte de commande principale indique un problème de mémoire. Mesure autocorrectrice: Contactez votre revendeur ou la société Handicare. Code: r Description: Pas de courant de charge. Mesure autocorrectrice: Assurez-vous que le courant secteur est bien allumé. S’il est allumé, contactez votre revendeur ou la société Handicare. Code: y Description: Défaut logiciel sur la carte de commande principale. Mesure autocorrectrice: Contactez votre revendeur ou la société Handicare.
SÉCURITÉ RAIL ARTICULÉ CONNECTEUR PAS DE CONNEXION PAS DE CONNEXION PAS DE CONNEXION COM PAS DE CONNEXION COM TOUS CONTACTS NORMALEMENT FERMÉS SAUF DIRECTION BUTÉE DE FIN DE COURSE BUTÉE BUTÉE RIVE DE SÉCURITÉ RIVE DE SÉCURITÉ DIRECTION MARCHE 1 3 4 2 3 4 INFRAROUGE/RADIO BOUTON DIDACTIQUE CONNECTEUR A 8 VOIES MARCHE 2 COMMUTATEUR DIP 2 CHARGE POSITIVE (33VDC) FREIN CONNECTEUR (24VDC) PANNEAU AVANT CONNEXION DEL INFRAROUGE\RADIO ARTICULATION RAIL ARTICULATION RAIL MOTEUR 1 MOTE
FINS DE COURSE 3 4 M2 NÉGATIVE (UTILISEZ N’IMPORTE QUELLE CONNEXION) COMMUTATEUR DIP 1 2 MARCHE M1 MOTEUR PIVOTEMENT (UTILISEZ N’IMPORTE QUELLE CONNEXION) COMMS 1 2 3 4 2 3 4 2 3 4 2 3 4 2 3 4 FRANÇAIS REPOSE-PIEDS ÉLECTRIQUE – SIÈGE SMART 1 ON PIVOTEMENT ÉLECTRIQUE – SIÈGE SMART 1 MARCHE PIVOTEMENT ÉLECTRIQUE – LUX/SS 1 MARCHE ARTICULATION 2000 1 MARCHE ARTICULATION 1000 1 MARCHE RÉGLAGES COMMUTATEURS DIP Circuit imprimé MS 126 Dispositif de pivotement Appendi
Appendice 3 – Certificat de conformité Nous Handicare de 82 First Avenue, Pensnett Estate, Kingswinford West Midlands DY6 7FJ, Angleterre.
Informations relatives à l’installation Informations importantes sur votre monte-escalier, à remplir par l’installateur.
Introducción Contenido Gracias por elegir la silla elevadora de Minivator. Por favor lea estas instrucciones detenidamente. Su silla elevadora Minivator ha sido diseñada y construida prestando gran atención al detalle. Características de su silla elevadora Minivator . . . . . . . . . . . . . . . . . . . . 69 Para lograr muchos de años libres de problemas siga las instrucciones, prestando especial atención a los requisitos de cuidado y mantenimiento.
Características de su silla elevadora Minivator 1 Plegado de la base de su asiento 5 Control de llave de contacto fácil de operar 2 Giro del asiento 6 Apoyabrazos plegables 3 Control a distancia infrarrojo 7 Visualización de diagnóstico 4 Plegado del reposapiés con bordes de seguridad 3 6 6 2 ESPAÑOL 5 1 7 4 MANUAL DEL USUARIO 69
Operación de su silla elevadora Minivator Figura 1 Antes de usar Antes de usar su silla elevadoras, LO MÁS IMPORTANTE, es asegurarse de que las escaleras están despejadas de gente, animales y otros objetos que puedan obstruir su silla elevadora. Luego cerciórese de que los brazos, el reposapiés y el asiento están desplegados para su uso a fin de garantizar su seguridad (Figura 1). Por su seguridad la silla elevadora no funcionará con la palanca de operación a menos que ambos brazos hayan sido bajados.
Operación de su silla elevadora Minivator Llave de contacto Su silla elevadora Minivator viene con una llave de contacto instalada (Figura 3). La silla elevadora no funcionará a menos que se meta la llave y se ponga en la posición de encendida (on). La llave de contacto se suministra para permitirle bloquear su silla elevadora y prevenir que otros la usen (por ejemplo los niños). Sin embargo, se puede dejar en la posición de encendido (on) si lo desea.
Operación de su silla elevadora Minivator Figura 5 Control a distancia El mando de control a distancia (Figura 5) se utiliza para llamar a la silla elevadora bien hacia arriba o hacia abajo de las escaleras o para operar una bisagra de plegamiento automática cuando esté instalada. El mando podrá ser utilizado también por un asistente cuando el usuario no pueda operar la silla elevadora por sí mismo. El asistente deberá permanecer siempre fuera de la escalera hasta que la silla elevadora se haya detenido.
Operación de su silla elevadora Minivator Operar el giro Se proporciona un asiento de giro para que pueda subirse y bajarse del asiento con más facilidad, arriba de las escaleras, girándolo hacia el rellano. Para operar el giro del asiento, espere hasta que la silla elevadora se haya parado. Para girar el asiento sujete bien la palanca de giro (hay una en cada lado del asiento) hacia abajo o tire de ella hacia arriba (sólo hacia arriba en el modelo Simplicity 950).
Operación de su silla elevadora Minivator Figura 8 Figura 9 Plegar su silla elevadora El reposapiés, el apoyabrazos y el asiento de su silla elevadora Minivator se pueden plegar para hacer más fácil el pasaje hacia arriba y hacia abajo de las escaleras cuando no esté en uso (Figura 8). PRECAUCIÓN DE SEGURIDAD DEVUELVA SIEMPRE LA SILLA ELEVADORA A SU POSICIÓN DE GUARDAR. I.E.
Operación de su silla elevadora Minivator Riel de bisagra o riel de deslizamiento Minivator En ciertas instalaciones puede que sea necesario un Riel de bisagra o un riel de deslizamiento Minivator, normalmente para despejar el riel de la puerta al pie de las escaleras.
Operación de su silla elevadora Minivator pernos de fijación Figura 11 Riel de deslizamiento Minivator (opcional) – continuación moverse. Para continuar, presione y mantenga presionado el botón UP de nuevo. Después de un breve retardo se reiniciará el movimiento de nuevo. AVISO ANTES DE OPERAR EL RIEL DE DESLIZAMIENTO QUITE CUALQUIER OBSTÁCULO QUE PUEDA OBSTRUIR EL RIEL.
Operación de su silla elevadora Minivator En este punto el asiento emitirá un pitido tres veces mientras el riel de bisagra se despliega automáticamente por si solo (Figura 13). Cuando la bisagra esté totalmente abierta la silla elevadora continuará hasta abajo de las escaleras. Estacionar la silla elevadora CUANDO NO SE ESTÉ UTILIZANDO LA SILLA ELEVADORA DEBERÁ MOVERSE A SU POSICIÓN DE ESTACIONAMIENTO PARA QUE NO CAUSE OBSTRUCCIÓN.
Operación de su silla elevadora Minivator Figura 16 Instrucciones para el rebobinado manual de emergencia En el caso improbable de que la silla elevadora tenga un fallo de corriente o marcha hasta los topes finales del riel. Siga los pasos a continuación: 1 Apague la silla elevadora con la llave. 2 Introduzca el tirador de rebobinado manual de emergencia (Figura 16).
Seguridad y mantenimiento Servicio de mantenimiento anual Recomendamos que la silla elevadora reciba servicio de mantenimiento después de los 12 primeros meses y POR LO MENOS CADA 12 MESES TRAS ESTO. Se debe rellenar con regularidad un registro del servicio de mantenimiento recibido como prueba de un mantenimiento específico. Si no hace esto podría invalidar la garantía del producto. Este trabajo deberá ser llevado a cabo por una persona competente, ej. un distribuidor autorizado de Handicare.
Mantenimiento y cuidado rutinarios Carga y cuidado de la batería La silla elevadora de Minivator funciona con batería y seguirá funcionando durante un periodo de tiempo incluso si hay un corte de luz. Normalmente podrá desplazarse hacia arriba y hacia abajo de las escaleras al menos 10 veces sin la necesidad de cargar la batería.
Apéndice 1 Visualización de diagnóstico Código: Significa: Okay (bien) Cargando Acción de auto ayuda: Si la silla elevadora no se desplaza compruebe que los brazos están bajados. Si esto no corrige el fallo, póngase en contacto con su distribuidor o Handicare. 1 Código: 1 Significa: Tiene que cargarse. Acción de auto ayuda: La batería de la silla elevadora necesita cargarse.
Apéndice 1 5 Código: 5 Significa: Limites finales activados. 6 Código: 6 Acción de auto ayuda: Contacte con su distribuidor o con Handicare. Significa: Borde de seguridad (dirección arriba/abajo) activado; reposapiés. Acción de auto ayuda: Contacte con su distribuidor o con Handicare. Código: 7 Significa: El nivel de la batería se aproxima a nivel crítico. Acción de auto ayuda: La batería de la silla elevadora necesita cargarse.
Apéndice 1 Código: d Significa: El relé principal está cerrado. Acción de auto ayuda: Contacte con su distribuidor o con Handicare. F Código: F Significa: Semi-conductor de freno ha fallado. Acción de auto ayuda: Contacte con su distribuidor o Handicare. H Código: H Significa: El relé principal se ha cerrado con anticipación. Acción de auto ayuda: Contacte con su distribuidor o Handicare. L Código: L Significa: Límite de corriente excedido.
Apéndice 1 Código: o Significa: El panel del control principal tiene un problema de memoria. Acción de auto ayuda: Contacte con su distribuidor o Handicare. Código: r Significa: Sin corriente de carga. Código: P Significa: El giro automático no responde. Acción de auto ayuda: Contacte con su distribuidor o Handicare. Código: U defectuoso. u Significa: Suministro de potencia Acción de auto ayuda: Contacte con su distribuidor o Handicare.
BLOQUEO DE BISAGRA CONECTOR SIN CONEXIÓN SIN CONEXIÓN SIN CONEXIÓN COM SIN CONEXIÓN COM TODOS LOS CONTACTOS NORMALMENTE CERRADO EXCEPTO DIRECCIÓN LIMITE FINAL TOPE FINAL TOPE FINAL BORDE DE SEGURIDAD BORDE DE SEGURIDAD DIRECCIÓN CONECTOR DE 9 HILOS CONECTOR DE 8 HILOS ON (Activado) 1 2 3 4 2 3 4 FRENO CONECTOR (24VDC) CARGA POSITIVA (33VDC) BISAGRA MOTOR 1 MOTOR 2 BATERIA NEGATIVA BATERIA POSITIVA (24VDC) 1 3 DIP 2 2 1 4 PING INHABILITADO ON (Activado) PLATAFORMA HABILITAD
LIMITES FINALES 3 4 INTERRUPTOR DIP 1 2 ON (Activado) M2 NEGATIVO (USAR CUALQUIER CONEXIÓN) M1 MOTOR DEL GIRO ESPAÑOL (USAR CUALQUIER CONEXIÓN) COMMS 1 2 3 4 2 3 4 2 3 4 2 3 4 2 3 4 REPOSAPIÉS AUTOMÁTICO – REPOSAPIÉS INTELIGENTE 1 ON (Activado) GIRO AUTOMÁTICO – ASIENTO INTELIGENTE 1 ON (Activado) GIRO AUTOMÁTICO - LUX/SS 1 ON (Activado) BISAGRA 2000 1 ON (Activado) BISAGRA 1000 1 ON (Activado) CONFIGURACIONES DEL INTERRUPTOR DIP PCB del giro automático MS 126
Apéndice 3 – Certificado de conformidad Nosotros Handicare of 82 First Avenue, Pensnett Estate, Kingswinford West Midlands DY6 7FJ, England.
Información de instalación Información importante sobre su silla elevadora que deberá ser completada por el técnico de instalación. Instalado por: (Nombre de la compañía) Núm.
Introduzione Contenuti Grazie per aver scelto un montascale Minivator. Leggete attentamente queste istruzioni. Il vostro montascale Minivator é stato disegnato e costruito con attenzione ai dettagli. Caratteristiche del vostro montascale Minivator . . . . . . . . . . . . . . . . . . 91 In modo da avere tanti anni senza preoccupazioni si prega di seguire le istruzioni, facendo particolare attenzione alle esigenze di cura e manutenzione.
Caratteristiche del vostro montascale Minivator 1 Sedile pieghevole 5 Interrutore chiave di controllo facile da operare 2 Sedile girevole 6 Braccioli pieghevoli 3 Controllo a distanza infrarosso 7 Display diagnostico 4 Poggiapiedi pieghevole con bordi di sicurezza 3 6 6 2 5 ITALIANO 1 7 4 MANUALE UTENTE 91
Operare il vostro montascale Minivator Figura 1 Prima dell’uso Prima di usare il vostro montascale, LA COSA PIU’ IMPORTANTE é che vi assicuriate che le scale sono libere da altre persone, animali o alcun oggetto che puó ostruire il vostro montascale. Assicuratevi poi che le braccia, la piattaforma ed il sedile sono ripiegati per l’uso per assicurarvi della vostra sicurezza (Figura 1).
Operare il vostro montascale Minivator Figura 4 Interruttore chiave Leva operativa Il vostro montascale Minivator é dotato di una chiave (Figura 3). Il montascale non puó essere operato a meno che la chiave sia inserita e messa in posizione on. Il vostro montascale Minivator si opera semplicemente pressando e tenendo premuto la leva operativa nella direzione che desiderate viaggiare (Figura 4).
Operare il vostro montascale Minivator Figura 5 Figura 6 Controllo a distanza Display diagnostico Il controllo a distanza (Figura 5) é usato per chiamare l’ascensore sia dall cima che dal fondo delle scale o per operare una cerniera pieghevole potenziata se installata. Il controllo puó essere usato da un aiutante quando l’utente non puó operare il montascale da solo. Il montascale é provvisto di un display diagnostico (Figura 6) che mostra un codice per aiutare a diagnosticare guasti.
Operare il vostro montascale Minivator Operare il perno Un sedile a perno é fornito per permettrvi di salire/scendere dal sedile piú facilmente in cima alle scale girandovi sul pianerottolo. Per operare il perno del sedile, aspettate che il montascale si sia fermato. Per girare il sedile tenete qualsiasi(ce ne una in ogni lato del sedile) leva del perno verso il basso o l’alto (verso l’alto solo per il modello Semplicity 950).
Operare il vostro montascale Minivator Figura 8 Figura 9 Ripiegare il vostro montascale Il sedile, braccioli e poggiapiedi del vostro montascale Minivator possono essere ripiegati per permettere di andare su e giú per le scale piú facilmente quando non in uso (Figura 8). PRECAUZIONI DI SICUREZZA RIPORTATE SEMPRE L’ASCENSORE NELLA POSIZIONE RIPIEGATA.
Operare il vostro montascale Minivator Minivator Slide Track o traccia a cerniera In alcune installazioni una traccia a cerniera o Minivator Slide Track puó essere necessario, in genere spostando la traccia dall’entrata ai piedi della scala.
Operare il vostro montascale Minivator Bullone di chiusura Figura 11 Figura 12 Minivator Slide Track Traccia a cerniera (opzionale) – continua potenziata (opzionale) Controllo Manuale d’emergenza Andando su per le scale La vostra Slide Track é dotata di un controllo manuale che permette alla traccia di essere spostata in caso d’emergenza. Questa é posizionata verso il fondo della traccia (Figura 10).
Operare il vostro montascale Minivator In quel moment il sedile bipperá tre volte mentre la traccia a cerniera si aprirá da sola (Figura 13). Quando la cerniera é aperta completamente il montascale continuerá fino alla cima delle scale. Parcheggiare il montascale QUANDO L’ASCENSORE NON E’ IN USO DOVREBBE ESSERE SPOSTATO DAL FONDO DELLE SCALE IN MODO CHE NON CAUSA ALCUNA OSTRUZIONE. IL MONTASCALE NON SI CARICA QUANDO E’ PARCHEGGIATO AL FONDO DELLE SCALE.
Operare il vostro montascale Minivator Figura 16 Istruzioni d’emergenza per avvolgimento a mano Nell’improbabile evento che l’ascensore abbia una completa interruzione di corrente o non vada sui nottoli d’arresto della traccia c’é una procedura d’emergenza per avvolgimento a mano. Per favore seguite questi punti: 1 Spegnete il montascale con la chiave. 2 Inserite la manopolo per l’avvolgimento a mano (Figura 16).
Sicurezza e manutenzione Manutenzione annuale Vi consigliamo di manutenzionare il vostro montascale dopo i primi 12 mesi e successivamente ALMENO OGNI 12 MESI. Il registro con la storia della manutenzione deve essere riempito regolarmente come prova di una manutenzione specifica. In caso d’inosservanza la garanzia del prodotto potrebbe risultare non valida. Questo lavoro deve essere eseguito da una persona competente, per esempio un rivenditore approvato Handicare.
Cura e manutenzione di routine Cura della batteria e carica Il vostro montascale Minivator va a batteria e continuerá a lavorare per un certo periodo anche quando vi é un blocco di corrente. Dovreste riuscire ad andare su e giú per le scale almeno 10 volte senza bisogno di caricare le batterie. Specialmente nel caso di un blocco di corrente dovreste assicurarvi che ci sia luce sufficente per viaggiare in sicurezza, e specialmente alle estremitá della traccia dove salite e scendete dall’ascensore.
Appendice 1 Display diagnostico Codice: Nessuno Significato: Nessun display. Azione autonoma: Premete l’interruttore a leva e guardate se il dispaly si accende. Controllate che l’interruttore di corrente principale sull’ascensore é acceso. Se questo non risolve il guasto, contattate il vostro rivenditore o Handicare. Codice: Okay Significato: Carica. Azione autonoma: Se l’ascensore non viaggia assicurarsi che le braccia siano in basso.
Appendice 1 5 Codice: 5 Significato: Nottoli d’arresto attivati. 6 Code: 6 Azione autonoma: Contattate il vostro rivenditore o Handicare. Significato: Bordo di sicurezza (direzione su/giú) attivato – piattaforma. Azione autonoma: Contattate il vostro rivenditore o Handicare. Codice: 7 Significato: Le batterie stanno raggiungendo un livello critico. Azione autonoma: Le batterie del montascale devono essere caricate.
Appendice 1 Codice: d Significato: L’invertitore principale di potenza é saldato. Azione autonoma: Contattate il vostro rivenditore o Handicare. F Codice: F Significato: Guasto al freno semi-conduttore. Azione autonoma: Contattate il vostro rivenditore o Handicare. H Codice: H Significato: L’invertitore principale di potenza ha chiuso in anticipo. Azione autonoma: Contattate il vostro rivenditore o Handicare. L Codice: L Significato: Limite corrente superato.
Appendice 1 Significato: Il pannello di controllo principale ha un problema di memoria. Azione autonoma: Contattate il vostro rivenditore o Handicare. Codice: r Significato: Nessuna carica di corrente. Azione autonoma: Controllare che il generatore di potenza é acceso in riferimento ai generatori principali. Se si contattate il vostro rivenditore o Handicare. Codice: Y Significato: Il pannello di controllo principale ha un problema di software.
COM NESSUNA CONNESSIONE CERNIERA A BLOCCO CONNETTORE TUTTI CONTATTI CHIUSO NORMALMENTE ECCETTO DIREZIONE ARRESTO FINALE NOTTOLO D’ARRESTO NOTTOLO D’ARRESTO NESSUNA CONNESSIONE NESSUNA CONNESSIONE BORDO SICURO BORDO SICURO NESSUNA CONNESSIONE PIATTAFORMA A POTENZA COM CONNETTORE A 8 VIE CONNETTORE A 9 VIE 4 3 DIREZIONE ON DIAGNOSTICA DISPLAY 2 1 DIAGNOSTICA ESTERNA ON PANNELLO FRONTALE CONNESSIONE LED CARICA POSITIVA (33VDC) FRENO CONNETTORE (24VDC) MOTORE 1 CERNIERA CERNIERA INFRA
LIMITI FINALI 3 4 M2 MANUALE UTENTE 109 ITALIANO NEGATIVO (USARE QUALSIASI CONNESSIONE) INTERRUTTORE-DIP 1 2 ON M1 PERNO MOTORE (USARE QUALSIASI CONNESSIONE) COMMS 1 2 3 4 2 3 4 2 3 4 1 ON 2 3 4 PERNO A POTENZA – LUX/SS 1 ON CERNIERA 2000 1 ON CERNIERA 1000 1 ON POSIZIONI DEGLI INTERRUTTORI DIP 2 3 4 PIATTAFORMA A POTENZA – SMART SEAT 1 ON PERNO A POTENZA – SMART SEAT MS 126 Perno a Potenza PCB Appendice 2 – Diagramma dei circuiti elettrici
Appendice 3 – Certificato di conformitá Noi Handicare di 82 First Avenue, Pensnett Estate, Kingswinford West Midlands DY6 7FJ, Inghilterra.
Informazioni di installazione Importanti informazioni circa il vostro montascale che dovrebbero essere completate dal vostro ingegnere installatore.
Handicare, 82 First Avenue, Pensnett Estate Kingswinford, West Midlands DY6 7FJ, England Customer Services: +44 (0) 8700 118282 Textphone: (180015) 020 7490 8913 ext 05 Voicephone: (18002) 020 7490 8913 ext 05 Email: sales@handicare.co.uk www.handicare.co.uk Handicare Treppenlifte GmbH, Gesellenweg 7 32427 Minden, Deutschland Tel: +49 (0) 571 97 33 980 Fax: +49 (0) 571 97 33 9833 Email: treppenlifte@handicare.de www.handicare.