
User manual


miniDSP Ltd, Hong Kong / www.minidsp.com / Features and speci fi cations subject to change without prior noti ce 22
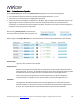
3.4.3 Output & Levels tab
The Output & Levels tab is used to set the signal levels used in the subsequent measurement:
1. Set Output volume quite low. If you have another volume control “down-stream” of the nanoAVR DL, set it
about halfway (or around -20 dB) and increase it later if needed.
2. Connect an HDMI source to the currently selected HDMI input. (This is needed so that audio can be
transmitted over the HDMI output.)
3. Click on the Test button for the left channel and gradually increase the output volume until it is at a
moderate level, such that your voice would have to be raised to converse with someone sitting next to you .
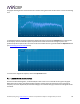
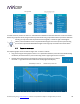
4. Increase the Input gain slider until the blue bar on the level meter reaches up into the green section:
5. Click again on the Test button for the left channel to stop the test signal.
6. Click on the Test button for each of the remaining channels. If any channel is not in the green zone, use its
Channel volume slider to adjust the volume of the test signal for that channel. (Some readjustment of
Input gain and Output volume to get all channels “green” may also be required.)
The nanoAVR DL requires an active video signal input in order to output audio data. This is
because HDMI inserts the audio data between the video frames. If you do not hear audio when
pressing a Test button, ensure that an HDMI video source is connected, selected, and not asleep.
When done, click the Proceed button.