
User manual
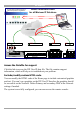


Table Of Contents
- 1. Welcome
- 2. Introduction
- 3. Features of DX User IP
- 4. DX User IP components
- 5. Cables
- 6. DX User IP front panel
- 7. DX User IP rear panel
- 8. Rack mounting the DX User IP
- 9. Pre-installation guidelines
- 10. Mouse synchronization limitations
- 11. DX User IP connections
- 12. Connecting the DX User IP to the Wan/LAN
- 13. Local User
- 14. Connecting an RS232 terminal
- 15. Order of powering on
- 16. Configuring the system
- 17. The DX User IP system interface
- 18. Logging in
- 19. Timeout
- 20. The Work area
- 21. Remote Console Settings
- 22. Telnet Console
- 23. Status via IPMI
- 24. Event Log via IPMI
- 25. File transfer – Virtual Floppy
- 26. Power Control
- 27. Keyboard & Mouse Settings
- 28. KVM Settings
- 29. KVM Port Settings
- 30. Video Settings
- 31. User/Group Management
- 32. User/Group Permissions
- 33. Network Settings
- 34. Dynamic DNS
- 35. Serial Port Settings
- 36. Security Settings
- 37. SNMP Settings
- 38. IPMI Settings
- 39. LDAP Settings
- 40. Maintenance
- 41. Accessing the remote console
- 42. Keyboard layout
- 43. The Control buttons /toolbar icons
- 44. The Chat window
- 45. The Video settings
- 46. Video Settings access
- 47. Mouse synchronization
- Frequently Asked Questions
- Glossary of terms
- Appendix A: DX User IP Video modes
- Appendix B: Key codes
- Appendix C: Pin assignments
- Appendix D: Disabling mouse acceleration
- Appendix E: Technical specifications

DX USER IP
59
Intelligent Sync - If fast sync doesn't work or the mouse settings have been changed
on the host system use the Intelligent Sync option.
To do so:
1. Ensure the picture is correctly adjusted, Click Auto Adjust or manually correct
the picture using the Video Settings.
2. Choose Options / Mouse Handling / Intelligent Sync.
Pressing the button leads to a fast sync, except when the video mode
recently changed.
Note! For the intelligent sync to work, the picture MUST be correctly adjusted. Use
the auto adjustment function or the manual correction in the Video Settings panel to
adjust the picture. The video must also be of sufficiently good quality.
Single mouse mode
The information above applies to the Double Mouse Mode, where remote and host
mouse pointers are visible and need to be synchronized. There is also the Single
Mouse mode. In this mode only the client mouse pointer is visible.
Single Mouse mode needs a Sun Java Virtual Machine 1.3 or later.
Select the mode in the Remote console – see Figure 44.
From the Options menu choose Mouse Handling/Mouse Mode/ Single Mouse Mode.
Or press from the Control Buttons toolbar. The client mouse pointer can be
controlled directly.
To leave this mode, you must define a mouse hotkey in the Remote Console Settings
Panel – see page 18. Press this key to free the captured host mouse pointer.