
User manual
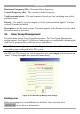

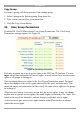

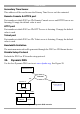

Table Of Contents
- 1. Welcome
- 2. Introduction
- 3. Features of DX User IP
- 4. DX User IP components
- 5. Cables
- 6. DX User IP front panel
- 7. DX User IP rear panel
- 8. Rack mounting the DX User IP
- 9. Pre-installation guidelines
- 10. Mouse synchronization limitations
- 11. DX User IP connections
- 12. Connecting the DX User IP to the Wan/LAN
- 13. Local User
- 14. Connecting an RS232 terminal
- 15. Order of powering on
- 16. Configuring the system
- 17. The DX User IP system interface
- 18. Logging in
- 19. Timeout
- 20. The Work area
- 21. Remote Console Settings
- 22. Telnet Console
- 23. Status via IPMI
- 24. Event Log via IPMI
- 25. File transfer – Virtual Floppy
- 26. Power Control
- 27. Keyboard & Mouse Settings
- 28. KVM Settings
- 29. KVM Port Settings
- 30. Video Settings
- 31. User/Group Management
- 32. User/Group Permissions
- 33. Network Settings
- 34. Dynamic DNS
- 35. Serial Port Settings
- 36. Security Settings
- 37. SNMP Settings
- 38. IPMI Settings
- 39. LDAP Settings
- 40. Maintenance
- 41. Accessing the remote console
- 42. Keyboard layout
- 43. The Control buttons /toolbar icons
- 44. The Chat window
- 45. The Video settings
- 46. Video Settings access
- 47. Mouse synchronization
- Frequently Asked Questions
- Glossary of terms
- Appendix A: DX User IP Video modes
- Appendix B: Key codes
- Appendix C: Pin assignments
- Appendix D: Disabling mouse acceleration
- Appendix E: Technical specifications

DX USER IP
39
The DX User IP acts as an Internet Service Provider (ISP) to which you can dial in.
The connection is established using the Point-to-Point Protocol (PPP).
Before connecting to DX User IP, configure your console computer accordingly. For
instance on Windows based operating systems you can configure a dial-up network
connection, which defaults to the right settings like PPP.
Serial line speed - Most modems today will support the default value of 115200
bps. For older modems lower the speed.
Modem Init String - Initialization string. The default value works with all modern
standard modems connected to a telephone line. For special modems or if connected
to a local telephone switch that requires a special dial sequence to connect to the
public telephone network, change this setting by giving a new string. See the
modem's manual about the AT command syntax.
Modem Server IP address – This address is used only when connecting to DX
User IP via a modem. When you dial into the DX User IP the client computer will
receive a Modem Client IP address from the DX User IP. Open the Web browser
and type Modem server IP address to login to the DX User IP.
The Client IP (see paragraph below) must be in the same class C subnet as the server
IP. This subnet should not conflict with the Ethernet subnet on the client side and
with the Ethernet subnet on DX User IP Network side.
Modem Client IP address - This address is assigned to your console computer
during the PPP handshake. Since it is a point-to-point IP connection virtually every
IP address is possible but ensure, it is not interfering with the IP settings of DX User
IP and your console computer. The default value will work in most cases.
IPMI over Serial - Check to use this Serial port for IPMI 1.5 over serial. See page
47 for more information.
Passthrough access to serial port via Telnet - Connect an arbitrary device to the
serial port and access it (assuming it provides terminal support) via telnet. Select the
appropriate options for the Serial port and use the Telnet Console (see page 19) or a
standard telnet client to connect to DX User IP.
External Power Option – When the External Power Option is the Sentry Power
Tower or Baytec RPC series connected to Serial port 1, configure it by clicking
change external power switch option. The External Power Option for Serial port 1
window appears.
Fill in the Username and password as defined by the Sentry Power Tower.