
User manual

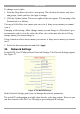

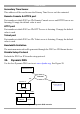

Table Of Contents
- 1. Welcome
- 2. Introduction
- 3. Features of DX User IP
- 4. DX User IP components
- 5. Cables
- 6. DX User IP front panel
- 7. DX User IP rear panel
- 8. Rack mounting the DX User IP
- 9. Pre-installation guidelines
- 10. Mouse synchronization limitations
- 11. DX User IP connections
- 12. Connecting the DX User IP to the Wan/LAN
- 13. Local User
- 14. Connecting an RS232 terminal
- 15. Order of powering on
- 16. Configuring the system
- 17. The DX User IP system interface
- 18. Logging in
- 19. Timeout
- 20. The Work area
- 21. Remote Console Settings
- 22. Telnet Console
- 23. Status via IPMI
- 24. Event Log via IPMI
- 25. File transfer – Virtual Floppy
- 26. Power Control
- 27. Keyboard & Mouse Settings
- 28. KVM Settings
- 29. KVM Port Settings
- 30. Video Settings
- 31. User/Group Management
- 32. User/Group Permissions
- 33. Network Settings
- 34. Dynamic DNS
- 35. Serial Port Settings
- 36. Security Settings
- 37. SNMP Settings
- 38. IPMI Settings
- 39. LDAP Settings
- 40. Maintenance
- 41. Accessing the remote console
- 42. Keyboard layout
- 43. The Control buttons /toolbar icons
- 44. The Chat window
- 45. The Video settings
- 46. Video Settings access
- 47. Mouse synchronization
- Frequently Asked Questions
- Glossary of terms
- Appendix A: DX User IP Video modes
- Appendix B: Key codes
- Appendix C: Pin assignments
- Appendix D: Disabling mouse acceleration
- Appendix E: Technical specifications
DX USER IP
37
DX User IP is reachable via the IP address of the DSL router, which is dynamically
assigned by the provider. Since the administrator doesn't know the IP address
assigned by the provider, DX User IP connects to a special dynamic DNS server in
regular intervals and registers its IP address there. The administrator can contact this
server as well and pick up the same IP address belonging to his card.
The administrator has to register a DX User IP that is supposed to take part in the
service with the Dynamic DNS Server. He will get an approved nickname and
password in return to the registration process. This account information is needed in
order to determine the IP address of the registered DX User IP.
To enable the Dynamic DNS:
1. Ensure the DX User IP LAN interface is properly configured.
2. From the DX User IP menu choose Network Settings / Dynamic DNS. The
Dynamic DNS Settings appear. See Figure 29.
Figure 29 Dynamic DNS Settings
3. Check the Enable Dynamic DNS box.
4. Change the settings as desired.
Hostname - The Hostname registered during manual registration with the Dynamic
DNS Server. Spaces are not allowed in the Hostname.
Username/Password – Fill in the Username and Password.
Check time - DX User IP card registers itself in the Dynamic DNS server at this
time.