
User manual
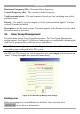

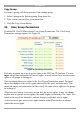
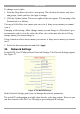

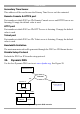

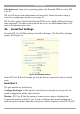
Table Of Contents
- 1. Welcome
- 2. Introduction
- 3. Features of DX User IP
- 4. DX User IP components
- 5. Cables
- 6. DX User IP front panel
- 7. DX User IP rear panel
- 8. Rack mounting the DX User IP
- 9. Pre-installation guidelines
- 10. Mouse synchronization limitations
- 11. DX User IP connections
- 12. Connecting the DX User IP to the Wan/LAN
- 13. Local User
- 14. Connecting an RS232 terminal
- 15. Order of powering on
- 16. Configuring the system
- 17. The DX User IP system interface
- 18. Logging in
- 19. Timeout
- 20. The Work area
- 21. Remote Console Settings
- 22. Telnet Console
- 23. Status via IPMI
- 24. Event Log via IPMI
- 25. File transfer – Virtual Floppy
- 26. Power Control
- 27. Keyboard & Mouse Settings
- 28. KVM Settings
- 29. KVM Port Settings
- 30. Video Settings
- 31. User/Group Management
- 32. User/Group Permissions
- 33. Network Settings
- 34. Dynamic DNS
- 35. Serial Port Settings
- 36. Security Settings
- 37. SNMP Settings
- 38. IPMI Settings
- 39. LDAP Settings
- 40. Maintenance
- 41. Accessing the remote console
- 42. Keyboard layout
- 43. The Control buttons /toolbar icons
- 44. The Chat window
- 45. The Video settings
- 46. Video Settings access
- 47. Mouse synchronization
- Frequently Asked Questions
- Glossary of terms
- Appendix A: DX User IP Video modes
- Appendix B: Key codes
- Appendix C: Pin assignments
- Appendix D: Disabling mouse acceleration
- Appendix E: Technical specifications

USER GUIDE
32
Modify User button
To modify a user:
1. Select a user in the Existing users Drop-down list.
2. Click the lookup button to get all the user's information.
3. All fields can be modified as required. The old password is not displayed, but can
be modified.
4. Click the Modify User button.
Copy User
To copy an existing user’s properties to a new user:
1. Select a user in the Existing user Drop-down list.
2. Enter a new user name in the New user name box.
3. Click the Copy User button. All properties of the selected user will be copied to
the new one, except user specific permissions.
Group Management
The following headings appear under Group Management.
Create group button
To create a group:
1. Type a name into the New group name box
2. Click the Create group button.
Delete Group button
To delete a group:
1. Select a group in the Existing groups Drop-down list.
2. Click the Delete group button.
Modify Group
To modify an existing group select the group in the Existing group control. The
group's name field can be modified. Finally click the Modify group button.