
User manual
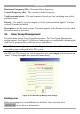

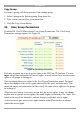
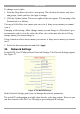


Table Of Contents
- 1. Welcome
- 2. Introduction
- 3. Features of DX User IP
- 4. DX User IP components
- 5. Cables
- 6. DX User IP front panel
- 7. DX User IP rear panel
- 8. Rack mounting the DX User IP
- 9. Pre-installation guidelines
- 10. Mouse synchronization limitations
- 11. DX User IP connections
- 12. Connecting the DX User IP to the Wan/LAN
- 13. Local User
- 14. Connecting an RS232 terminal
- 15. Order of powering on
- 16. Configuring the system
- 17. The DX User IP system interface
- 18. Logging in
- 19. Timeout
- 20. The Work area
- 21. Remote Console Settings
- 22. Telnet Console
- 23. Status via IPMI
- 24. Event Log via IPMI
- 25. File transfer – Virtual Floppy
- 26. Power Control
- 27. Keyboard & Mouse Settings
- 28. KVM Settings
- 29. KVM Port Settings
- 30. Video Settings
- 31. User/Group Management
- 32. User/Group Permissions
- 33. Network Settings
- 34. Dynamic DNS
- 35. Serial Port Settings
- 36. Security Settings
- 37. SNMP Settings
- 38. IPMI Settings
- 39. LDAP Settings
- 40. Maintenance
- 41. Accessing the remote console
- 42. Keyboard layout
- 43. The Control buttons /toolbar icons
- 44. The Chat window
- 45. The Video settings
- 46. Video Settings access
- 47. Mouse synchronization
- Frequently Asked Questions
- Glossary of terms
- Appendix A: DX User IP Video modes
- Appendix B: Key codes
- Appendix C: Pin assignments
- Appendix D: Disabling mouse acceleration
- Appendix E: Technical specifications

DX USER IP
31
New user name
Enter a login name for a new user here. Ensure that it is not the same as an existing
user or group.
Full user name
Write the full name of the new user.
Password / Confirm password
The password must be at least four characters. Confirm password.
Email address /Mobile number
These are optional.
Group membership/Member of/Not Member of
Each user can be a member of one or more groups and inherit the rights of that
group. Use the arrows to add or remove a user from a group.
Existing groups
Select an existing group for copying, modification or deletion.
New group name
To create a new group, enter a new group name.
Create User button
Once the required fields are filled in, click the Create User button to create a new
user.
Delete User button
To delete a user:
1. Select a user in the Existing users Drop-down list.
2. Click the Lookup button. The complete user information appears.
3. Click the Delete User button.
Note: The factory set supervisor user `super' cannot be deleted, but it can be
renamed.