
User manual
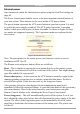
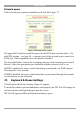
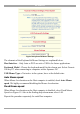
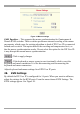
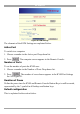
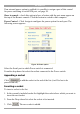
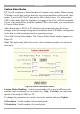
Table Of Contents
- 1. Welcome
- 2. Introduction
- 3. Features of DX User IP
- 4. DX User IP components
- 5. Cables
- 6. DX User IP front panel
- 7. DX User IP rear panel
- 8. Rack mounting the DX User IP
- 9. Pre-installation guidelines
- 10. Mouse synchronization limitations
- 11. DX User IP connections
- 12. Connecting the DX User IP to the Wan/LAN
- 13. Local User
- 14. Connecting an RS232 terminal
- 15. Order of powering on
- 16. Configuring the system
- 17. The DX User IP system interface
- 18. Logging in
- 19. Timeout
- 20. The Work area
- 21. Remote Console Settings
- 22. Telnet Console
- 23. Status via IPMI
- 24. Event Log via IPMI
- 25. File transfer – Virtual Floppy
- 26. Power Control
- 27. Keyboard & Mouse Settings
- 28. KVM Settings
- 29. KVM Port Settings
- 30. Video Settings
- 31. User/Group Management
- 32. User/Group Permissions
- 33. Network Settings
- 34. Dynamic DNS
- 35. Serial Port Settings
- 36. Security Settings
- 37. SNMP Settings
- 38. IPMI Settings
- 39. LDAP Settings
- 40. Maintenance
- 41. Accessing the remote console
- 42. Keyboard layout
- 43. The Control buttons /toolbar icons
- 44. The Chat window
- 45. The Video settings
- 46. Video Settings access
- 47. Mouse synchronization
- Frequently Asked Questions
- Glossary of terms
- Appendix A: DX User IP Video modes
- Appendix B: Key codes
- Appendix C: Pin assignments
- Appendix D: Disabling mouse acceleration
- Appendix E: Technical specifications

DX USER IP
27
If an external power option is enabled it is possible to assign a port of this control
for power switching to each KVM port, see page 20.
Show in console – check this option to have a button with the port name appear on
the top of the Remote console. Click the button to switch to that computer.
Power Control – Click Assign to configure the power option for each port. The
following screen appears.
Figure 22 Power option
Select the Serial port to which Power switch is connected.
From the drop-down list select the outlets connected to the Power switch.
Appending a socket
Click to add the socket to the end of the list (it will be last to be
powered on/off).
Inserting a socket
To insert a socket in the list:
1. In the currently included socket list highlight the socket above which you want to
insert the new socket.
2. From the Drop-down list select the socket to be inserted.
3. Click . The new socket is added.