
User manual
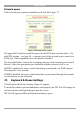
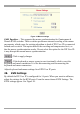
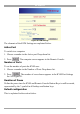
Table Of Contents
- 1. Welcome
- 2. Introduction
- 3. Features of DX User IP
- 4. DX User IP components
- 5. Cables
- 6. DX User IP front panel
- 7. DX User IP rear panel
- 8. Rack mounting the DX User IP
- 9. Pre-installation guidelines
- 10. Mouse synchronization limitations
- 11. DX User IP connections
- 12. Connecting the DX User IP to the Wan/LAN
- 13. Local User
- 14. Connecting an RS232 terminal
- 15. Order of powering on
- 16. Configuring the system
- 17. The DX User IP system interface
- 18. Logging in
- 19. Timeout
- 20. The Work area
- 21. Remote Console Settings
- 22. Telnet Console
- 23. Status via IPMI
- 24. Event Log via IPMI
- 25. File transfer – Virtual Floppy
- 26. Power Control
- 27. Keyboard & Mouse Settings
- 28. KVM Settings
- 29. KVM Port Settings
- 30. Video Settings
- 31. User/Group Management
- 32. User/Group Permissions
- 33. Network Settings
- 34. Dynamic DNS
- 35. Serial Port Settings
- 36. Security Settings
- 37. SNMP Settings
- 38. IPMI Settings
- 39. LDAP Settings
- 40. Maintenance
- 41. Accessing the remote console
- 42. Keyboard layout
- 43. The Control buttons /toolbar icons
- 44. The Chat window
- 45. The Video settings
- 46. Video Settings access
- 47. Mouse synchronization
- Frequently Asked Questions
- Glossary of terms
- Appendix A: DX User IP Video modes
- Appendix B: Key codes
- Appendix C: Pin assignments
- Appendix D: Disabling mouse acceleration
- Appendix E: Technical specifications
DX USER IP
21
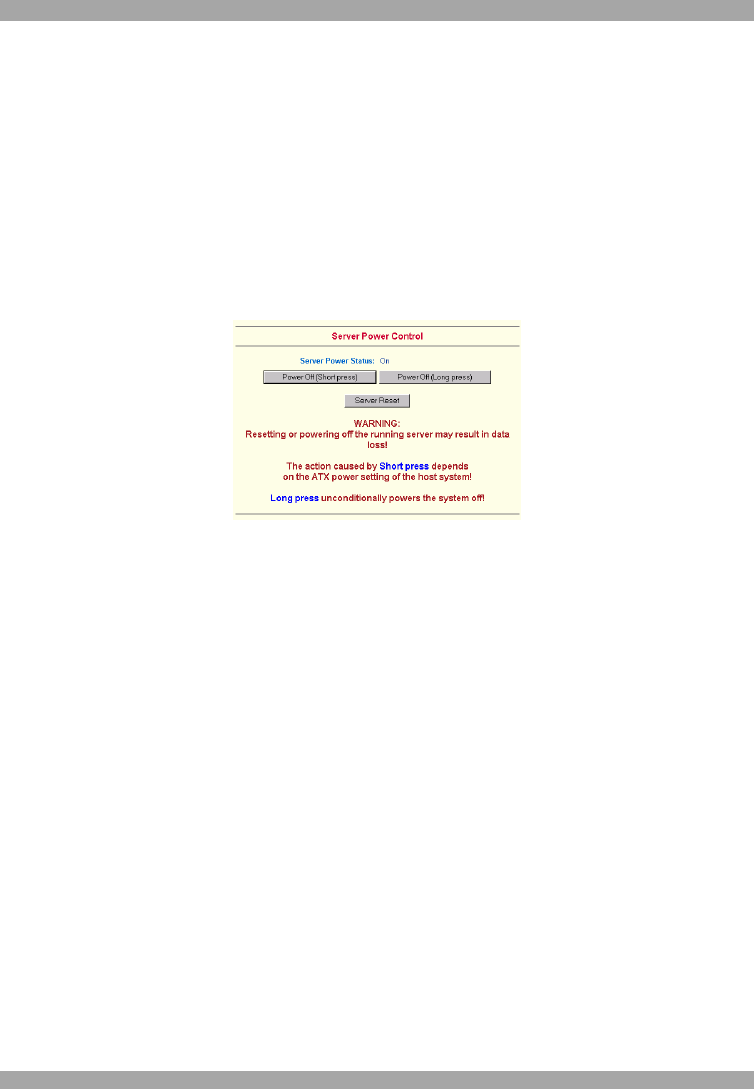
Internal power
Once connected, enable the internal power option using the Serial Port settings on
page 40.
The Power Control panel enables access to the most important external buttons of
your host system. These buttons are the reset and the ATX power button.
The power button represents the ATX power button on your host system. It is used
to switch the power supply on and off. The ATX power button has 2 operation
modes: a short press, and a press of about 4 seconds. As shown in Figure 16 these
two modes are supported separately. The 2 operation modes are explained in the
next section.
Figure 16 Internal Power Control
Note: The prerequisite for the remote power/reset button to work is a correct
installation of DX User IP.
The Remote reset and power button effects are as follows:
Reset - This is similar to pressing the reset button directly on the remote system.
Pressing the reset button will result in a cold start of the system. This might damage
open files and the file system itself.
Power (short press) - A short press on the ATX button is normally caught by the
running operating system that tries to initiate a controlled shut down. Do this to
switch off the system. If this does not work try the long press button.
After pressing, the power state displayed in the administration panel won't
immediately reflect the requested change. A controlled shut down of the system may
take some minutes. Observe the action caused by your button press using the
Remote Console window or by reloading the Server Power Control panel.
Power (long press) - This will unconditionally power off the system. Even if you
have submitted a short press before, this will shut down the power supply of the host
system. The effect of the long button press can be immediately observed on the
panel that is loaded into the browser because of the button press. The power state
will be off.