
User manual
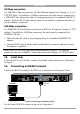


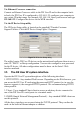
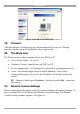
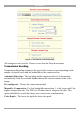

Table Of Contents
- 1. Welcome
- 2. Introduction
- 3. Features of DX User IP
- 4. DX User IP components
- 5. Cables
- 6. DX User IP front panel
- 7. DX User IP rear panel
- 8. Rack mounting the DX User IP
- 9. Pre-installation guidelines
- 10. Mouse synchronization limitations
- 11. DX User IP connections
- 12. Connecting the DX User IP to the Wan/LAN
- 13. Local User
- 14. Connecting an RS232 terminal
- 15. Order of powering on
- 16. Configuring the system
- 17. The DX User IP system interface
- 18. Logging in
- 19. Timeout
- 20. The Work area
- 21. Remote Console Settings
- 22. Telnet Console
- 23. Status via IPMI
- 24. Event Log via IPMI
- 25. File transfer – Virtual Floppy
- 26. Power Control
- 27. Keyboard & Mouse Settings
- 28. KVM Settings
- 29. KVM Port Settings
- 30. Video Settings
- 31. User/Group Management
- 32. User/Group Permissions
- 33. Network Settings
- 34. Dynamic DNS
- 35. Serial Port Settings
- 36. Security Settings
- 37. SNMP Settings
- 38. IPMI Settings
- 39. LDAP Settings
- 40. Maintenance
- 41. Accessing the remote console
- 42. Keyboard layout
- 43. The Control buttons /toolbar icons
- 44. The Chat window
- 45. The Video settings
- 46. Video Settings access
- 47. Mouse synchronization
- Frequently Asked Questions
- Glossary of terms
- Appendix A: DX User IP Video modes
- Appendix B: Key codes
- Appendix C: Pin assignments
- Appendix D: Disabling mouse acceleration
- Appendix E: Technical specifications

DX USER IP
11
15. Order of powering on
Connect the DX User IP to the power supply using the power cord provided.
The devices and servers can be powered on at any time. Power on the DX
components in the following order:
1. The primary and secondary level DX Centrals.
2. The DX User and DX User IP units.
16. Configuring the system
The DX User IP's communication interfaces are based on TCP/IP, and it comes
configured with the values listed below.
· DHCP - disabled
· IP address - 192.168.1.22
· Net mask - 255.255.255.0
· Default Gateway - None
If the above values are unsuitable, you can change the IP configuration. This can be
done in a number of ways as set out below. We recommend configuring a fixed IP
address to the DX User IP. You can find the MAC address on the IP Extender's
underside.
Configuration via DHCP server
If you activate DHCP, DX User IP tries to contact a DHCP server on the network.
The DHCP server provides a valid IP address, gateway address and subnet mask. If
the DHCP connection fails on boot up, DX User IP boots with the last known IP
configuration.
Configuration via local console
There are 3 ways of configuring via local console:
· Serial connection
· Ethernet Crossover connection
· IP Device Setup utility
Via Serial connection
Connect the NULL modem cable to the computer and to DX User IP’s Serial 1 port.
Use any Terminal software to connect to DX User IP. The screen shots below use
Windows Hyperterminal.