
User guide
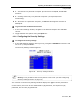
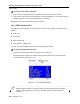
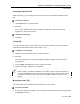

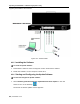
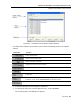
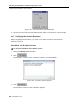
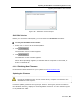
Table Of Contents
- 1 Introduction
- 2 Installation
- 3 Configuring the Network
- 3.1 Boot-Up Process
- 3.2 Logging Onto the Web Configuration Interface
- 3.3 Configuring the Network Settings
- 3.4 Configuring Network SNMP Settings
- 3.5 Configuring User Settings
- 3.6 Configuring the KVM Switch
- 3.7 Configuring the Security Settings
- 3.8 Performing Additional Configuration Operations
- 3.9 Reloading a Page
- 3.10 Saving Changes and Logging Out
- 4 Conducting a Remote Session
- 4.1 Starting a Remote Session
- 4.2 Sharing a Remote Session
- 4.3 Displaying the Toolbar
- 4.4 Setting the Session Profile
- 4.5 Verifying Remote Presence Solutions Information
- 4.6 Changing the Video Performance Settings
- 4.7 Adjusting the Video
- 4.8 Managing Keyboard Sequences
- 4.9 Synchronizing Mouse Pointers
- 4.10 Switching to a Different Server
- 4.11 Disconnecting the Remote Session
- 5 Troubleshooting – Safe Mode
- 6 Operating the SmartRack 116 IP Switching System Locally
- Activating Password Protection
- Changing the OSD Hotkey
- Activating Autoskip
- Serial Port
- Changing the Keyboard Language
- Editing the Switch Name
- Restoring OSD to Factory Defaults (F7)
- 6.3 Upgrading the SmartRack 116 IP Firmware
- 6.3.1 Downloading Update Software and Latest Firmware
- 6.3.2 Update Software System Requirements
- 6.3.3 Connecting the SmartRack 116 IP System
- 6.3.4 Connecting the RS232 Download Cable
- 6.3.5 Installing the Software
- 6.3.6 Starting and Configuring the Update Software
- 6.3.7 Verifying the Version Numbers
- 6.3.8 Obtaining New Firmware
- 6.3.9 Restoring Factory Settings
- 6.4 Troubleshooting – Update Software
- 7 Technical Specifications
- 8 Video Resolution and Refresh Rates
- 9 SNMP Events Table

Operating the SmartRack 116 IP Switching System Locally
Using the OSD
User Guide | 83
Scanning Computers (F4)
When necessary, you can adjust the scan time in the Time Settings window (Figure
78).
To activate scanning:
1. Press Shift twice to open the OSD.
2. Press F4.
Your screen displays each active computer sequentially, with the Scan label
appearing in the top left corner.
To deactivate scanning:
1. Press F4.
Tuning (F5)
You can tune the image of any computer screen from the Select Computer window,
accessed from the Main window (see Section 6.2.2).
To adjust the screen image:
1. Navigate to the computer that you want to adjust.
2. Press F5.
The screen image of the selected computer appears, together with the Image
Tuning label.
3. Use the Right and Left arrow keys to adjust the image
.
4. When the image is satisfactory, press Esc.
Picture quality is relative to distance. The further away a remote computer is
from the SmartRack 116 IP, the lower the image quality, and the more tuning
is required. Therefore, place the higher resolution computers closer to the
Switch.
Moving the Label ( F6)
You can position the Confirmation label anywhere on the screen.
To position the label:
1. In the main window (see Figure 74), navigate to the desired compute
r using the Up
and Down arrow keys.