
User guide

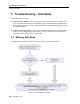
Table Of Contents
- 1 Introduction
- 2 Installation
- 3 Configuring the Network
- 3.1 Boot-Up Process
- 3.2 Logging Onto the Web Configuration Interface
- 3.3 Configuring the Network Settings
- 3.4 Configuring Network SNMP Settings
- 3.5 Configuring User Settings
- 3.6 Configuring the KVM Switch
- 3.7 Configuring the Security Settings
- 3.8 Performing Additional Configuration Operations
- 3.9 Reloading a Page
- 3.10 Saving Changes and Logging Out
- 4 Conducting a Remote Session
- 4.1 Starting a Remote Session
- 4.2 Sharing a Remote Session
- 4.3 Displaying the Toolbar
- 4.4 Setting the Session Profile
- 4.5 Verifying Remote Presence Solutions Information
- 4.6 Changing the Video Performance Settings
- 4.7 Adjusting the Video
- 4.8 Managing Keyboard Sequences
- 4.9 Synchronizing Mouse Pointers
- 4.10 Switching to a Different Server
- 4.11 Disconnecting the Remote Session
- 5 Troubleshooting – Safe Mode
- 6 Operating the SmartRack 116 IP Switching System Locally
- Activating Password Protection
- Changing the OSD Hotkey
- Activating Autoskip
- Serial Port
- Changing the Keyboard Language
- Editing the Switch Name
- Restoring OSD to Factory Defaults (F7)
- 6.3 Upgrading the SmartRack 116 IP Firmware
- 6.3.1 Downloading Update Software and Latest Firmware
- 6.3.2 Update Software System Requirements
- 6.3.3 Connecting the SmartRack 116 IP System
- 6.3.4 Connecting the RS232 Download Cable
- 6.3.5 Installing the Software
- 6.3.6 Starting and Configuring the Update Software
- 6.3.7 Verifying the Version Numbers
- 6.3.8 Obtaining New Firmware
- 6.3.9 Restoring Factory Settings
- 6.4 Troubleshooting – Update Software
- 7 Technical Specifications
- 8 Video Resolution and Refresh Rates
- 9 SNMP Events Table
Conducting a Remote Session
Switching to a Different Server
66 | SmartRack 116 IP
3. In Max Rate, select the maximum mouse report rate.
For Sun Solaris the default value is 20 in order to support older Sun versions.
4. Click OK.
4.9.2 Aligning the Mouse Pointers
When accessing the target server, the mouse pointers may appear at a distance to
each other, due to the mouse on SmartRack 116 IP losing sync with the mouse on
the host system. You can align the local mouse pointer with the remote target
device’s mouse pointer.
To align the mouse pointers:
1. On the toolbar, select
> Align (or press Ctrl+M).
The mouse pointers align.
4.9.3 Calibrating Mouse Pointers
A target server may have a different mouse pointer speed than the client computer.
Calibrating automatically discovers the mouse speed of the target server and aligns
the two pointers.
You can perform automatic calibration when the target server operating system is
Windows NT4, 2000, or 98.
SmartRack 116 IP saves this alignment so that calibration is only needed once per
target server.
To perform the calibration:
1. On the toolbar, select
> Calibrate.
If the Video Noise Level is above zero, calibration may not work. In this case, go to
Video Adjustment and try to eliminate the noise by automatically adjusting the video
(see Section 4.7.2) and/or adjusting the bars in
manual video adjust (see Section
4.7.3), and then performing the m
ouse calibration.
If the mouse settings on the target server have been changed, you must
synchronize mouse pointers manually, as explained below.
4.10 Switching to a Different Server
In the middle of a remote session, you can switch to a different server.