
User guide
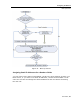
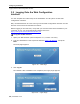
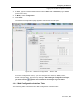
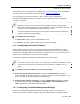
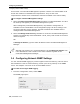

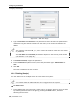
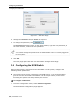
Table Of Contents
- 1 Introduction
- 2 Installation
- 3 Configuring the Network
- 3.1 Boot-Up Process
- 3.2 Logging Onto the Web Configuration Interface
- 3.3 Configuring the Network Settings
- 3.4 Configuring Network SNMP Settings
- 3.5 Configuring User Settings
- 3.6 Configuring the KVM Switch
- 3.7 Configuring the Security Settings
- 3.8 Performing Additional Configuration Operations
- 3.9 Reloading a Page
- 3.10 Saving Changes and Logging Out
- 4 Conducting a Remote Session
- 4.1 Starting a Remote Session
- 4.2 Sharing a Remote Session
- 4.3 Displaying the Toolbar
- 4.4 Setting the Session Profile
- 4.5 Verifying Remote Presence Solutions Information
- 4.6 Changing the Video Performance Settings
- 4.7 Adjusting the Video
- 4.8 Managing Keyboard Sequences
- 4.9 Synchronizing Mouse Pointers
- 4.10 Switching to a Different Server
- 4.11 Disconnecting the Remote Session
- 5 Troubleshooting – Safe Mode
- 6 Operating the SmartRack 116 IP Switching System Locally
- Activating Password Protection
- Changing the OSD Hotkey
- Activating Autoskip
- Serial Port
- Changing the Keyboard Language
- Editing the Switch Name
- Restoring OSD to Factory Defaults (F7)
- 6.3 Upgrading the SmartRack 116 IP Firmware
- 6.3.1 Downloading Update Software and Latest Firmware
- 6.3.2 Update Software System Requirements
- 6.3.3 Connecting the SmartRack 116 IP System
- 6.3.4 Connecting the RS232 Download Cable
- 6.3.5 Installing the Software
- 6.3.6 Starting and Configuring the Update Software
- 6.3.7 Verifying the Version Numbers
- 6.3.8 Obtaining New Firmware
- 6.3.9 Restoring Factory Settings
- 6.4 Troubleshooting – Update Software
- 7 Technical Specifications
- 8 Video Resolution and Refresh Rates
- 9 SNMP Events Table

Configuring the Network
Configuring the Network Settings
User Guide | 35
If the DHCP server is published in the DNS server, you can connect to the SmartRack
116 IP system using the device name, as follows: https://DeviceName.
You can select any TCP port from port # 800 to 65535. When managed by
Centralized Management, the port number can be changed from the management
interface, if needed.
Firewall or router security access list must enable inbound communication
through the selected TCP port for the SmartRack 116 IP’s IP address. (Default
TCP port is 900; default Web interface TCP port is 443.)
For client computer access from a secured LAN, the selected ports should be
open for outbound communication.
To configure Device ID settings:
1. In Device Name, type a name for SmartRack 116 IP.
2. In TCP Port, type the number of the port (from 800 to 65535).
3.3.2 Configuring the Device IP Address
When a DHCP server is active on the same network to which SmartRack 116 IP is
connected, the DHCP can provide automatic IP assignment. However, best practices
recommend using MAC address reservations in the DHCP server to ensure that the IP
address of the SmartRack 116 IP will not be changed.
Consult your Network Administrator regarding the use of the DHCP.
If you have access to the server, your configured (or default) SmartRack 116 IP
device name will appear on the DHCP server’s interface, making it easy to
locate.
To configure the device IP address, do one of the following:
Select automatic IP address assignment – Select the Enable DHCP checkbox to
enable a DHCP server that is active on the same network to which SmartRack 116
IP is connected, to provide automatic IP assignment.
Select manual IP address assignment – Clear the Enable DHCP checkbox to disable
the DHCP, and then type the IP Address,
Subnet Mask, and Default Gateway for
LAN 1, provided by your Network Administrator.
3.3.3 Configuring Centralized Management Settings
Minicom’s Centralized Management IP-based systems ensure secure control of
servers and network devices, and power and user administration in the data center