
User guide


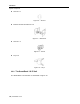

Table Of Contents
- 1 Introduction
- 2 Installation
- 3 Configuring the Network
- 3.1 Boot-Up Process
- 3.2 Logging Onto the Web Configuration Interface
- 3.3 Configuring the Network Settings
- 3.4 Configuring Network SNMP Settings
- 3.5 Configuring User Settings
- 3.6 Configuring the KVM Switch
- 3.7 Configuring the Security Settings
- 3.8 Performing Additional Configuration Operations
- 3.9 Reloading a Page
- 3.10 Saving Changes and Logging Out
- 4 Conducting a Remote Session
- 4.1 Starting a Remote Session
- 4.2 Sharing a Remote Session
- 4.3 Displaying the Toolbar
- 4.4 Setting the Session Profile
- 4.5 Verifying Remote Presence Solutions Information
- 4.6 Changing the Video Performance Settings
- 4.7 Adjusting the Video
- 4.8 Managing Keyboard Sequences
- 4.9 Synchronizing Mouse Pointers
- 4.10 Switching to a Different Server
- 4.11 Disconnecting the Remote Session
- 5 Troubleshooting – Safe Mode
- 6 Operating the SmartRack 116 IP Switching System Locally
- Activating Password Protection
- Changing the OSD Hotkey
- Activating Autoskip
- Serial Port
- Changing the Keyboard Language
- Editing the Switch Name
- Restoring OSD to Factory Defaults (F7)
- 6.3 Upgrading the SmartRack 116 IP Firmware
- 6.3.1 Downloading Update Software and Latest Firmware
- 6.3.2 Update Software System Requirements
- 6.3.3 Connecting the SmartRack 116 IP System
- 6.3.4 Connecting the RS232 Download Cable
- 6.3.5 Installing the Software
- 6.3.6 Starting and Configuring the Update Software
- 6.3.7 Verifying the Version Numbers
- 6.3.8 Obtaining New Firmware
- 6.3.9 Restoring Factory Settings
- 6.4 Troubleshooting – Update Software
- 7 Technical Specifications
- 8 Video Resolution and Refresh Rates
- 9 SNMP Events Table

Installation
Rack Mounting SmartRack 116 IP
20 | SmartRack 116 IP
2. Connecting the SmartRack 116 IP console to the rack
3. Connecting the KVM Switch 116 IP
2.4.1 Rack Mounting Safety Considerations
When mounting SmartRack 116 IP onto a rack, avoid the following conditions:
Elevated operating ambient temperature – The operating ambient temperature of
the rack environment may be greater than the room ambient temperature.
Therefore, take special care when installing the unit in a closed or multi-unit rack
assembly that the environment is compatible with the maximum rated ambient
temperature.
Reduced airflow – Install the equipment in a rack in such a way that the amount of
airflow required for safe operation is not compromised. Leave a gap of at least 5
cm / 2” on each side of SmartRack 116 IP.
Uneven mechanical loading – Uneven loading can cause damage to the equipment
or personal injury. Mount the equipment in the rack in such a way that a
hazardous condition does not result due to uneven mechanical loading.
Circuit overloading – When connecting the equipment to the supply circuit, make
sure that the total power of all the components does not exceed the circuit
capabilities. Overloading of circuits can affect over-current protection and supply
wiring, potentially resulting in fire and shock hazards.
Unreliable earthing – Maintain reliable earthing of rack-mounted equipment. Pay
attention to supply connections other than direct connections to the branch circuit
(for example, use of power strips).
2.4.2 Replacing the Bracket
The rails in your hardware kit come assembled with shorter brackets. These brackets
are appropriate for a rack depth of 504 ~ 614 mm. If this rack depth is suitable for
your needs, proceed to connect the SmartRack 116 IP to the rack (see Section 2.4.3).
If you require a rack de
pth of 905 ~ 990 mm, replace the shorter brackets with
longer brackets, as described in the following procedure.
The illustrations in the following procedure show the connections to one side of
the SmartRack 116 IP. The connections are the same for the other side..
To replace the bracket:
1. Loosen the seven screws.