
User guide


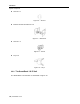

Table Of Contents
- 1 Introduction
- 2 Installation
- 3 Configuring the Network
- 3.1 Boot-Up Process
- 3.2 Logging Onto the Web Configuration Interface
- 3.3 Configuring the Network Settings
- 3.4 Configuring Network SNMP Settings
- 3.5 Configuring User Settings
- 3.6 Configuring the KVM Switch
- 3.7 Configuring the Security Settings
- 3.8 Performing Additional Configuration Operations
- 3.9 Reloading a Page
- 3.10 Saving Changes and Logging Out
- 4 Conducting a Remote Session
- 4.1 Starting a Remote Session
- 4.2 Sharing a Remote Session
- 4.3 Displaying the Toolbar
- 4.4 Setting the Session Profile
- 4.5 Verifying Remote Presence Solutions Information
- 4.6 Changing the Video Performance Settings
- 4.7 Adjusting the Video
- 4.8 Managing Keyboard Sequences
- 4.9 Synchronizing Mouse Pointers
- 4.10 Switching to a Different Server
- 4.11 Disconnecting the Remote Session
- 5 Troubleshooting – Safe Mode
- 6 Operating the SmartRack 116 IP Switching System Locally
- Activating Password Protection
- Changing the OSD Hotkey
- Activating Autoskip
- Serial Port
- Changing the Keyboard Language
- Editing the Switch Name
- Restoring OSD to Factory Defaults (F7)
- 6.3 Upgrading the SmartRack 116 IP Firmware
- 6.3.1 Downloading Update Software and Latest Firmware
- 6.3.2 Update Software System Requirements
- 6.3.3 Connecting the SmartRack 116 IP System
- 6.3.4 Connecting the RS232 Download Cable
- 6.3.5 Installing the Software
- 6.3.6 Starting and Configuring the Update Software
- 6.3.7 Verifying the Version Numbers
- 6.3.8 Obtaining New Firmware
- 6.3.9 Restoring Factory Settings
- 6.4 Troubleshooting – Update Software
- 7 Technical Specifications
- 8 Video Resolution and Refresh Rates
- 9 SNMP Events Table

Installation
Overview
16 | SmartRack 116 IP
2 Installation
2.1 Overview
Install the SmartRack 116 IP system as follows:
1. Remove the SmartRack 116 IP system from the package, and check that all
components are present and in good working condition.
2. Mount the SmartRack 116 IP unit in a rack.
3. Make all hardware connections between the power source, SmartRack 116 IP,
services, network, and KVM console.
4. Power on the SmartRack 116 IP unit.
2.2 System Components
Before installing the SmartRack 116 IP system, verify that you have all the
components on the following list, as well as any other items required for installation.
The SmartRack 116 IP system consists of:
One SmartRack (p/n 0SU52088)
SmartRack Switch (p/n 0SU70006)
One RS232 Download cable (p/n 5CB40419)
ROCS – PS/2, USB (ordered separately)
CAT5 cables (1.5 m provided)
Hardware kit
2.2.1 Hardware Kit
The hardware kit contains the following items:
Rail with front and rear bracket x 2, for rack depth of 614 ~ 800 mm. Right and
left sides are different.