
User guide


USER GUIDE
5
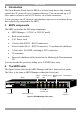
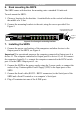
6. Rack mounting the SRPS
The SRPS comes with brackets for mounting onto a standard 19-inch rack.
To rack mount the SRPS:
1. Choose a location for the brackets. A notched hole on the vertical rail denotes
the middle of a U slot.
2. Connect the mounting brackets to the unit, using the screws provided. See
Figure 5.
Connect this section to side
of the RPS using 4 screws
Screw to
the rack
here
RING ON
& RESET
iLINK
i i i
i
i i
L
N
K
P
W
R
RS232
I
0
A B
C D E F
H
9
1
10
99
1112
95
1314
67
1516
8
G
ii
RS232 Console Command
Figure 5 Connecting the mounting brackets
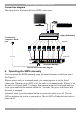
7. Installing the SRPS
1. Connect the power cord sockets of the computers and other devices to the
Output ports of the SRPS, see Figure 6.
Important! For operational purposes the computer connected to Output port A is
device #1. The computer connected to Output port B is device #2, etc. So connect
the computers logically. I.e. connect the computer connected to the KVM switch
port #1 to the SRPS Output port #1. etc.
2. Connect the SRPS to the power supply using the 2 power cords, or connect the
socket of any Uninterruptible Power Supply (UPS) to the Input ports of the
SRPS.
3. Connect the Serial cable (RS232 - RS232 connectors) to the Serial port of the
SRPS and a Serial Terminal or to a computer’s Serial port.
4. Plug a Terminator into one of the iLINK ports.