
User guide


Operating the Smart 216/232 IP Switching System Locally
Moving the Confirmation Label (F1)
User Guide | 79
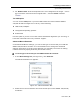
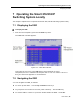
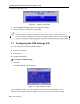
Figure 64 – Power Prompt
3. Select the desired option and press Enter.
The power command is sent.
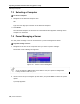
7.5 Moving the Confirmation Label (F1)
The Confirmation label appears briefly, showing which computer is currently
accessed. You can position the Confirmation label anywhere on the screen.
To position the label:
1. In the OSD Main window (see Figure 62), navigate to the desired
computer using
the Up and Down arrow keys.
2. Press F1.
The selected screen image and Confirmation label appear.
3. Use the arrow keys to move the label to the desired position.
4. Press Esc to save and exit.
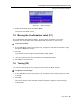
7.6 Tuning (F5)
You can tune the image of any computer screen from the Main window.
To adjust the screen image:
1. In the OSD Main window (see Figure 62), navigate to the computer that you want
to adjust
.
2. Press F5.
The screen image of the selected computer appears, together with the Image
Tuning label.