
User guide

SMART IP EXTENDER
You can generate and install a new certificate unique to a particular card. IP
Extender can generate a new cryptographic key and the associated Certificate
Signing Request that needs to be certified by a certification authority (CA). A CA
verifies you are who you claim to be and signs and issues a SSL certificate to you.
To create and install a IP Extender SSL certificate:
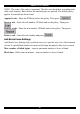
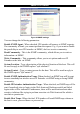
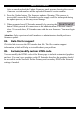
1. From the Security Settings page choose Create your own SSL certificate. The
window appears as in Figure 35.
Figure 35 CSR
2. Fill in the fields:
Common name - Network name of IP Extender once installed in the user's network.
It is identical to the name that is used to access the card with a Web browser. In case
the name given here and the actual network name differ, the browser will pop up a
security warning when the card is accessed over HTTPS.
Organizational unit - Specifies which department within an organization IP
Extender belongs.
Organization/Locality/City/State/Province - Organization to which IP Extender
belongs + location.
Country - Use the 2 letter ISO code, e.g. DE for Germany.
Challenge Password/Confirm- Some certification authorities require a challenge
password to authorize later changes on the certificate. The minimum is 4 characters.
Email - Of a security contact person that is responsible for IP Extender.
Key length - Length of the generated key in bits. 1024 Bits are supposed be
sufficient for most cases. Larger keys may result in slower response time during the
connection.
3. Click
.
51