
User guide


IP CONTROL
9
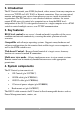
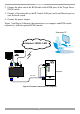
Computer rack
COMPUTER1 COMPUTER2
COMPUTER6COMPUTER5STATION2
SCREE
N
P
S
/2
MOUS
E
K
B
POWE
R
SERIA
L
MOUS
E
COMPUTER3 COMPUTER4
COMPUTER8COMPUTER7
KVM
switch
SD
P110
KVM cable
MINICOM
IP CONTROL
LAN
MINICOM
User over IP
Internet / WAN / LAN
ProLiantDL360
9.1-GB10k
ULTRA2SCSI
9.1-GB10k
ULTRA2SCSI
ProLiantDL360
9.1-GB
10k
ULTRA2SCSI
9.1-GB
10k
ULTRA2SCSI
ProLiantDL360
9.1-GB
10k
ULTRA2SCSI
9.1-GB
10k
ULTRA2SCSI
ProLiantDL360
9.1-GB10k
ULTRA2SCSI
9.1-GB10k
ULTRA2SCSI
ProLiantDL360
9.1-GB
10k
ULTRA2SCSI
9.1-GB
10k
ULTRA2SCSI
ProLiantDL360
9.1-GB
10k
ULTRA2SCSI
9.1-GB
10k
ULTRA2SCSI
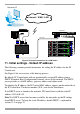
Figure 8 IP Control connections to a KVM switch
11. Initial settings - Default IP address
The following sections provide instructions for setting the IP address for the IP
Control unit.
See Figure 9 for an overview of the boot-up process.
By default, IP Control boots with an automatically assigned IP address from a
DHCP (Dynamic Host Configuration Protocol) server on the network. The DHCP
server provides a valid IP address, gateway address and subnet mask.
To identify the IP address, the IP Control MAC address appears on the underside of
the IP Control box. The device number (D.N.) can also be found there.
If no DHCP server is found on the network, IP Control boots with the static IP
address:192.168.0.155.
Note! If a DHCP server later becomes available, the unit picks up the IP settings
from DHCP server. To keep the static IP address, disable DHCP – explained in
section 13.1 on page 12.