
User guide


USER GUIDE
30
2 examples!
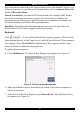
For Windows XP, go to the Mouse settings on the Target Server and uncheck
Enhance pointer precision.
For NT4
If Mouse Properties were ever changed for the Target Server – even if they have
been returned to their original state - uncheck default -
.
4. Click OK. The mouse pointers should be synchronized.
USB – This option is available for RICC and X-RICC USB and Phantom Specter
USB and for unsupported operating systems and SUN Solaris. Use this option if
you are sure of the custom acceleration algorithm you are using, or have been
informed so by customer support.
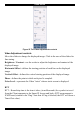
Align / Control + M Hotkey
You only need to perform calibration once for the Target Server and only after the
video adjustments. When accessing the Target Server, the mice may appear at a
distance to each other.
To re-synchronize the Mouse pointers:
Select Align or press Ctrl+M simultaneously. The mice re-synchronize.
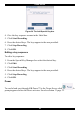
Advanced – Mouse Emulation
In the Advanced Mouse settings, you can set the type of mouse that you would like
Smart IP Access to emulate. We recommended not changing the advanced settings
unless there is erratic mouse behavior (the mouse is making random clicks and
jumping arbitrarily around the screen).
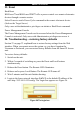
Click
the Mouse Emulation box appears see Figure 22.
Figure 22 Mouse Emulation box