
User guide


SMART IP ACCESS
11
Initial Settings
The following sections provide instructions for setting the IP address for the Smart
IP Access unit.
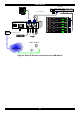
8. Default IP address
Smart IP Access has two available Ethernet Adapters, LAN 1 and LAN 2:
• By default, LAN 1 boots with an automatically assigned IP address if a
DHCP (Dynamic Host Configuration Protocol) server exists. The MAC
address appears on a label on the underside of the IP Access box. Also on
the label is the 6-digit device number (D.N.). The default device name is
the letter ‘D’ followed by the device number
• LAN 2 boots with the default IP configuration:
IP Address - 192.168.0.155
Subnet mask - 255.255.255.0
You can use the default Smart IP Access IP address if your computer resides on the
same subnet where Smart IP Access is installed, or you can connect a Crossover
LAN connector cable to the Smart IP Access on one end, and to the Ethernet
adapter of your computer at the other end.
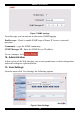
9. Logging into the Web interface
To complete the initial setup via the Web configuration interface:
1. Open your Web browser (Internet Explorer version 5.0 or higher)
2. Type the IP address of the Smart IP Access system in the address field
(i.e.
https://192.168.0.155/config) and press Enter. The login page appears, see
Figure 5