
User Guide switch DX System

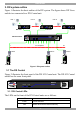
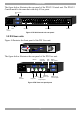
Table Of Contents
- Welcome
- 1. Introduction
- 2. Pre-installation guidelines
- 3. DX system outline
- 4. Connecting the DX system
- 4.1 Connecting an optional local computer to a DX User
- 4.2 Connecting servers to the DX Central
- 4.3 XRICC power supply
- 4.4 Connecting a RICC or XRICC PS/2
- 4.5 Connecting an XRICC SUN
- 4.6 Connecting an XRICC USB
- 4.7 Connecting an XRICC RS232
- 4.8 Connecting the CAT5 cables
- 4.9 Connecting the DX User to an RS232 Terminal
- 5. Power management
- 6. Connecting Legacy KVM switches
- 7. Cascading DX Central units
- 8. Powering on the system
- 9. Configuration wizard (non-DX cascaded system)
- 10. Logging in
- 11. Configuring the DX system
- 12. Creating/editing Users and Groups
- 13. Arranging devices
- 14. Scanning a group of servers
- 15. Adjusting the picture quality
- 16. Connect - Private
- 17. Disconnect User
- 18. Connecting to a local computer
- 19. Updating the DX Central
- 20. Updating the DX User and XRICCS/RICCs
- 21. Events log
- 22. Troubleshooting - Resetting the DX Central
- 23. USB / SUN Combo keys
- 24. Technical specifications
- 25. Terminal hotkeys
- 26. User guide feedback

DX SY
STEM
7
Reduced airflow
Install the equipment in a rack in such a way that the amount of airflow required for
safe operation is not compromised. Leave a gap of at least 5cm/2” each side of the
DX Central unit.
Mechanical loading
Mount the equipment in the rack in such a way that a hazardous condition is not
achieved due to uneven mechanical loading.
Circuit overloading
When connecting the equipment to the supply circuit, consider the effect that
overloading of circuits might have on over-current protection and supply wiring.
Reliable earthing of rack-mounted equipment should be maintained. Give attention
to supply connections other than direct connections to the branch circuit (e.g. use of
power strips).