
User Guide switch DX System
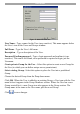
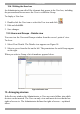
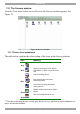
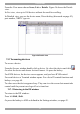

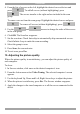
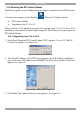
Table Of Contents
- Welcome
- 1. Introduction
- 2. Pre-installation guidelines
- 3. DX system outline
- 4. Connecting the DX system
- 4.1 Connecting an optional local computer to a DX User
- 4.2 Connecting servers to the DX Central
- 4.3 XRICC power supply
- 4.4 Connecting a RICC or XRICC PS/2
- 4.5 Connecting an XRICC SUN
- 4.6 Connecting an XRICC USB
- 4.7 Connecting an XRICC RS232
- 4.8 Connecting the CAT5 cables
- 4.9 Connecting the DX User to an RS232 Terminal
- 5. Power management
- 6. Connecting Legacy KVM switches
- 7. Cascading DX Central units
- 8. Powering on the system
- 9. Configuration wizard (non-DX cascaded system)
- 10. Logging in
- 11. Configuring the DX system
- 12. Creating/editing Users and Groups
- 13. Arranging devices
- 14. Scanning a group of servers
- 15. Adjusting the picture quality
- 16. Connect - Private
- 17. Disconnect User
- 18. Connecting to a local computer
- 19. Updating the DX Central
- 20. Updating the DX User and XRICCS/RICCs
- 21. Events log
- 22. Troubleshooting - Resetting the DX Central
- 23. USB / SUN Combo keys
- 24. Technical specifications
- 25. Terminal hotkeys
- 26. User guide feedback

DX SY
STEM
57
4. From the list of servers on the left, highlight the desired servers/devices and
press . To add all servers (without highlighting), press
. The servers transfer to the right and are included in the scan
group.
To remove servers from the scan group: Highlight the desired server and press
. To remove all servers (without highlighting), press .
5. Use the and arrows to change the order of the servers
in the scan group.
6. Click OK. The Scan box reappears.
7. Set the scan time. Check Auto skip to automatically skip unconnected servers.
Check Infinite Loop to make the scan un-ending.
8. Select the group to scan.
9. Press Scan, the scan activates.
10. To exit scan, press Esc.
15. Adjusting the picture quality
Where the picture quality is unsatisfactory, you can adjust the picture quality of
each computer.
To do so:
1. In Servers window, click once on the desired computer’s icon.
2. From the Action menu select Video Tuning. The selected computer’s screen
appears.
3. Use the keyboard Up, Down and Left, Right Arrow keys to adjust the picture.
4. When the picture is satisfactory, press Esc. The Servers window reappears.
5. Apply the changes to the tuned computer or to all the servers connected to the
device.