
User Guide switch DX System
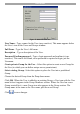
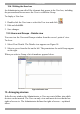
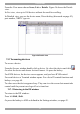

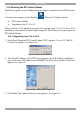
Table Of Contents
- Welcome
- 1. Introduction
- 2. Pre-installation guidelines
- 3. DX system outline
- 4. Connecting the DX system
- 4.1 Connecting an optional local computer to a DX User
- 4.2 Connecting servers to the DX Central
- 4.3 XRICC power supply
- 4.4 Connecting a RICC or XRICC PS/2
- 4.5 Connecting an XRICC SUN
- 4.6 Connecting an XRICC USB
- 4.7 Connecting an XRICC RS232
- 4.8 Connecting the CAT5 cables
- 4.9 Connecting the DX User to an RS232 Terminal
- 5. Power management
- 6. Connecting Legacy KVM switches
- 7. Cascading DX Central units
- 8. Powering on the system
- 9. Configuration wizard (non-DX cascaded system)
- 10. Logging in
- 11. Configuring the DX system
- 12. Creating/editing Users and Groups
- 13. Arranging devices
- 14. Scanning a group of servers
- 15. Adjusting the picture quality
- 16. Connect - Private
- 17. Disconnect User
- 18. Connecting to a local computer
- 19. Updating the DX Central
- 20. Updating the DX User and XRICCS/RICCs
- 21. Events log
- 22. Troubleshooting - Resetting the DX Central
- 23. USB / SUN Combo keys
- 24. Technical specifications
- 25. Terminal hotkeys
- 26. User guide feedback

USER GUIDE
50
Figure 53 Add New User box
User Name – Type a name for the User (case sensitive). This name appears below
the User’s icon in the Users and Groups window.
Full Name - Type the User’s full name.
Description – Type a description of the User.
Password/Confirm password – Type a login password and confirm it (case
sensitive). This can be left blank, so no password is required at login, just the
Username.
Create private Group for the User - Select this option to create a new Group for
the User (to which you can define unique access permissions).
Select existing Group - Select this option to place the User into a predefined
Group:
Choose the desired Group from the Drop-down menu.
Click OK. Where the User is added to an existing Group, a User icon with the User
name below it appears in the Group Members section. Where the User has a new
Group created for it, a new Group icon also appears in the Group section. The
Group name is the same as the User name, plus the word Group.
Click to save changes.