
User Guide switch DX System
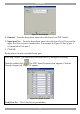
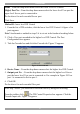
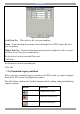
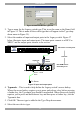
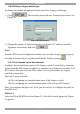
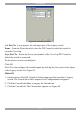
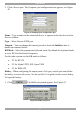
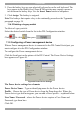
Table Of Contents
- Welcome
- 1. Introduction
- 2. Pre-installation guidelines
- 3. DX system outline
- 4. Connecting the DX system
- 4.1 Connecting an optional local computer to a DX User
- 4.2 Connecting servers to the DX Central
- 4.3 XRICC power supply
- 4.4 Connecting a RICC or XRICC PS/2
- 4.5 Connecting an XRICC SUN
- 4.6 Connecting an XRICC USB
- 4.7 Connecting an XRICC RS232
- 4.8 Connecting the CAT5 cables
- 4.9 Connecting the DX User to an RS232 Terminal
- 5. Power management
- 6. Connecting Legacy KVM switches
- 7. Cascading DX Central units
- 8. Powering on the system
- 9. Configuration wizard (non-DX cascaded system)
- 10. Logging in
- 11. Configuring the DX system
- 12. Creating/editing Users and Groups
- 13. Arranging devices
- 14. Scanning a group of servers
- 15. Adjusting the picture quality
- 16. Connect - Private
- 17. Disconnect User
- 18. Connecting to a local computer
- 19. Updating the DX Central
- 20. Updating the DX User and XRICCS/RICCs
- 21. Events log
- 22. Troubleshooting - Resetting the DX Central
- 23. USB / SUN Combo keys
- 24. Technical specifications
- 25. Terminal hotkeys
- 26. User guide feedback

USER GUIDE
32
Figure 34 Cascade Inputs
(Left) Port No: - This refers to the User port numbers.
Name – From the drop-down menu select the higher level DX Central this User
port cascades to.
(Right) Port No: - From the drop-down menu select the higher level Server port
the lower level User port is connected to.
Do the above for each cascaded User port.
Click Save.
Do the above for each cascaded port.
Click OK.
11.4 Cascaded Legacy switches
Where you have cascaded Legacy switches in the DX system, you must configure
them in the DX System Configuration window.
The table below explains the Toolbar buttons used for adding editing and deleting
Legacy switches.
Button Function
Add KVM device
Delete KVM device
Edit KVM device