
User Guide switch DX System
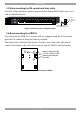
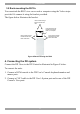
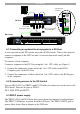
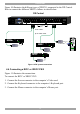
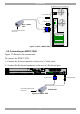
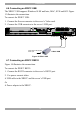
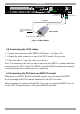
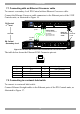
Table Of Contents
- Welcome
- 1. Introduction
- 2. Pre-installation guidelines
- 3. DX system outline
- 4. Connecting the DX system
- 4.1 Connecting an optional local computer to a DX User
- 4.2 Connecting servers to the DX Central
- 4.3 XRICC power supply
- 4.4 Connecting a RICC or XRICC PS/2
- 4.5 Connecting an XRICC SUN
- 4.6 Connecting an XRICC USB
- 4.7 Connecting an XRICC RS232
- 4.8 Connecting the CAT5 cables
- 4.9 Connecting the DX User to an RS232 Terminal
- 5. Power management
- 6. Connecting Legacy KVM switches
- 7. Cascading DX Central units
- 8. Powering on the system
- 9. Configuration wizard (non-DX cascaded system)
- 10. Logging in
- 11. Configuring the DX system
- 12. Creating/editing Users and Groups
- 13. Arranging devices
- 14. Scanning a group of servers
- 15. Adjusting the picture quality
- 16. Connect - Private
- 17. Disconnect User
- 18. Connecting to a local computer
- 19. Updating the DX Central
- 20. Updating the DX User and XRICCS/RICCs
- 21. Events log
- 22. Troubleshooting - Resetting the DX Central
- 23. USB / SUN Combo keys
- 24. Technical specifications
- 25. Terminal hotkeys
- 26. User guide feedback

USER GUIDE
18
6. Connecting Legacy KVM switches
You can cascade Legacy KVM switches by connecting an XRICC PS/2 or RICC
PS/2 to the switch.
To cascade a non-DX KVM switch:
1. Connect an XRICC PS/2 or RICC PS/2 to the User ports of the KVM switch.
2. Connect a CAT5 cable to the Server port of the DX Central.
3. Connect the other end of the CAT5 cable to the XRICC PS/2. The configuration
process is explained at the beginning of the DX System Operating Guide.
To connect devices to the KVM switch, follow the connection instructions in the
User Guide of the KVM switch.
7. Cascading DX Central units
When you need to connect more than 32 severs/devices you can cascade the DX
system by adding more DX Centrals.
For DX systems with only 1 DX Central, skip to section 8 on page 23.
In a cascaded scenario, the DX Centrals communicate via Ethernet using TCP/IP
signals. For this you must assign IP addresses to each DX Central and provide
TCP/IP connectivity between them. Cascaded DX Centrals must be on the same
subnet to communicate with each other.
For up to 56 severs/devices you can connect 2 DX Centrals (8 Users model) with
the supplied Ethernet Crossover cable. To cascade more than 2 DX Centrals, the
DX Centrals must be connected to a network hub/ Ethernet switch. Ethernet
connectivity is essential for the proper operation of the system and is in addition to
the dedicated CAT5 cables for KVM signals. Sections 7.1 and 7.2 illustrate these
connections.
You must also connect one CAT5 cable per DX User to a User port of a secondary
level DX Central and a Server port of the primary DX Central - see Figure 16 and
Figure 17 and section 7.5 on page 22. These cables are used to carry the keyboard,
mouse and video signals from a server to the user station.
When a user clicks on the icon of a server, the primary DX Central sends a
command to the secondary DX Central via the Ethernet port to route the KVM
signals to one of the available User ports.