
User guide


USER GUIDE
8
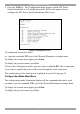
Security Tab
Type addresses which are authorized or denied access to the DX Power Switch
over the Network. For details about these features, see section 9 on page 17.
Options Tab
Define the restart delay valid for all power sockets of all DX Power Switch
connected together.
Configure an Email address to which the user can send a message in case of
problems.
Miscellaneous Tab
In combination with one of the left vertical tabs "Device 1" to "Device 5" to know
how many times an DX Power Switch has been powered ON and how many times
its power sockets have been switched from OFF to ON. The user cannot reset these
values.
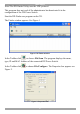
8. Configuration using a Terminal connection
Through an RS232 Serial connection using a Terminal connection. If you use a PC,
use the Serial cable supplied with the product and a Terminal program such as
Windows HyperTerminal or the MicroTerminal program on the CD (folder
miscellaneous).
The RS232 Serial port of the DX Power Switch-Standalone can be used to control
its power socket and to configure its Web server.
To configure the Web server using a PC and a Terminal connection:
1. Connect the DX Power Switch-Standalone to a Serial port of your PC using the
RS232 Serial cable.
2. Run the Terminal program.
3. Configure the appropriate Serial port with the following settings:
9.600 bauds, 8 bits, no parity, 1 stop bit and no flow control.
If you use the MicroTerminal program from the CD you only have to choose the
used serial port, this program is already configured at 9600, n, 8, 1.
4. On your keyboard, press Enter until the prompt «>» appears. The DX Power
Switch-Standalone is now in Command mode and is waiting for commands to
switch the power sockets. The Serial command mode is explained in section 12
on page 21.