
User guide


DX POWER SWITCH 8 PORT
19
Use any other straight Serial cable. For EMC reasons, we advise not to use cables
above 2.9 meters long.
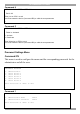
DX Power Switch-Slave
RJ9F connector
Pin configuration Configuration parameters
1 (yellow) = Ground Speed 9600 bauds
2 (white) = RxD (receive commands) Parity No
3 (blue) = TxD (transmit data) Format 8 bits
4 (orange) = Ground Stop bit 1
Flow control No
A short connection cable is supplied with each DX Power Switch-Slave. Connect
the RJ9 input connector to the RJ9 output connector of a DX Power Switch-
Standalone or another DX Power Switch-S8.
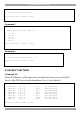
If you want to connect the DX Power Switch-Slave directly to a computer Serial
port, make a Serial cable as indicated by the drawing below or contact your dealer.
Figure 4 Serial cable
11. Commanding the Power Sockets through a Web browser
1. Start the Web browser.
2. Type the IP address of your DX Power Switch-Standalone. The Password box
appears. See Figure 5.