KVM.net ® II Quick Installation Guide w w w . m i n i c o m . c o m International HQ North American HQ European HQ Jerusalem, Israel Linden, NJ, USA Dübendorf, Switzerland Tel: + 972 2 535 9666 minicom@minicom.com Tel: + 1 908 486 2100 info.usa@minicom.com Tel: + 41 44 823 8000 info.europe@minicom.com Technical support - support@minicom.
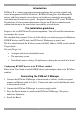
QUICK INSTALLATION GUIDE Introduction KVM.net II is a robust central management appliance that provides reliable and secure management of KVM IP devices. KVM.net II integrates with Minicom IP devices and Serial console server devices to facilitate an intuitively manageable, centralized out-of-band access portal - designed to maintain all IT assets. KVM.net II centralizes all user account information relevant for IP device administration without interfering in the stand-alone survivability of each device.
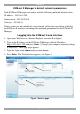
KVM.NET II KVM.net II Manager’s default network parameters Each KVM.net II Manager unit comes with the following network default values: IP address - 192.168.1.250. Subnet mask - 255.255.255.0 Gateway - 192.168.1.1 If these values are not suitable for your network, follow the steps below to display the KVM.net II interface and change the network parameters of the KVM.net II Manager. Logging into the KVM.net II web interface 1. Open your Web browser (Internet Explorer version 6.0 or higher). 2.
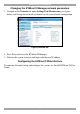
QUICK INSTALLATION GUIDE Changing the KVM.net II Manager network parameters 1. Navigate to the Network tab under Settings/Unit Maintenance (see figure below) and change the network parameters to suit your network configuration. Figure 2 Network tab 2. Press Save and restart the KVM.net II Manager. 3. Wait for the system to restart and login with the new IP address. Configuring the KVM.net II Web interface To complete the initial setup and configure the system, see the full KVM.net II User Guide.