
Installation Guide


Page 9
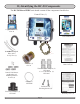
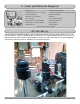
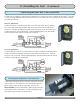
2.) Install the four mounting brackets using the enclosed screws to the back of the control box. Mount the con-
trol box to the wall allowing for the electrode and coil wire to reach prospective locations. Remember the Scale-
Blaster wire has to reach the area of the pipe where the coil will go and return back to the control box. Hold the
control box up to the wall or surface to where it will be mounted and mark the four screw holes. Using a bullet
level will ensure the control box is straight. Attach the control box to the wall according to the wall material us-
ing approved mounting hardware for that material, i.e. wood screws, mollys, concrete screws, or anchors.
Installing the K-Flex conduit
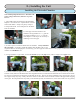
3) The control box in equipped with a k-ex conduit connector for attaching to the electrical power source. Run
conduit to the control box either from the pump motor or timer box, we recommend using the timer box. Please
refer to the conduit manufacturer’s instructions, your local state building codes, and electrical codes for the
details on proper installation of the k-ex conduit.
Mounting the Control Box (continued)
E.) Installing the Unit (Continued)