Turn on (pg. 20) Choose a discrimination pattern (pg. 32, 33) Adjust sensitivity (pg. 45) and volume (pg. 47) Choose a noise cancel* channel (pg. 49) Adjust ground balance* (pg. 52) Begin detecting! (pg. 24) These quick start instructions allow you to begin detecting straight away and find important reference information for setting up your X-Terra. Minelab however encourages all users to read the entire manual to ensure a complete understanding of all features and functions your X-Terra offers.
The World Leader in Metal Sensing Technology From our origins in 1985, Minelab have specialised in advanced electronics technologies. Our competitive advantage was created almost immediately with a highly competent and innovative Research and Development team, inspired by the genius of Mr. Bruce Candy. Please return the tear off section of your warranty card to Minelab as soon as possible.
1 Metal detecting is a fascinating and rewarding activity enjoyed by people all over the world. By getting to know your X-Terra you can become one of the many who find valuable coins, relics and jewellery on a regular basis. The X-Terra is a high-precision instrument incorporating Minelab’s latest single frequency technology, VFLEX. VFLEX processes a pure single frequency, ensuring that you can enjoy the hobby at all times, confident that you are using a highly-tuned and dependable detector.
3 2 VFLEX Technology Assembling Your X-Terra Connecting the Coil Shaft Assembly Armrest Assembly Connecting the Control Box Coil Cable Assembly Inserting Batteries Ready for Use Quick Start Reference 4 6 8 9 10 11 12 13 14 Back Cover Detecting Basics Holding the Detector Sweeping the Coil Introducing the Control Panel Keypad Layout Turning on the Detector LCD Layout Detecting Exercise Example Detections How Detectors Work Target ID Discrimination Scale Preset Discrimination Patterns Choosing a Discrimin
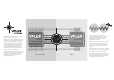
Power Supply Audio Transmit Transmit Standard VLF Signal (Without VFLEX) Analog Signal The X-Terra detectors are Minelab’s first products to incorporate VFLEX Technology. VFLEX uses state of the art digital and mixed-signal components to enhance standard single frequency technology by replacing most of the analogue circuitry with digital signal processing.
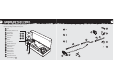
7 6 Before assembling your X-Terra please check that the package includes these parts: Coil Skidplate (fitted to coil) Lower shaft Middle shaft Upper shaft Armrest Stand Control box Rubber washers (2) Plastic wing nut Plastic bolt Armrest screw Armrest strap Velcro tabs (2) :-) Warranty card Instruction manual you’re holding it
9 8 Plug the two rubber washers into the holes on either side of the lower shaft yoke. Slide the yoke into the yoke bracket on top of the coil. Ensure that the spring loaded pin in the lower shaft is underneath. Insert the plastic bolt through the yoke and the yoke bracket. Fasten with the plastic wing nut provided, being careful not to damage the thread of the bolt by over-tightening. This may need to be loosened to adjust the coil to a comfortable detecting angle.
11 10 Place the armrest onto the top of the upper shaft, lining up the central hole in the armrest with a hole in the aluminium shaft. Position the armrest to suit your arm length. Connecting With the LCD facing up, push the control box onto the end of the handle until it fits into place. (Holding the Detector, pg. 15) Insert the screw up through the stand, upper shaft and armrest. Tighten the screw, being careful not to overtighten and damage the thread.
13 12 Wind the coil cable around the lower and middle shaft enough times to take up the slack. Use the velcro tabs to keep the coil cable in place against the shaft. It is recommended that one tab is used on the lower shaft close to the coil and the other tab on the middle shaft before the cable reaches across to the control box. Align the coil plug and connect into the socket in the back of the control box, lightly tightening the retaining ring to hold it in place.
15 14 Thread your arm through the armrest and strap. Grasp the handle of the detector and rest your forearm in the armrest. CONGRATULATIONS! YOU HAVE SUCCESSFULLY ASSEMBLED YOUR X-TERRA. IT IS NOW READY FOR DETECTING! Your elbow should sit just above the top of the armrest. Lightly tighten the velcro strap and secure it around your arm.
17 16 The correct position of armrest and length of shaft should allow you to swing the coil in front of your body without any uncomfortable stretching or stooping. To adjust the length of the shafts, undo the twistlocks, compress the spring pins of the shafts and move them up or down to suit. Once all shafts are clipped into position, rotate twistlocks clockwise onto the shafts until a firm clamping action is achieved.
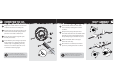
19 18 POWER turns the detector on/off. Scrolls through the different discrimination patterns. Accesses and scrolls through detecting settings. Accepts or rejects certain metals by turning on/off individual discrimination segments. This button has two functions. Assists in locating the exact position of a target prior to recovery (PINPOINT). * Toggles between the selected discrimination pattern and the all metal pattern. * Activates the manual adjustment to compensate for different types of soil.
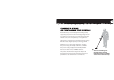
21 20 There are many metallic objects inside the house (e.g. nails in the floor, reinforcing in the walls) that will result in overloading the detector’s electronics. There may also be interference from TV sets and other household appliances. In this environment the detector may give erratic performance and numerous false signals. Press POWER A short start up sequence will display and a tune will be heard. Once on, the detector will be in automatic detection.
23 22 A good way to become familiar with detecting is to test the detector against a range of metal objects. This exercise is a simple lesson on how the detector interprets metal objects. Pass the coil across the objects, one at a time, and observe the LCD and the detector’s sounds as it detects each object. Gather a collection of different metal objects, e.g. various coins, gold and silver jewellery, a rusted nail, pull-tab, brass button and aluminium foil.
25 24 Discrimination Pattern The factory preset pattern 1 rejects ferrous metals and foil, and accepts non-ferrous metals. Patterns can be edited and saved according to detecting preferences. All Metal Pattern The all metal pattern turns off every discrimination segment, allowing all metals including ferrous targets to be detected. 1 2 Audio A detected non-ferrous target will give a medium - high tone audio response. Audio A detected ferrous target will give a low tone audio response.
27 26 Metal detectors work due to the fact that metal is conductive. Metal detectors create an electromagnetic field, which penetrates the ground. When the coil senses a change in this field (caused by a metal object) it sends a signal back to the control box which then alerts the operator. Metal detectors react to the size, shape and composition of objects. Typically, the larger the object, the deeper it can be detected. The X-Terra uses a single frequency (7.5kHz) as the standard operating frequency.
28 29 30 In addition to the target ID, targets are also represented as a particular segment on a linear scale at the bottom of the display. Each discrimination segment represents a level of conductivity and ferrous content. Non ferrous targets are those that have no iron content, such as gold, silver, copper and bronze. Non-ferrous targets are often higher in conductivity and are represented by the right hand side segments.
30 All Metal Pattern The combinations of accepted and rejected segments are referred to as patterns. The X-Terra has preset discrimination patterns that have been customised to detect general desired targets such as coins and jewellery. The X-Terra 30 has an all metal pattern and 1 preset pattern. The X-Terra 50 has an all metal pattern and 2 preset patterns. Patterns 1 and 2 can be edited to create your own custom discrimination patterns. Edited patterns are automatically saved.
33 32 On the X-Terra 30 PATTERNS toggles between the all metal pattern (AM) and pattern 1. 1 2 On the X-Terra 50 PATTERNS toggles between pattern 1 and pattern 2. 1 2 1 2 1 2 3 1 2 3 4 5 The X-Terra 50 also has an all metal shortcut. This toggles between the selected pattern and all metal. 1 2 1 2 1 2 1 2 The all metal pattern cannot be edited. 2 3 4 1 2 1 2 The all metal pattern cannot be edited.
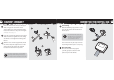
35 34 Enabling pinpoint instructs the X-Terra to temporarily disengage discrimination and become a non-motion detector. Targets normally discriminated against will emit a signal when beneath the coil. high coil tone this target will produce a loud, high tone sound this target will produce a quiet, low tone sound low During normal detection, the X-Terra operates with discrimination patterns. When a target signal is heard, it is an advantage to identify the target’s exact position.
37 36 A trowel, knife or small spade are good tools for recovering targets. Once a target has been located, clear the surface of loose material and check again for a signal. If there is no signal then the target is amongst the surface material. In this case, search the surface material until the target is located. If the target is still in the ground, check again with pinpoint. The aim, when digging, is to leave the area of ground exactly as you found it.
39 38 Target ID All Metal Target signals contain both ferrous and conductivity information. This is digitally processed and results in a number being displayed that distinguishes between different types of metal. AM indicates that the all metal pattern has been selected. This pattern has no discrimination and will allow signals from all types of metals, both ferrous and non-ferrous. Target ID numbers range from -4 to 44 on the X-Terra 30 and -9 to 45 on the X-Terra 50.
41 40 Menu * The X-Terra has a list of settings (sensitivity, volume, noise cancel* and ground balance*) that can be adjusted to customise it for your own personal preferences. (Note: Ground This icon appears when rejecting a discrimination segment. It disappears when accepting a discrimination segment (pg. 54, 55). balance cannot be accessed via the menu key, even though it is in the menu list on the LCD.) 1 2 Battery This icon indicates how much power is left in the batteries (pg. 62).
43 42 The X-Terra operates in two display states – Detection and Settings. Detection The target ID, discrimination segments and depth automatically translate detected signals. The last detected target ID stays on the display until another is detected. If the detector passes over a target that it rejects, the display will return to a blank detection screen represented by 2 dashes.
45 44 The X-Terra detectors are highly sensitive and therefore have a wide sensitivity adjustment range. It is important to set the correct sensitivity level for your detecting conditions. Some experimentation with the sensitivity may be required for different areas. For beginners, start with a low setting and increase progressively. Sensitivity is the detector’s level of response to a target and its environment. Real targets are interpreted as distinct beeps.
47 46 Volume is the level of sound the detector gives when a target is detected. The volume control limits the potential loudness of target signals. The X-Terra has proportional target signal volume. The sound produced by a distant target starts softly. As you get closer, the volume level increases rapidly until it reaches the maximum level that has been set.
49 48 The detector may become noisy or erratic due to electrical interference from powerlines, electrical equipment or other detectors operating close by. This interference is interpreted as a crackling or popping noise. Noise Cancel* allows you to change the noise cancel channel so that you experience less interference. Three channels are available, represented by the numbers -1, 0 and 1 and are also indicated on the menu scale.
51 50 The X-Terra 30 has a fixed ground balance that allows adequate operation over most types of soils. Ground balancing the detector reduces false detections and enables good targets to be displayed and heard correctly. The X-Terra 50 has an adjustable ground balance which helps in compensating for false signals. Ground balance settings affect both normal discrimination detection and pinpoint operation.
53 52 Using the detector in all metal, find a clear area of ground without any targets. Hold the coil parallel and 4” (10 cm) above the ground. Select GROUND BALANCE*. A constant hum known as the ground balance tone will sound when the coil is held steady. 1 3 4 5 AL Low 1 2 Continuously lower and raise the coil towards and away from the ground and listen to the ground balance tone. Try to lower the coil as close to the ground as possible without touching it.
55 54 The detector’s preset discrimination patterns can be edited to create custom patterns. Method 1 - to reject a specific target ID using an actual target Method 2 - to reject a specific target ID using + – 1 2 In detection, a discrimination segment will flash, indicating its position on the discrimination scale and the target’s ID number will appear on the LCD. The discrimination segment and X icon will appear and the target ID number will disappear to indicate the rejected ID.
56 56 Custom patterns are saved when the X-Terra is switched off. To erase custom patterns and return to preset patterns: 1 2 3 4 5 AL Turn the detector off. After the start up sequence, the patterns erased message (PE) will appear for 3 seconds to indicate that the current patterns have been erased and returned to the preset patterns. The settings sensitivity, volume, noise cancel* and ground balance are saved when the X-Terra is switched off.
59 58 Start Up Sequence Error When the detector is turned on, there is a short three note tune during its start up sequence. A six note tune will sound to indicate a detector error (Error Messages, pg. 60). Overload Positive Acknowledgement Negative Acknowledgement If the coil is passed across a large shallow target, the detector will give a repeating buzzing sound. This indicates that the target signal is too strong for the detector to interpret.
61 60 Coil Unplugged 1 The coil has been disconnected from the detector. The menu scale line icon will slowly flash until the coil is plugged back in. Turn the detector off. Send the coil and detector to be repaired. Coil Error 1 The coil is not communicating with the control box. 1 2 3 4 5 AL 1 2 3 4 5 AL The menu scale line icon will slowly flash until a standard coil is connected. Turn the detector off before connecting a standard coil.
63 62 The X-Terra is capable of using different types of AA batteries: 1.5 V Alkaline 1.5 V Carbon 1.5 V Lithium (non-rechargeable) 1.2 V NiMH (rechargeable) 1.2 V NiCad (rechargeable) The adjacent graph is a representation of how both types of batteries may discharge over time. How the detector is used will affect how long the batteries last for.
65 64 The X-Terra is a high quality electronic instrument, finely engineered and packaged in a durable housing. Taking proper care of your X-Terra is common sense. The X-Terra’s storage temperature is -4˚F to 149˚F (-20˚C to +65˚C) and the operating temperature is 32˚F to 113˚F (0˚C to 45˚C). Do not leave the detector in excessive heat or cold for longer than necessary. Try to avoid leaving it in a closed trunk or in a car sitting in sunlight. Covering it when not in use will help protect it.
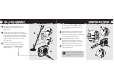
67 66 Headphones have many advantages. They block out external noise such as wind and traffic, allowing you to listen more closely to target signals. Headphones also minimise disturbance to other people in the area and they extend battery life. Connecting Headphones The X-Terra is able to save separate settings for both the speaker volume and headphone volume, switching from one to the other as soon as the headphones are connected. Plug the headphone jack into the socket.
69 68 Accessory coils come in different types (Double D and Concentric), sizes and frequencies*. These coils are suitable for different ground conditions and specific targets. To attach an accessory coil: Turn the detector off using POWER. Follow the steps of Coil Cable Assembly (pg. 12) and Connecting the Coil (pg. 8) in reverse order to disconnect the coil from the detector. Environmental Cover Skid Plate A skid plate comes as standard with the detector.
71 70 Transmission Single Frequency Sine Wave Technology VFLEX Coil 9” Concentric 7.5 kHz Visual Display Audio Positive Reflective LCD Internal Speaker and Headphone Output Search Mode Motion Detector Discrimination Batteries (Not Included) Padded Armrest Multi Segment Accept/Reject 4 X AA Alkaline/Carbon/Lithium or NiMH/NiCad 4 Position Adjustable with Stand & Armrest Length Extended 56” (1.42m) Length Unextended 48” (1.
72 30 50
Today’s Date Detector Model Serial Number Purchased From Purchase Date Faulty Part(s) Owners Name Address Phone ( Fax ( Email ) Day ) Home