table of contents www.minelab.com 1. INTRODUCING THE QUATTRO MP 3 1.1. Multi-frequency-Full Band Spectrum (FBS) Technology 4 1.2. Quattro Technical Specifications 5 2. ASSEMBLING YOUR DETECTOR 6 Step 1 - Connecting the Search Coil 6 Step 2 - Shaft Assembly 6 Step 3 - Connecting the Shaft Assembly 7 Step 4 - Armrest Assembly 7 3. SEARCH COILS 8 4. BATTERIES 9 4.1. Removal/Replacement of Battery Pack 9 4.3. Recharging NiMH Battery Pack 10 4.4. Battery Indicator 10 5.
table of contents www.minelab.com 7.7. Noise Cancel 16 8. MENU SETTINGS 17 8.1. Sensitivity 18 8.2. Volume 18 8.3. Threshold 18 8.4. Noise Cancel 19 8.5. Contrast 19 8.6. Trash Density 19 9. DISCRIMINATION 21 9.1. Modifying Discrimination Scale 21 10. DETECTOR SOUNDS 23 11. USING YOUR QUATTRO MP 23 12. TROUBLESHOOTING 24 13. GLOSSARY OF TERMS 25 14.
1. Introducing the Quattro MP www.minelab.com 1. Introducing the Quattro MP Thank you for purchasing the Minelab Quattro MP (multi-purpose) metal detector. The Minelab Quattro MP has been designed with "powerful simplicity" in mind. The Quattro MP has four pre-set detect modes for turn on and go operation, and also features customizable programs which you can save with your own personal settings. The Quattro MP will locate valuable metal objects such as gold, coins, jewelry and other metallic items.
1. Introducing the Quattro MP www.minelab.com 1.1. Multi-frequency-Full Band Spectrum (FBS) Technology When developing the Quattro MP, Minelab’s scientists looked at developing a truly easy to use yet extremely powerful multi-purpose metal detector. Discussions with seasoned treasure hunters from around the world identified a number of possible enhancements for operators.
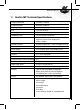
www.minelab.com 1.2. Quattro MP Technical Specifications Length Unextended 43 inches (1100mm) Length Extended 55 inches (1358mm) Shipping Weight 3 lb 7 oz (1700g) excluding batteries Coil 10.5 inch (264mm) Audio Output Internal speaker or headphones Headphone Input Transmission 1/4 inch (6.3mm) stereo jack Full Band Spectrum. Simultaneous multiple frequency transmission ranging from 1.
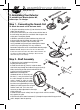
2. assembling your detector www.minelab.com 2. Assembling Your Detector To assemble your Minelab Quattro MP, follow steps 1 to 4 below. Step 1 - Connecting the Search Coil To attach the search coil to the lower shaft: 1. Plug the two rubber washers (1) into the holes on either side of the coil yoke (2). 2. Place the search coil (3) on a flat surface with the front of the coil facing away from you, and check that the open side of the yoke is facing the ground. 3.
www.minelab.com Step 3 - Connecting the Shaft Assembly To connect the shaft assembly to the handle assembly: 5. Release the control box camlock lever (12) to the open position. 6. Push the coil cable connector into the socket (13) underneath the handle assembly control box. Ensure the connector’s threaded bracelet is firmly secured. 7. Extend the lower shaft from the upper shaft by approximately 6 inches (15cm) to prevent the coil cable ‘bunching’. 8.
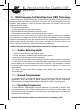
3. search coils www.minelab.com 3. Search Coils The function of the search coil is to transmit electromagnetic signals into the ground, and receive the response. The Quattro MP is supplied with a 10.5 inch open web "Double D" search coil. Double D is the common term used to describe the two internal coil windings which overlap each other, producing a blade like search pattern.
4. batteries www.minelab.com 4. Batteries The Minelab Quattro MP has both Alkaline and NiMH battery packs available as either standard or accessory items. The NiMH 1600 mAh battery pack will power the detector for up to 12.5 hours of constant use and the NiMH 1800 mAh battery pack for 14 hours. Eight good quality, fresh, 1.5V AA alkaline batteries will power the Quattro MP for up to 14 hours of constant use.
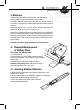
4. batteries www.minelab.com 4.3. Charging the NiMH Battery Pack To charge your battery, only use the Minelab charger designed for your NiMH battery. Using other chargers may damage your battery and will void the product warranty. Wall/Mains Charger The NiMH battery pack is sold in the discharged condition. It is necessary to charge it before operating the detector. 1. Plug the mains charger into the wall socket. 2. Insert the mains charger plug into the socket at the tapered end of the battery pack.
5. headphones www.minelab.com 5. Headphones The use of headphones while treasure hunting can reduce the distraction of external noise and allow the operator to hear softer target signals. While the use of headphones is not necessary during operation, the reduced power demands of the headphones will extend battery life. The 1/4" socket for the headphone plug is located in the top right of the rubber seal at the top of the handle assembly.
7. control panel www.minelab.com 7. Control Panel 1. Power (On/Off) 2. Display Meter 3. Detect Modes a. Coin Mode b. Coin & Jewelry Mode c. Relic Mode d. All Metal Mode 4. Menu/Select 5. -/+ (Minus / Plus) 6. Accept/Reject 7. Pinpoint 8. Noise Cancel 7.1. Power (On/Off) Press and release the POWER button (1) to turn your detector on/off. On first time start-up, your detector will default to the COIN mode and you can begin detecting.
7. control panel www.minelab.com 7.2.1. Battery Power icon At the top right-hand corner of the screen is an icon of a battery (A). This shows the level of stored power in your battery. A fully charged battery shows the icon as fully shaded. As the power in the battery is used the shaded area depletes until a fully discharged battery is un-shaded. 7.2.2. Graphic Identification Bar Located across the base of the screen is a horizontal bar graph (B) and serves a number of purposes.
7. control panel www.minelab.com 7.2.5. Depth Reading Located in the center of the meter is a vertical bar (G), which predicts the likely depth of the target. On shallow targets, the cursor is very high or close to the top, and the bar becomes almost fully shaded, whereas for deep targets the cursor is quite close to the bottom, and the bar is only partially filled. The full depth of the bar is equal to 12" plus, meaning that the target will be greater than 12" deep.