
Owner`s manual


OM-223 528 Page 23
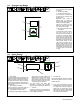
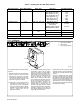
5-7. Feeder Set Up Push Button
1 Feeder Set Up Push Button LED
2 Feeder Set Up Push Button
• Press button to choose Sequence. Feeder
Set Up push-button LED will illuminate.
3 Sequence LED
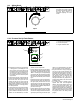
• When the Feeder Set Up button is pressed
once, the Sequence LED will illuminate and
the upper display will show sequence
options. Use the Adjust knob to select PRE
(preflow), STRT (start), WELD (weld, this
sequence can be untimed or timed from 0 to
999 seconds), CRTR (crater), POST
(postflow), or RETR (retract).
• Press the lower display push button and the
Lower Display push-button LED will
illuminate as well as the lower display. The
Time LED will automatically begin flashing
indicating that a time value can be entered
by turning the Adjust knob. By entering a
time value the sequence state will become
active. To turn off a sequence state, change
the time value to OFF. To step back for
selecting another sequence option, press
the Upper Display push button.
• The Sequence option STRT and CRTR will
have additional parameter settings. By
pushing the Lower Display push button a
second time, while STRT or CRTR appear
in the upper display, allows entering voltage
(MIG) or Arc Adjust [Pulse, Accu-pulse, or
RMD (optional)]. Use the Adjust knob to
change the values indicated by the flashing
LED for either Volts or Arc Adjust. Pressing
the Lower Display push button a third time
will activate the WFS setting for either STRT
or CRTR and the WFS LED will begin flash-
ing. Use the Adjust knob to change the WFS
value.
• Pressing the Feeder Set Up button two
more times will exit the Sequence menu and
return the system to standby mode.
4 Output A
• When Output A is selected, this LED will
illuminate.
5 Output B
• When Output B is selected, this LED will
illuminate.
6 Lock LED
• The lock LED is illuminated when one or more
programs have been locked using an optional
PDA with File Management/WaveWriter
software. This indicates that some programs
have been disabled. A disabled program will
not show up for selection.
Refer to the File Management/WaveWriter
Owner’s Manual for additional information.
1
3
4
Output A
Feeder Set Up
Output B
Sequence
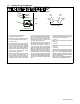
Sequence Diagram
Preflow
Time
Start
Time
Crater
Time
Postflow
Time
2
5
6