819 Solo VJ V2 16/1/04 11:25 AM Page 3 Introduction Operation Manual Thank you for purchasing the Miller SOLO VJ tripod. Please read this manual carefully prior to using the SOLO VJ tripod. Do not omit any steps. SOLO VJ is a professional tripod, compatible with most 100mm ball levelling pan & tilt heads. SOLO VJ is designed to support camcorders in location and studio production environments.
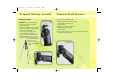
Remove tripod from carry bag, undo clip on leg strap and stand on a level surface (if possible). Depending on surface, screw out rubber foot for non-scratch contact to interior or hard surfaces or in for a spike on exterior soft surfaces such as dirt or sand. Minimum Height: Note: It is recommended that minimum height position is used only with legs at their shortest length. Note: Leg angle adjusters are spring loaded and self adjusting.
819 Solo VJ V2 16/1/04 11:25 AM Page 5 Tripod Setup (cont) Tripod Pull Down Mid Position: 1 Remove camera from fluid head. Note: This refers to the Mid leg angle position, not necessarily the height of the tripod. Fig 5 Leg angle adjuster raised 2 Close the tripod legs so all are pointing straight down and disengage all concentric locks. 3 Holding the bowl, lower tripod to its shortest length and re-engage concentric locks. The SOLO VJ tripod has three leg angle positions.
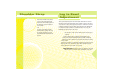
Shoulder Strap SOLO VJ’s Shoulder Carry Strap can be used looped (both ends attached to the mounting point on the bowl), to carry the tripod on one shoulder. OR it can be used attached to the bowl and the Leg Strap “D” ring, to carry the tripod across your back with fluid head towards the ground. Leg to Bowl Adjustment The leg to bowl pivot joint on the Solo tripod should have no lateral movement and should swing with a firm, smooth resistance.