
User's Manual
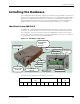
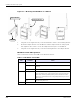
Table Of Contents
- MeshScape™ RK-5424-5 Reference Kit for 2.4 GHz MeshScape Systems User's Guide
- Contents
- About This Guide
- 1: Introduction
- 2: Installing the MeshScape System
- 3: Running MeshScape Network Monitor
- MeshScape Network Monitor Overview
- Configuring a Node’s Operation
- Labeling an End Node or Mesh Node
- Configuring Persistence Attributes
- Selecting a Com Port on the Host PC
- Configuring Serial and ADC Data Formats
- Turning Event Tracking On/Off
- Broadcasting Data to All Nodes.
- Creating an Event Log File
- Viewing the Contents of an Event Log File
- Viewing MeshScape Statistics
- 4: Using the MeshScape API
- A: Running the Demo Application
- B: Using MeshScape Programmer
- Glossary
- Index

RK-5424-5 Reference Kit User’s Guide 2-5
Installing the Hardware
Mounting options
There are three mounting options for the MeshGate:
• desktop
• wall
• DIN rail
Mounting the MeshGate on a Desktop
1. Choose a level, stable surface on which to rest the MeshGate.
2. Install one of the four supplied self-adhesive rubber feet in the round depression located
in each corner on the bottom of the MeshGate chassis.
Mounting the MeshGate on a Wall
When mounting the MeshGate to a wall, we recommend that you secure the MeshGate in
place using two #6 screws and screw anchors (not supplied) of the appropriate type for the
mounting surface.
1. Place the MeshGate against the wall in the desired mounting location.
2. Mark the location of the two chassis screw holes on the wall.
3. Drill two screw holes in to the wall at the marked locations.
4. Mount the MeshGate to the wall using two #6 screws (not supplied).
Mounting the MeshGate to a DIN Rail
Millennial Net offers an optional DIN rail mounting kit (MG-DIN) to enable you to mount the
MeshGate to a standard DIN rail easily and quickly.
To mount the MeshGate to a DIN rail using the supplied DIN rail mounting bracket and
hardware, refer to
Figure 2-6 and complete the following steps: