
User Manual
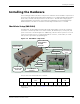
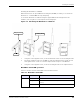
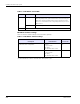
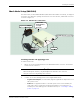
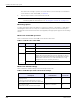
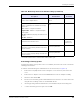
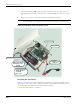
Table Of Contents
- RK-5409-5 Reference Kit for 916 MHz MeshScape™ Systems
- Contents
- About This Guide
- 1: Introduction
- 2: Installing the MeshScape System
- 3: Running MeshScape Network Monitor
- MeshScape Network Monitor Overview
- Configuring a Node’s Operation
- Configuring Sample Interval of Single Node
- Configuring Sample Interval of all Network Nodes
- Configuring Digital I/O Operation
- Configuring UART Operation
- Configuring AD (analog-to-digital) Converter Operation
- Configuring RS-232 Operation (MN-5409 only)
- Configuring RS-485 Operation (MN-5409 only)
- Using Watch Function to Display Configuration Information
- Labeling an End Node or Mesh Node
- Configuring Persistence Attributes
- Selecting a Com Port on the Host PC
- Configuring Serial and ADC Data Formats
- Turning Event Tracking On/Off
- Broadcasting Data to All Nodes.
- Creating an Event Log File
- Viewing the Contents of an Event Log File
- Viewing MeshScape Statistics
- 4: Using the MeshScape API
- A: Sample Application
- B: Performing Firmware Upgrades and Configuring Device IDs
- Glossary
- Index

2-4 Millennial Net
Installing the MeshScape System
To set up the MeshGate:
1. Attach one of the four included 1/2-wave antennas to the REV-SMA antenna connector.
The antenna screws onto the connector.
2. Connect the RS-232 cable between the MeshGate and the host PC.
3. Plug the supplied AC adapter into the MeshGate power connector and then into a
110 VAC power source.
4. Remove the connector panel access cover and slide the on/off switch to the ON position.
5. Replace the connector panel access cover.
The MeshGate is ready to interface with the host PC and surrounding network nodes
(mesh nodes and end nodes). For information on the behavior of the status LEDs, see
Table 2-1.
Mounting options
There are three mounting options for the MeshGate:
• desktop
•wall
• DIN rail
Mounting the MeshGate on a Desktop
1. Choose a level, stable surface on which to rest the MeshGate.
2. Install one of the four supplied self-adhesive rubber feet in the round depression located
in each corner on the bottom of the MeshGate chassis.
Mounting the MeshGate on a Wall
1. Place the MeshGate against the wall in the desired mounting location.
2. Mark the location of the two chassis screw holes on the wall.
3. Drill two screw holes in to the wall at the marked locations.
4. Mount the MeshGate to the wall using the two supplied screw anchors and screws.
Caution
When attaching the antenna, only hand-tighten the antenna to the connector.
Using excessive force may damage the connector.