
User's Manual

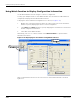
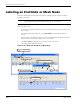
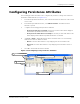
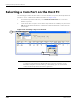
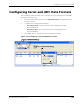
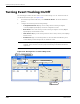
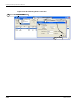
Table Of Contents
- MeshScape™ RK-5424-5 Reference Kit for 2.4 GHz MeshScape Systems User's Guide
- Contents
- About This Guide
- 1: Introduction
- 2: Installing the MeshScape System
- 3: Running MeshScape Network Monitor
- MeshScape Network Monitor Overview
- Configuring a Node’s Operation
- Labeling an End Node or Mesh Node
- Configuring Persistence Attributes
- Selecting a Com Port on the Host PC
- Configuring Serial and ADC Data Formats
- Turning Event Tracking On/Off
- Broadcasting Data to All Nodes.
- Creating an Event Log File
- Viewing the Contents of an Event Log File
- Viewing MeshScape Statistics
- 4: Using the MeshScape API
- A: Running the Demo Application
- B: Using MeshScape Programmer
- Glossary
- Index

3-18 Millennial Net
Running MeshScape Network Monitor
Labeling an End Node or Mesh Node
Labels are meaningful, persistent text strings used to identify network nodes beyond their
group and device IDs.
The following procedure describes the steps required to assign a label to an End Node or Mesh
Node (see
Figure 3-18):
1. From MeshScape Network Monitor, click on the desired device from the list of discovered
sensor nodes.
2. From MeshScape Network Monitor, select Edit>Labels. The Edit Labels window is
opened.
3. Enter the label to be applied to the node, then select Set. MeshScape Network Monitor
displays the label in the Label column of the selected node.
4. Click Prev or Next to apply labels to other discovered sensor nodes.
5. Select X to exit the Edit Label window.
Figure 3-18. Labeling an End Node or Mesh Node
Note:
Labels are only accessible through the MeshScape Network Monitor program.
Custom Applications using the API will not be able to access labels.
Enter label information,
3
then select Set
Select X
5
Click Device
1
Node label added
Select Prev or Next
4
Select Edit>Labels
2