
User's Manual


RK-5424-5 Reference Kit User’s Guide 2-5
Installing the Hardware
4. Mount the MeshGate Extra Long Range to the wall using two #6 screws (not supplied).
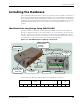
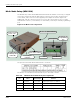
Mounting the MeshGate Extra Long Range to a DIN Rail
Millennial Net offers an optional DIN rail mounting kit (MG-DIN) to enable you to mount the
MeshGate to a standard DIN rail easily and quickly.
To mount the MeshGate Extra Long Range to a DIN rail using the supplied DIN rail mounting
bracket and hardware, refer to
Figure 2-9 and complete the following steps:
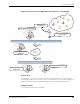
Figure 2-9. Mounting the MeshGate Extra Long Range to a DIN rail
1. Using two of the supplied screws, secure the MeshGate Extra Long Range chassis to the
mounting bracket.
2. Mount the adapter bracket onto the DIN rail. Slide the adapter bracket’s clamp up and
then tighten its two screws to secure the adapter bracket in place on the DIN rail.
3. Using two of the supplied screws, secure the mounting bracket to the adapter bracket.
Connection options
The MeshGate Extra Long Range is equipped with an RS-232 serial port that enables the
MeshGate Extra Long Range to connect to a Windows XP host PC running the MeshScape
Network Monitor application, or to a Linux- or Windows-application platform (network
controller, PDA, PC, etc.) running a MeshScape API-based application.
Use one of the following options to establish a connection between the MeshScape Network
Monitor host PC and the MeshGate Extra Long Range:
• Establish a direct serial connection between the MeshScape Network Monitor host PC and
the MeshGate Extra Long Range using the supplied RS-232 cable.
Adapter Bracket
DIN Rail
Mounting Bracket