
User's Manual


2-4 Millennial Net
Installing the MeshScape System
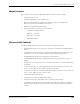
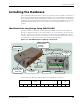
The function of each MeshGate terminal block pin is described as follows:
Mounting options
There are three mounting options for the MeshGate Extra Long Range:
• desktop
•wall
• DIN rail
Mounting the MeshGate Extra Long Range on a Desktop
1. Choose a level, stable surface on which to rest the MeshGate Extra Long Range.
2. Install one of the four supplied self-adhesive rubber feet in the round depression located
in each corner on the bottom of the MeshGate Extra Long Range chassis.
Mounting the MeshGate Extra Long Range on a Wall
When mounting the MeshGate Extra Long Range to a wall, we recommend that you secure the
MeshGate in place using two #6 screws and screw anchors (not supplied) of the appropriate
type for the mounting surface.
1. Place the MeshGate Extra Long Range against the wall in the desired mounting location.
2. Mark the location of the two chassis screw holes on the wall.
3. Drill two screw holes in to the wall at the marked locations.
Table 2-1. MeshGate terminal block pin assignments
Pin Label Input/Output Function
1 RTN Reference Reference connection for RS-485
2 A I/O RS-485 signal +
3 B I/O RS-485 signal -
4 3.3V Output Power 3.3V output power
5 GND Power Digital ground
6 RTS Input RS-232 Request to Send
7 CTS Output RS-232 Clear to Send
8 RX Output RS-232 Receive Data
9 TX Input RS-232 Transmit Data
10 N/A N/A Not used
11 GND Power Digital Ground
12 + Power Input power (4.5V to 30V)