
User Manual

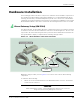
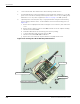
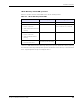
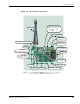
Table Of Contents
- About This Guide
- Introduction
- Kit Installation
- iB-5209 Network Monitor Operations
- iB-5209 Network Monitor Overview
- Setting Thread Priority
- Configuring a Node’s Operation
- Using Watch function to display current I/O information
- Configuring Sample Interval of Single Node
- Configuring Sample Interval of all Network Nodes
- Configuring Digital I/O Operation
- Configuring UART Operation
- Configuring AD (analog-to-digital) Converter Operation
- Configuring RS-232 Operation (RT-5209 only)
- Configuring RS-485 Operation (RT-5209 only)
- Labeling i-Bean Endpoint or i-Bean Router
- Creating an Event Log File
- Configure Persistence Attributes
- Configure Serial and ADC Data Formats
- Select Com Port on Host PC
- View Monitor Statistics
- View Contents of Event Log File
- Enable Multiple Capture
- API Functions
- Sample Application

2-4 EK-5209-5 Evaluation Kit User’s Guide
Kit Installation
2. Connect the RS-232 cable between the i-Bean Gateway and the host PC.
3. (recommended power connection) Plug the factory-installed AC adapter into a 110 VAC
power source. The i-Bean Gateway’s internal power switch is set to ON, so LED 2 (green)
illuminates as soon as power is applied (see Table 2-1 on page 5 for LED operation).
4. (optional power connection) This step is only required when using the internal battery
pack to supply power the device. To install batteries and connect the battery pack (see
Figure 2-2):
a. Remove the four philips head screws securing the cover to the base, then remove the
cover.
b. Remove the AC adapter connector from SL1 and remove the AC adapter assembly.
c. Turn the Power Switch OFF.
d. Install two AA batteries into the battery pack (observe polarity).
e. Connect the battery pack to keyed connector SL1.
f. Turn the Power Switch ON. LED 2 illuminates.
g. Replace the cover and secure in place with the four philips head screws.
Figure 2-2.Powering the i-Bean Gateway with batteries
Cover and Cover Screws (4)
AC Adapter Cable
Power Switch
Battery Pack and Batteries (2)
Connector SL1