
User Manual
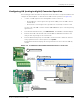
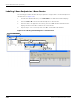

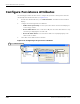
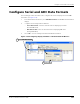
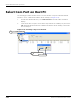
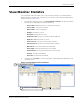
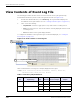
Table Of Contents
- About This Guide
- Introduction
- Kit Installation
- iB-5209 Network Monitor Operations
- iB-5209 Network Monitor Overview
- Setting Thread Priority
- Configuring a Node’s Operation
- Using Watch function to display current I/O information
- Configuring Sample Interval of Single Node
- Configuring Sample Interval of all Network Nodes
- Configuring Digital I/O Operation
- Configuring UART Operation
- Configuring AD (analog-to-digital) Converter Operation
- Configuring RS-232 Operation (RT-5209 only)
- Configuring RS-485 Operation (RT-5209 only)
- Labeling i-Bean Endpoint or i-Bean Router
- Creating an Event Log File
- Configure Persistence Attributes
- Configure Serial and ADC Data Formats
- Select Com Port on Host PC
- View Monitor Statistics
- View Contents of Event Log File
- Enable Multiple Capture
- API Functions
- Sample Application

3-18 EK-5209-5 Evaluation Kit User’s Guide
iB-5209 Network Monitor Operations
Configuring RS-232 Operation (RT-5209 only)
The following procedure describes the steps that need to be taken to set up the hardware and
configure an i-Bean Router for RS-232 operation (see Figure 3-9):
1. Use a DB-9 cable to connect the network device to the RS-232 female connector using
the pinout information provided in Figure 3-9.
2. From iB-5209 Network Monitor, select Edit>Devices. The Edit Device window displays.
3. Enter the device ID of the desired i-Bean Router and click Set. The Edit Device window is
now ready to make any changes to the selected i-Bean Router.
4. From the Digital I/O panel, select Serial Data: RS-232, then Update. The RS-232
connector is ready for operation (digital function is disabled).
5. (optional) To send serial data to the i-Bean Router, enter the data in the Serial Data panel,
then select Send Data.
Figure 3-9. Configuring i-Bean Router for RS-232
Connect signals
1
Select node
3
Select Edit>Devices
2
(optional) Enter serial data,
5
then select Send Data
Select RS-232,
4
then select Update